

arcv
In a nutshell
arcv is a safe, easy-to-use&learn revision control system which leaves the user’s original source file tree intact and ensures revisions integrity.
Unless traditional and most well-known revision control systems, arcv preserves the user’s source folder integrity and does not 'pollute' it with any additional files to achieve revision control. The revision control data are centralized in a dedicated folder, the repository, which can be either a local directory or a mountpoint to a directory located on an external system.
arcv's is a lightweight tool. Its simplicity of use makes it at the reach of anybody, enables instant step-in and limits to its bare minimum the learning curve and the daily time overhead to manage revision control. arcv only relies on standard system tools and there’s no command set overlay needed e.g. for adding or removing files.
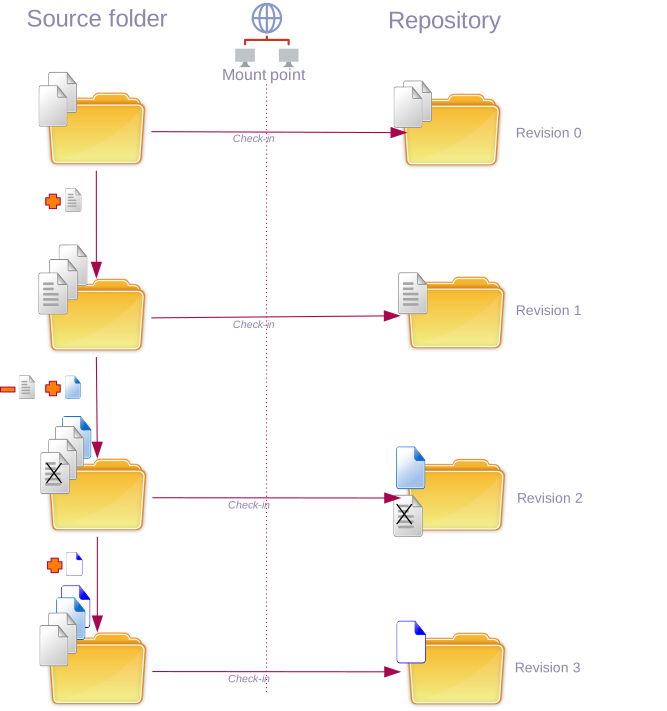
The following diagrams illustrate how arcv works through academic samples.
The first diagram provides a sample use where a folder containing 2 files are initially put under revision control. Then, the new file with the dashes is added to the folder and checked in. In the next folder update, the dashed file is actually removed and replaced with the new light blue file. At last, the dark blue file is added and checked in.
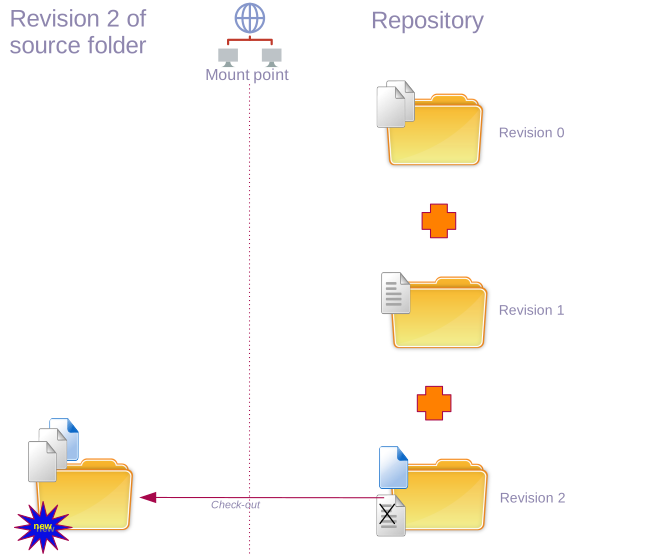
The following diagram shows a case where revision 2 of the source folder is retrieved (checked out):
Purpose and audience
Revision control system
arcv can be used by developers for the following purposes:
-
Individual developers or single person-lead projects
-
Early development stages of projects, prototyping
-
Individual, well-targeted, independent development lines or branches, which can be easily integrated into the main branch or another revision control system without polluting or unnecessarily complexifying his historical record.
Incremental backup tool
arcv can be used by anyone as incremental backup tool for domestic or professional purposes.
Background history
With 25 years spent in intense software development, I got enough opportunities into experiencing all aspects of each generation of revision control systems, from CVS, SVN to Git, amidst which a training stop at ClearCase as well. Enriched of those experiences, a bitter aftertaste always remained somehow because of :
-
the ever increasing learning curve required by those tools,
-
the non-negligible time overhead in the daily use and the never-ending learning curve,
-
their rich, but complex, overwhelming technical command terminology, sometimes redundant, that most often outpasses the most usual needs (in particular Git).
-
as consequence, a use that ends up to be error prone, raises confusions in mind and where errors are difficult to fix.
arcv was born in mind to handle all those cases where it is enough to stick to the essentials, following the famous KISS principle: Keep It Simple, Stupid
Download and installation
Please check the Download page
Architecture
White paper
arcv strives to implement the following principles:
Inviolability of the source file tree
-
Strict separation between the source and the revision control data
-
Source file tree is not impacted and modified by revision control data
-
The user keeps full control of its files and how they can be backed up, shared, and exported to other systems
Integrity of checked-out images
-
A SHA256 fingerprint is computed over the whole source folder and all its subcomponents at each commit and is associated with the revision
-
The fingerprint ensures absolute uniqueness and integrity of any revision
Simple to use and maintain
-
Enabling instant step-in, no knowledge required
-
Within the reach of non-developers
-
No extra command set that overlays already existing system commands and permission management
-
Rely on standard system tools and file system
Open and simple of architecture
-
A central storage (repository), decoupled of the source files, which eases global backup
-
Simple file copies and file difference checking
-
Transparent and readable file organization and revision control data
-
Reliance on existing, proven-in-use standard system tools like
rsync,diff,ls,sha256sum
Base principles
A standalone folder is used as repository to store the successive changes applied to a reference source folder |
The operation that consists in saving changes into the repository at a point of time is called 'check-in' or 'commit' |
Commits apply globally to the source folder, including all files and subfolders below it |
An incrementing revision number is associated to each commit |
By extension, the revision number is used to uniquely identify the state of the source folder at the time of the commit including the latest changes applied at that time. |
A hash checksum (SHA256) is computed over the whole source folder and all its subcomponents at each commit. This checksum can be used as fingerprint to ensure absolute uniqueness and integrity of a revision with regard to : file tree structure, file modification times, permissions and sizes. |
Commits can only be initiated from within the source folder or any of its subfolder |
There’s a 1-to-1 relation between the source and the repository, there shouldn’t be any other copy from which changes can be committed |
The current source folder (head revision) can be declared as a release. A release is assigned a version number of the form X.Y.Z and is associated with a logical tag name of the form 'RX.Y.Z'. The tag 'RX.Y.Z' is then uniquely bound with the revision number of the current source folder |
The user who initiated revision control for a source folder is the master user |
The master user controls which changes can be applied to or merged into the source from another branch |
The basic protection against external, unwanted changes are the file permissions |
It is permitted to access the original source folder in different ways and locations, e.g. via NFS from another machine |
The operation that consists in retrieving the content of the source folder associated with a revision number or a release tag is called 'check-out' |
When checking out a file or subfolder, the state of the file or subfolder is restored according to the state it has at a given commit identified by the specified revision number or release tag |
When checking out a full revision, the file tree for that revision is reconstituted locally, either overwriting the current source folder or copied into a separate target folder |
The state of the current source folder can only be restored (checked out) according to the head revision (latest commit). |
Standard system tools
arcv only relies on the file system and standard system tools to operate and uses standard, open, readable BASH script to orchestrate them.
There’s no additional command set overlay needed to learn and to use for manipulating files under revision control.
For example, to exclude and remove a file from the revision control, it is enough to do it using a system command (e.g. the UNIX rm) and commit the new revision. To add a new file, this file just needs to be present before commit.
The following table lists the major tools which it is relied upon:
| Tool |
|---|
rsync |
sha256sum |
ls |
diff |
meld |
bash |
Revision numbers
A revision number is a logical number which is incremented and assigned to each commit.
The first revision number is 0 when a source folder is put under revision control for the first time..
Note there are no individual numbers managed for each file. However, the state of the file at any revision can be retrieved.
SHA256 fingerprint
When an updated source folder is committed, a hash checksum (SHA256) is computed over it based on the following data :
-
the comprehensive file tree structure, i.e. full and paths of all contained subfolders and files
-
modification time, permission and size of each file
The checksum can be used as fingerprint to ensure absolute uniqueness and integrity of a revision.
The checksum can be recomputed for a checked out revision and should match the one stored in the repository for that revision.
Excluding files from revision control
It is possible to exclude certain files from revision control based on file patterns.
Exclusions can be defined when the repository is initialized, at check-in, or at any moment, using the '-X' option.
An exclusion can only be disabled by modifying manually the file EXCLUDE of the source folder of concern inside the repository.
Subsequent changes of default configuration does not impact the initial exclusions.
There are two levels of exclusions:
-
Default exclusions with global scope defined by configuration : these are included at the time the repository is initialized.
-
Exclusions which scope narrow to specific source folders: these are included as the user defines them over time.
|
The default excluded files with global scope are the following:
This can be changed as described in section Configuration. |
Repository structure
Overview
This explains how the repository is structured for saving the changes for each source folder/project under revision control.
arcv’s repository structure and the tool source code is readable and open. There’s no hidden action and no need to comprehend complex concepts. The few, readable revision control data files enable users to keep full control of the revisions and apply with ease common corrective actions without pain.
For instance, if the user only recognizes afterwards that a log message was incomplete or incorrect, it can simply modify the CHANGE_LOG file containing the message, without needing to execute multiple operations and the tooling skills coming along.
Archive folders
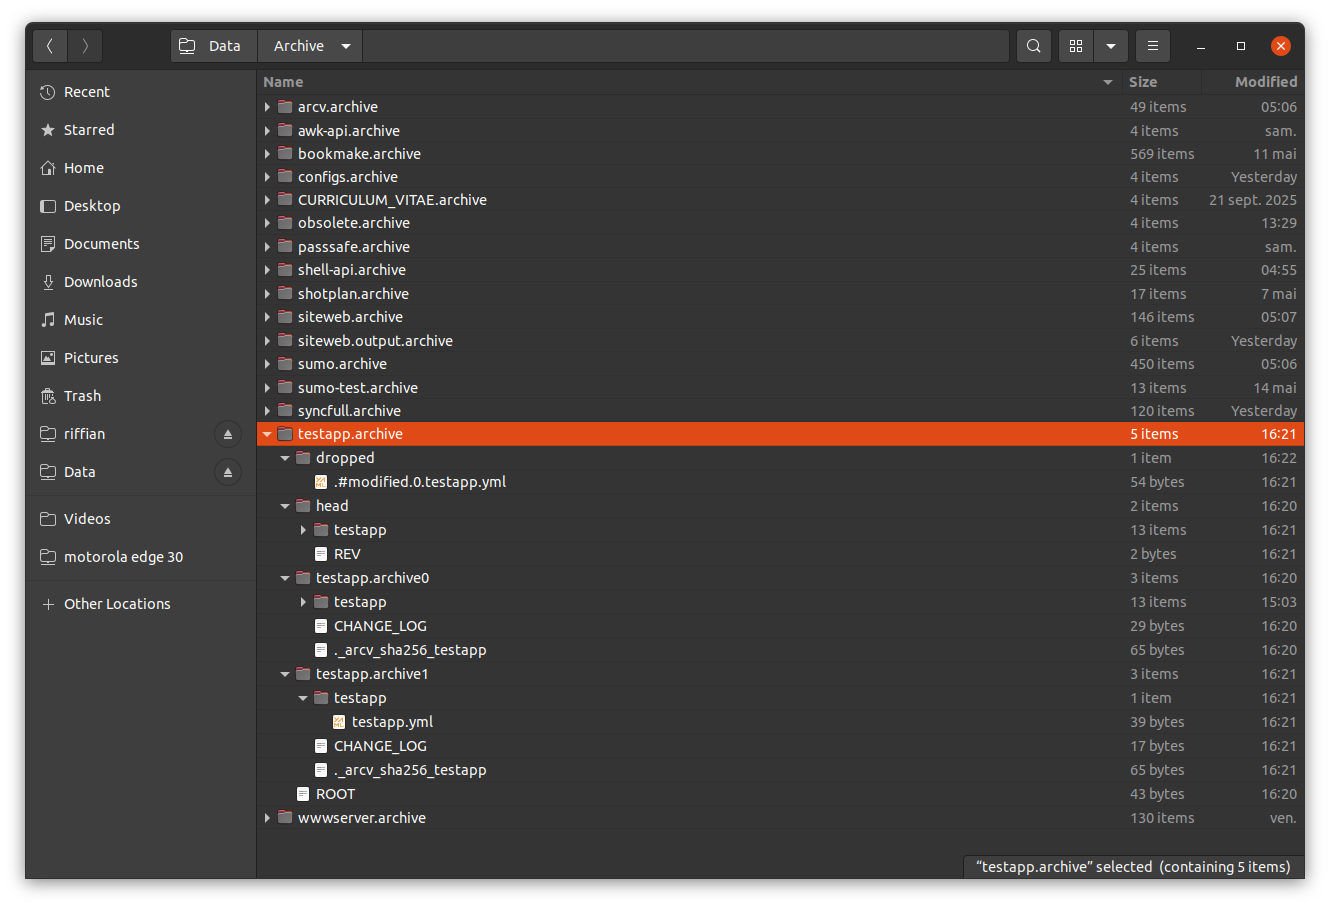
When a source folder is put under revision (when committed first time), a dedicated archive folder is created with the .archive extension.
Each revision (committed changes) is saved inside a dedicated subfolder with the .archive<revision> extension.
Eventually, the folder structure where the changes are committed are the same as the original source folder, whereby the root folder name is therefore the same as the root source folder.
The following table illustrates what happens:
| Time | Source code folder | Action | New revision | Repository folder state |
|---|---|---|---|---|
↧ |
📁 testapp |
📁 Archive |
||
📁 testapp |
➡ |
0 |
📁 Archive |
|
📁 testapp |
➡ |
1 |
📁 Archive |
Archive files
Upon check-in and the creation of a new revision, an archive file is created for each source file that changed or was added since the last committed revision.
This is illustrated by the following example, which shows the repository state on the following use scenario:
-
'testapp' , a project folder containing 3 files, resp. file1.txt, file2.txt and file3.txt, is put under revision the first time.
-
Then, the file2.txt is modified and the source folder is checked in.
| Time | Source code folder | Action | New revision | Repository folder state |
|---|---|---|---|---|
↧ |
📁 testapp |
📁 Archive |
||
📁 testapp |
➡ |
0 |
📁 Archive |
|
📁 testapp |
➡ |
1 |
📁 Archive |
Revision control-specific data files
Besides the actual achive files, additional folders and files are managed for the sake of the revision control and efficient check-in and check-out operations.
In the top archive folder of the project:
-
ROOT: the purpose of this file is to keep track of the absolute path of the source folder under revision control. However, the data stored there is more complex than just a folder path as explaine in ROOT file.
-
BRANCH_ROOT : this file stores the absolute path of the repository this one was branched off. This file only exists from branches, thus.
-
BRANCH_ROOT_REV : the revision number of BRANCH_ROOT at the time of the branch creation. This file only exists for branches, thus.
-
EXCLUDE: A list of coma-separated patterns of the files to be excluded from the check-in operations. This is specified at the time of creation of the first revision.
-
head/: this folder contains a full copy of the head revision. It reflects the latest state of all files under revision control as they were comitted at last.
-
head/REV: this file stores the head revision number. It is necessarily the highest revision number.
-
dropped/: a modified file, which is checked out without being checked-in beforehand, is saved in that folder.
-
git/: This folder stores the source image that is exported to GitHub.
In the revision sub folder of the archive folder:
-
CHANGE_LOG: this file stores the change log entered at the time of the commit.
-
DROPPED: this file stores a list of the the files which have been removed in this revision.
-
.arcv_sha256_<source folder name>: this file stores the SHA256 fingerprint computed over the file list of the source folder under revision control at the time of the check-in. The file list is basically the output of
lscommand with specific options, including access right and modification time information.
| Time | Source code folder | Action | New revision | Repository folder state |
|---|---|---|---|---|
↧ |
📁 testapp |
📁 Archive |
||
📁 testapp |
➡ |
0 |
📁 Archive |
ROOT file
The purpose of the ROOT file is to keep track of the absolute path of the source folder under revision control.
However, since it is permitted to access the original source folder in different ways and locations from any machine, typically via a user-made mountpoint like NFS, multiple paths may be stored there along with the machine identifications where the respective paths are valid.
A source path entry is formatted as follows and as illustrated below by the example:
hostname/MAC address: absolute path
The last path component name gives the name of the source folder under revision control. In the example below, the source project folder is arcv:
riffian-dell/10-65-30-39-a9-3c: /home/michel/riffian/Data/Data/admin/linux/arcv
riffian/b8-97-5a-f4-94-d0: /home/michel/Data/Data/admin/linux/arcv
If, for the current host name and the current folder name, there’s no matching entry found, arcv will propose the following:
-
if the source folder is not yet in the repository (no matching
.archivefolder found), arcv will propose to put the current folder under revision control. -
if the source folder is already in the repository, arcv will warn the user and propose to add the entry in the ROOT file.
| If the MAC address of the network interface changes and an entry was found matching the current hostname and source folder but with a different MAC, a new entry will automatically be added for the new MAC. |
Example of real repository
Repository access
Overview
The following table shows the possible types of access to repository along with the involved parameters and communication mechanism.
| Repo location | Parameter | Mechanism |
|---|---|---|
local |
|
The repo is accessed via the local file system |
external |
|
The repo is accessed via a mounted folder |
Local repository access
The most basic case is when the repository can be accessed locally when working from source folder. In that case, only the parameter storage is relevant, used to provide to the root directory of the repository. See also Configuration.
External repository access via mountpoint
When the repository is an external system not stored on the local file system, the repository is accessed via a mountpoint. In that case, only the parameter storage-via-mount is relevant, used to provide the absolute path to the mountpoint.
For convenience, instead of an absolute mountpoint path, a data source address (e.g. URL or device path) can be used to automatically setup the mounting using the sumo tool, which enables to deal with a large variety of external systems. See next section Automounting for remote access
Automounting for remote access
The value of storage-via-mount can be a data source address as accepted by the sumo tool part of the mountpilot package. This tool will be automatically installed, if necessary. See mountpilot page for further information.
By default, the mounted folder name will be located in the user’s home and named .mnt-archive- suffixed with the base-32 encoded value of the data source address. Example:
`.mnt-arcv-F5UG63LFF5WWSY3IMVWC6RDBORQS6QLSMNUGS5TFBI======`The data source will be mounted automatically when needed. The following table lists the types of data source addresses that can then be used, along with sample values
| Type of data source | Address example(s) | Comment |
|---|---|---|
NFS shared folder |
|
|
SSH shared folder |
|
|
Windows share |
|
|
FTP site |
|
|
Google drive |
||
A system device path |
|
This can be the path to an external mass storage media like disk or USB. Encrypted devices like VERA and LUKS are recognized. |
A disk file |
|
The file extension determines the type of the disk |
Source folder access
Local source access
When the user is working on the same host as the source folder, the source folder is simply accessed via the local file system.
The arcv configuration shall be set accordingly depending on whether the repository is located on the same machine as the user is working from or not. See section Repository access
Remote source access
When the user is working on another host as where the source folder is stored, the source folder is accessed via a mount point.
The arcv configuration shall be set accordingly depending on whether the repository is located on the same machine as the user is working from or not. See section Repository access
There’re two solutions to manage the mountpoint:
-
The user sets up the mount point by its own. For convenience,
sumomay be used for that purpose. -
The user reuses the repository’s own auto-mounted folder (if any, see above), in the particular case where both the repository and the source folder are stored on the same host and the user is operating from a different host.
Multiple origin source access
It is perfectly possible to access the original source folder from multiple different locations, e.g. locally or via NFS for any reason.
Inside the repository, arcv will maintain a registry of allowed remote access paths to the source folder, storing host identification data and the host-local mountpoint path. See ROOT file for details about the registry format.
Restrictions
-
Symbolic links are not under revision control
-
At the moment, there’s no file locking mechanism to manage concurrent access. An individual source folder is supposed to be updated and managed by an individual person.
-
The creation of a release tag should freeze all revisions up to the head revision. This could be achieved by storing all preceding revisions in a dedicated read-only, compressed file system image (e.g. squashfs).
-
The architecture is not optimized to handle very large files (text format). An optimization may be developed on the fly as needs arise, e.g. by storing only changed lines of files.
Configuration
Overview
Arcv first reads a main configuration file located in the .config folder of the user’s home directory.
At the present time, this file is only used to give the path to the actual operational configuration as entry point.
This indirection is set up that way to give the user the freedom and ability to:
-
use a shared, base configuration available over the LAN, but accessed via a different path depending on how the remote folder containing the config is actually mounted locally (typically, via NFS or SSHFS).
-
manage the revision-control of the configuration file at a more suitable location and at a central place on the LAN
-
override individual parameters on the local machine, e.g. user name and email
Location
The main configuration file is located in the .config folder of the user’s home directory (letter case is relevant):
$HOME/.config/Arcv/arcv.yml
If this file does not exist, it will be copied from the default configuration file coming along the release in the sumo’s installation directory.
If the user’s configuration file cannot be read for any reason, the default one is used.
The default operational configuration which is created is $HOME/arcv.yml. If this file is moved, the main configuration file has to be adapted to reflect the path change.
Alternatively, the -f option can be used once to specify which operational configuration files is to be used, whereby the tool will automatically adapt the main configuration file to reflect the new path.
Main configuration
| Option | Description |
|---|---|
arcv config |
relative path to the operational configuration, relatively to the HOME directory where arcv is run on the local machine |
arcv config: riffian/Data/Data/admin/linux/configs/arcv.ymlOperational configuration
| Option | Description |
|---|---|
host |
name of the host on the LAN where the repository is located |
storage |
absolute path to the repository on 'host' |
storage-via-mount |
mountpoint if repository is not accessed locally from 'host' either of the following:
|
copy-cmd |
command to use to copy files into the repository (currently only rsync is fully supported) |
copy-args[1] |
command arguments to use to copy files into the repository |
copy-args-intern[1] |
command arguments to use to perform internal copies like backup files |
exclude |
the list of file patterns for files to be excluded from revision control. By default, temporary NFS file *.nfs and the swap files .swp are ignored, plus all file patterns corresponding to rsync’s |
ignore-special-perm-bits |
When set to yes, enables to only regard the actual access permissions, not trailing special flags like '+' (ACL) |
git-diff-args |
git arguments when git is used for check-in and diff commands |
diff-diff-args[2] |
diff arguments when diff is used for check-in and diff commands |
plain-diff-args[2] |
diff arguments when diff is used to diff in plain mode |
diff-popup-xterm-args[2] |
This parameter is used when meld is not available (e.g. no desktop) and the diff is shown on popup window using xterm |
paging |
Paging command to use for the default output of some commands like 'diff' 'log' 'rel' |
revision-history-window |
Default revision window when revision history and file history log is requested when neither --from nor --to are explicitly specified |
user-name |
user name when exporting to GitHub |
user-email |
user email when exporting to GitHub |
mountpilot-pkg |
URL of sumo package for mounting |
1 The -C option of rsync shall never be used to exclude the related files from revision control. Instead, this shall be done using the exclude configuration property. This explicit setting is required to also enable suitable handling of diffing and fingerprint computation.
2 For versions > 1.1.0
host: riffian
storage: "/home/michel/Data/Archive"
storage-via-mount: riffian:/home/michel/Data/Archive
copy-cmd: "rsync"
copy-args: "-a -X --info=NONE"
copy-args-intern: "-a -X --info=NONE"
exclude:
  - ".nfs*"
  - ".swp*"
  - "RCS"
  - "SCCS"
  - "CVS"
  - "CVS.adm"
  - "RCSLOG"
  - "cvslog.*"
  - "tags"
  - "TAGS"
  - ".make.state"
  - ".nse_depinfo"
  - "*~"
  - ",*"
  - "_$*"
  - "*$"
  - "*.old"
  - "*.bak"
  - "*.BAK"
  - "*.orig"
  - "*.rej"
  - ".del-*"
  - "*.a"
  - "*.olb"
  - "*.o"
  - "*.obj"
  - "*.so"
  - "*.exe"
  - "*.Z"
  - "*.elc"
  - "*.ln"
  - "core"
  - ".svn"
  - ".git"
  - ".hg"
  - ".bzr
ignore-special-perm-bits: no
git-diff-args: "-w --word-diff=plain --word-diff-regex=."
diff-diff-args: "--no-dereference -r --color=always -u"
plain-diff-args: "--no-dereference -r"
diff-popup-xterm-args: -fa 'Monospace' -fs 12 +dc -geometry 200x50+0+0 -sb -e
paging: " | less -R"
revision-history-window: 100
user-name: Michel MEHL
user-email: michel.mehl@slashetc.fr
mountpilot-pkg: https://slashetc.fr/download/mountpilot_2.0-2_amd64.deb
# Mandatory newline
using --info=NAME1 for copy-args one can let display the names of actual copied files during commits.
|
Commands
General usage and execution context
The exhaustive command usage and accepted arguments are documented in the manpages. They can also be checked on command line by typing :
arcv -hor
av -h
A command is always to be considered in the context of the current working directory where it is executed. To perform an operation on a file tree under revision control, the user must change its current directory to the top directory of that file tree.
If the current working is not the top directory but a subdir below it, arcv will attempt to go upward in the file tree hierarchy and apply the operation on the first directory for which revision control data is available in the repository. For these reasons, the name of the source folder shall be defined with care, if necessary subject to a specific format.
When the path to a file or a subfolder needs to be passed as argument, the path must always be relative to the top folder.
Command alias
For the sake of convenience for frequent tasks, the following short-named alias scripts are available:
| Alias | Equivalent command | Description |
|---|---|---|
av |
arcv |
Runs arcv passing on arguments |
avl |
arcv log --verbose |
Show the revision logs , long format, i.e. showing the changed files for each revision |
avd |
arcv diff |
Standard line-by-line diff with the head revision |
avc |
arcv check --verbose |
Tells whether there are changed compared with the head revision. Returns 0 if no change, 1 otherwise. |
Initiate revision control
A folder is put under revision control by changing directory to it and simply calling arcv without argument.
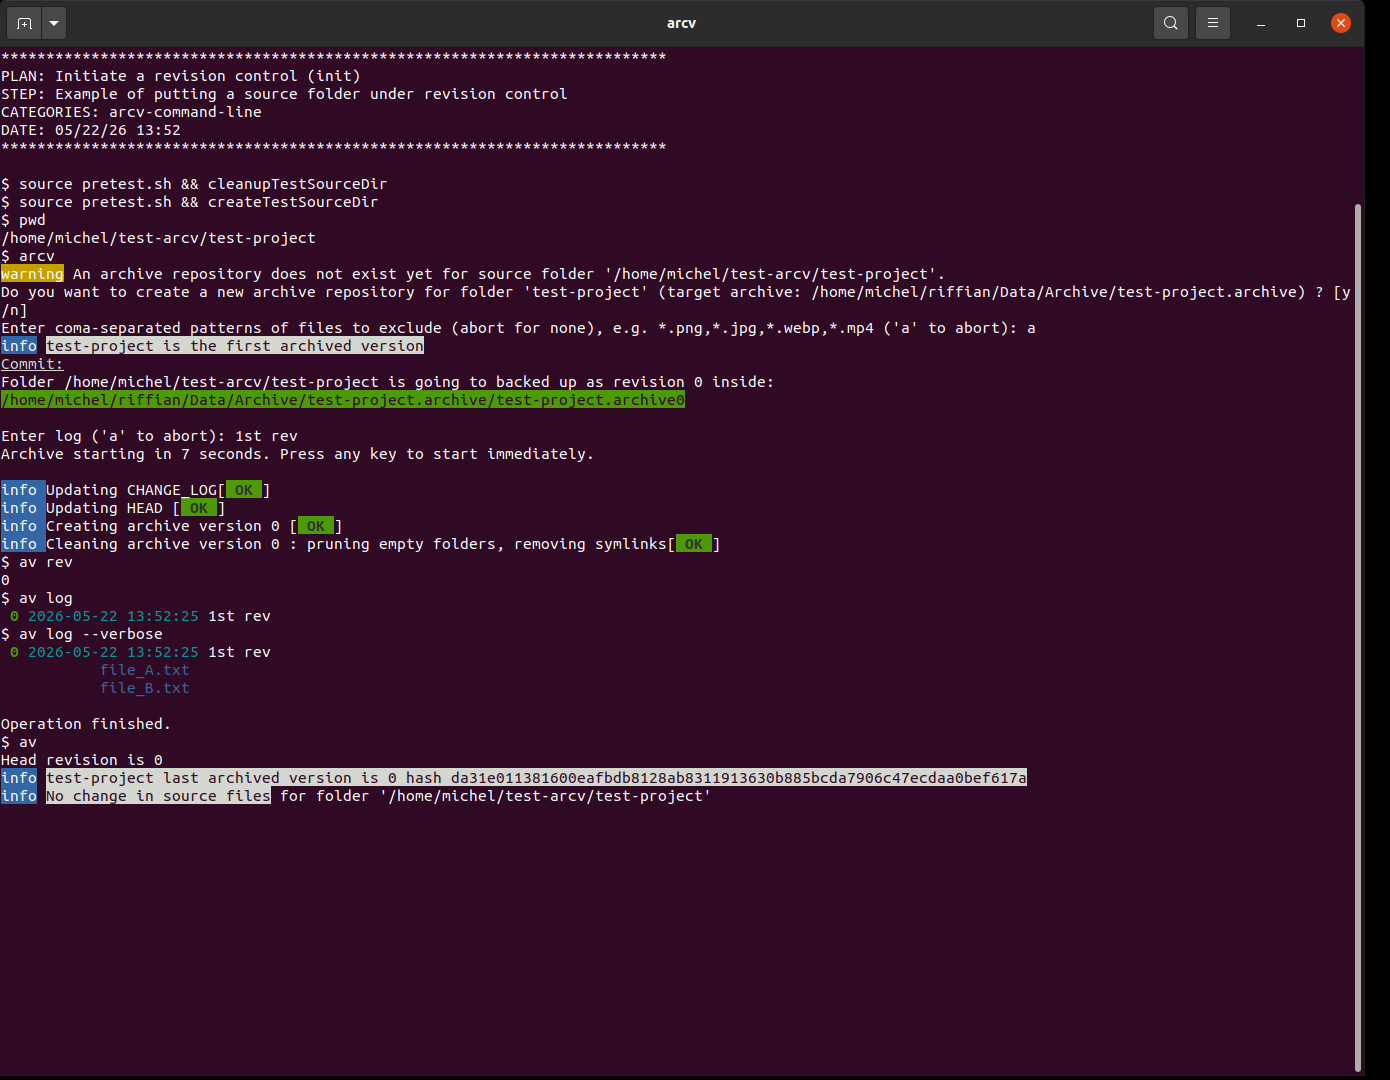
arcv [ -y ]arcvThis test initiates a simple revision control, requests to show the revision, the log message.
In detail:
- A new source folder 'test-arcv/test-project' is created with 2 files file_A.txt and file_B.txt.
- The folder is put under version control.
- Then, the following checks are done: current revision number, short and long revision log.
- Eventually, arcv is called as check-in request to check no change is indeed detected.
Check-in
Add files
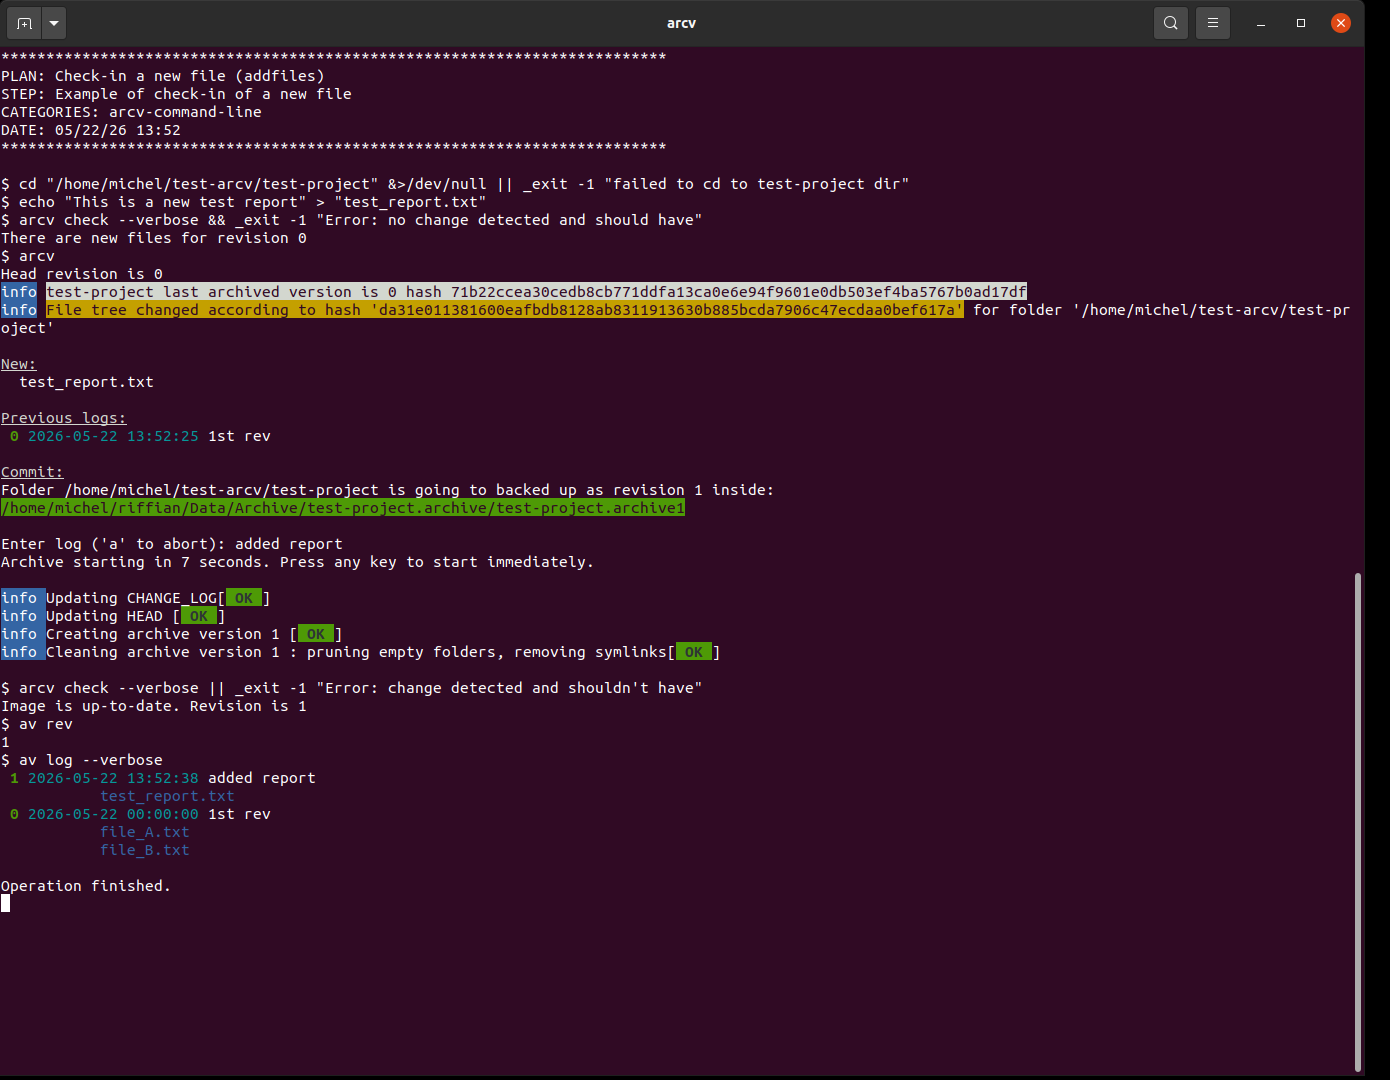
arcv will detect any new file when attempting to check in simply calling arcv without argument.
arcv [ -m <commit message> ]arcv -y -m "added test report"In the continuation of 'init' test, a new file 'test_report.txt' is checked in, verifying the revision and log messages. The repo content is inspected.
In detail:
- The new file is created and it is checked that the "check" command detects it.
- Then the file is checked in.
- Before and after check-in, the folder is checked for modification using 'check' command.
- At the end, the following is checked : current revision number, revision log
- The revision folder created for revision 1 is inspected: only the test report file was copied there and there is neither file A nor file B.
Remove files
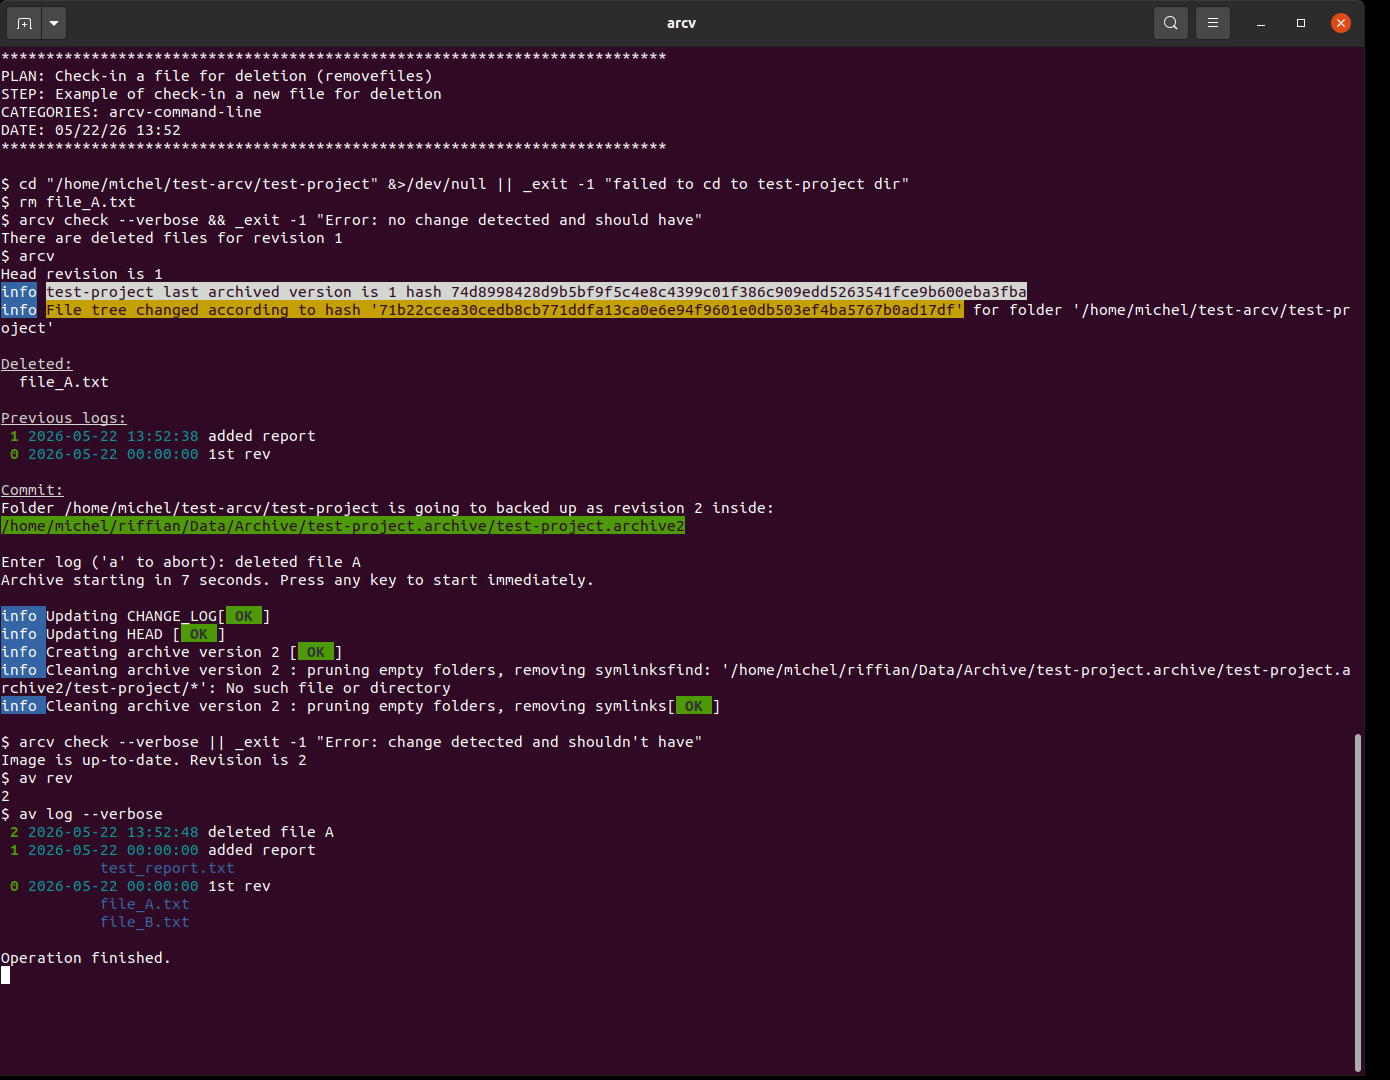
arcv will detect any missing file and remove them when attempting to check in simply calling arcv without argument.
arcv [ -m <commit message> ]arcv -y -m "Removed file A"In the continuation of 'addFiles' test, a file is removed, verifying the revision and log messages. The repo content is inspected.
In detail:
- file_A.txt is removed and the folder is checked in.
- Before and after check-in, the folder is checked for modification using 'check' command.
- The following is checked : current revision number, revision log
- It is checked that none of the files was copied into the archive revision folder.
- The internal DROPPED file is correct.
Modify files
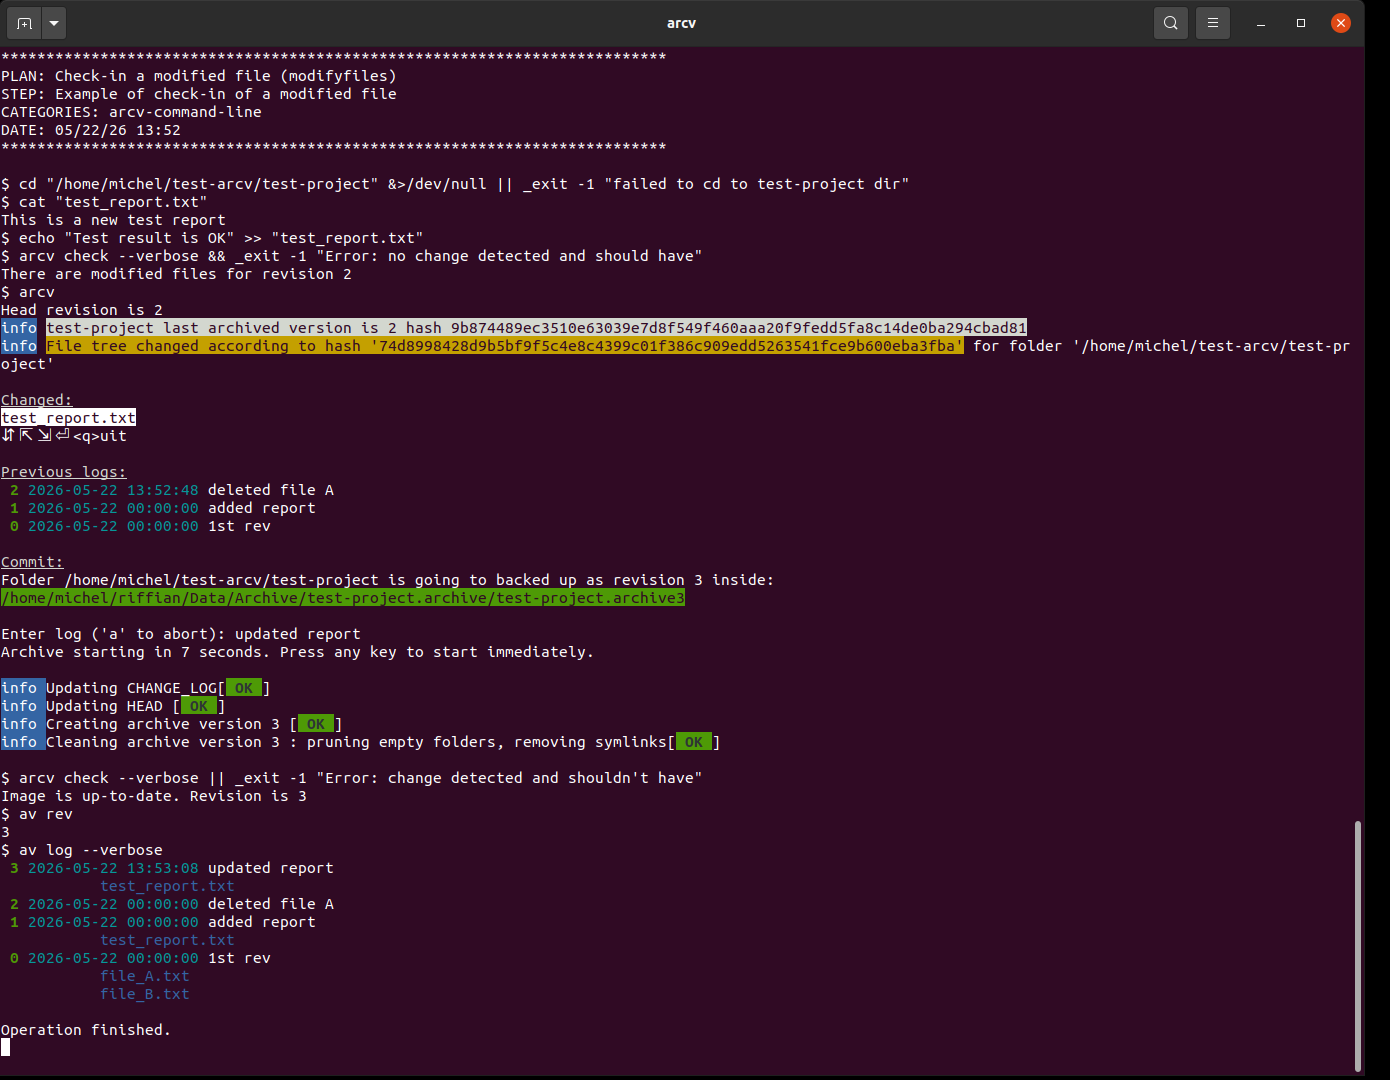
arcv will detect any modified file when attempting to check in simply calling arcv without argument.
If only file permissions changed, this will also be detected, ensuring file modification time update at commit.
arcv [ -m <commit message> ]arcv -y -m "Update report with test result"In the continuation of 'removefiles' test, a line is added to the previously added report 'test_report.txt', verifying the revision and log messages. The repo content is inspected.
In detail:
- Before and after check-in, the folder is checked for modification using 'check' command.
- During check-in, a menu is proposed to select the modified file.
- When pressing <enter>, the changes can be checked with meld tool.
- At the end, the following is checked : current revision number, revision log.
- It is checked that only the test report file was copied into the archive revision folder, not file A and B.
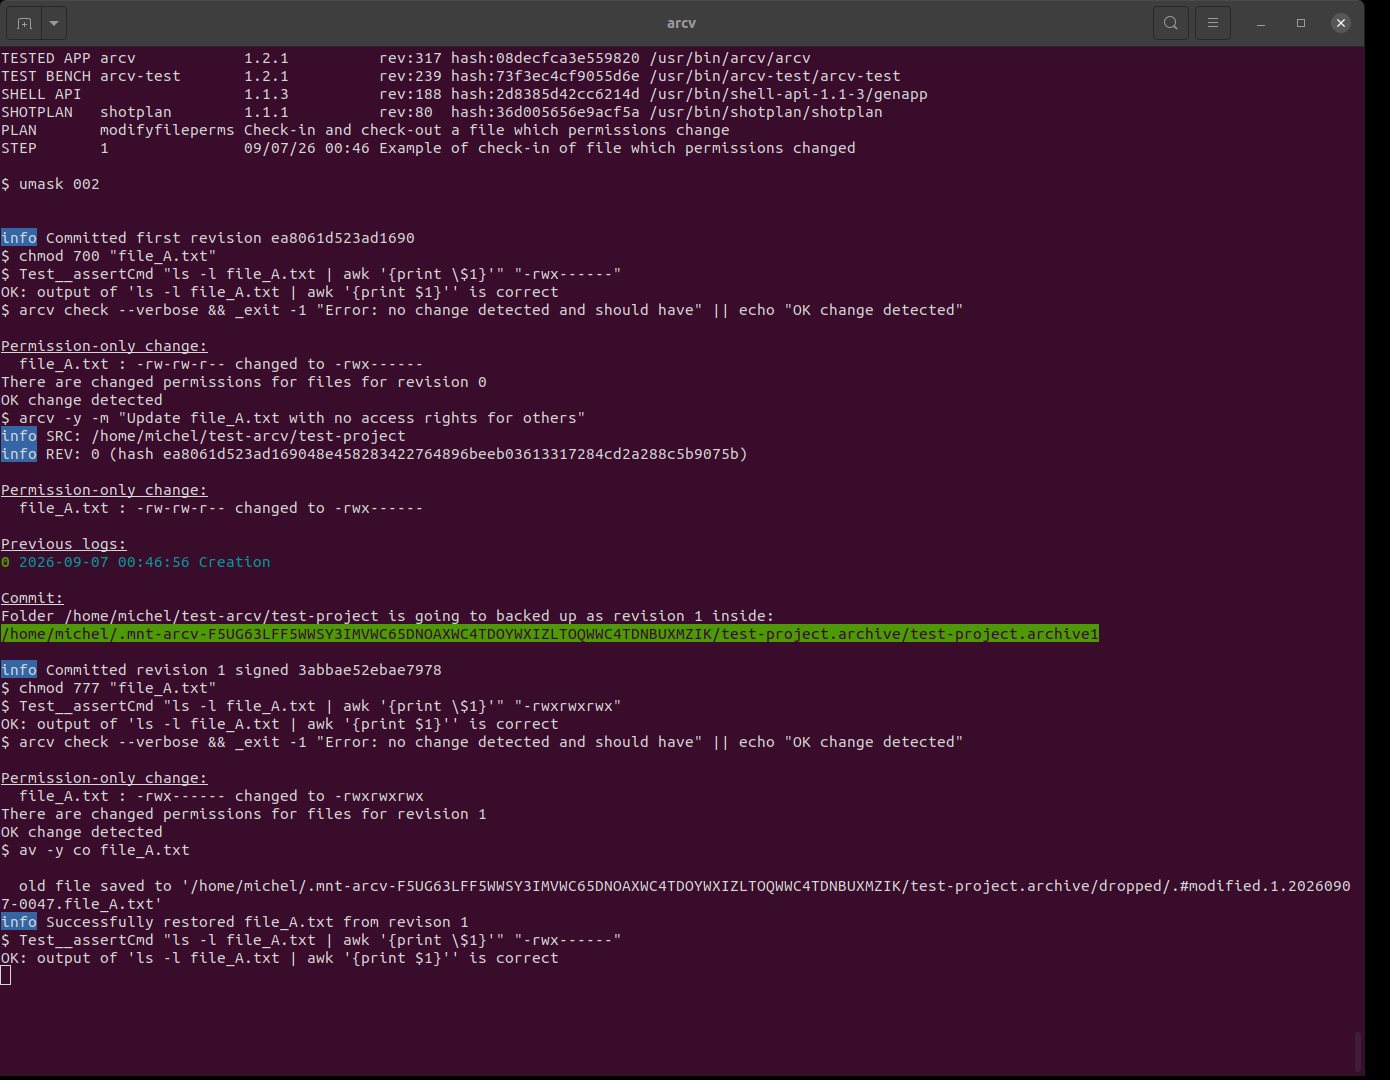
arcvarcvThe access rights are removed for file_A.txt, ensuring there were some before by using umask 002.
It is checked the change is detected and can be committed in a new revision.
Afterwards, the permissions are changed and the last committed ones are restored.
It is checked that the restore file permissions are matching those committed at first place.
Checking changes at check-in
At check-in, arcv will show a terminal menu in which the modified files can be selected for diffing the changes compared to the head revision.
The menu offers the following options:
-
View the diffs with the
meldtool by hitting the '<ENTER>' key. Ifmeldis not available or installable,diffwill be used as default -
View the diffs with the
difftool by hitting the 'd' key -
Restore a selected file by hitting the 'r' key (check out the head revision of the file)
-
Reset the whole folder by typing 'R' (check out the full head revision)
Video |
Comments |
Example of checking changes at check-in
|
This video shows how changes of modified files can be visualized with meld tool at check-in. |
Check-out from source folder
Overview
The following sections document the checkout operations which are possible to run when the current working directory is an actual source folder already under revision control.
The checkout operations are carried out taking as source reference the current directory name and the related revision data inside the repository.
Some of the checkout operations can also be used to alter the current states of all or some of the files part of the source folder.
Check-out a specific revision
A specific revision can be checked out passing the revision number, e.g. 10, as argument to the 'co' command.
The name of the checked out folder will be the original source folder name suffixed with -rev<revision>.
The parent output folder where the revision will be checked out can be specified with the -o option, otherwise the user will be asked for it.
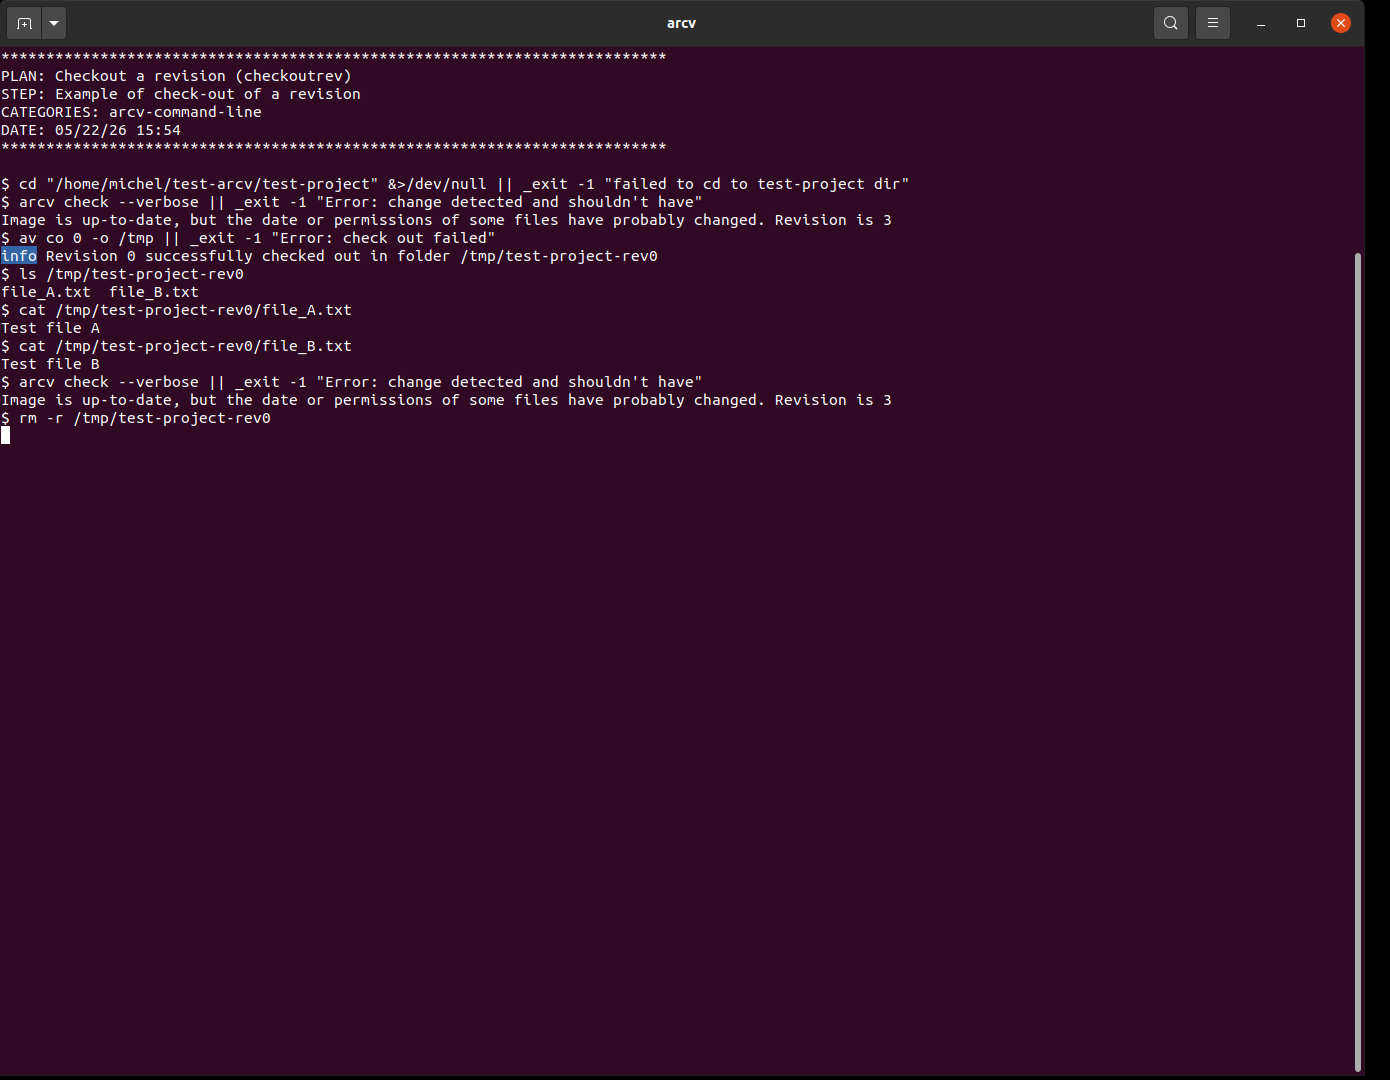
arcv co <revision> -o <output folder>av co 0 -o /tmpIn the continuation of 'modifyfiles' test, the revision 0 of 'test-project' is checked out in /tmp.
The following is checked: folder content and file contents.
Before and after check-out, it is checked the folder was not changed anyhow during the checkout.
Check-out a release
A specific tagged release can be checked out passing the release tag name, e.g. R1.0.0, as argument to the 'co' command.
The name of the checked out folder will be the original source folder name suffixed with -<release tag>.
The parent output folder where the revision will be checked out can be specified with the -o option, otherwise there’s an error.
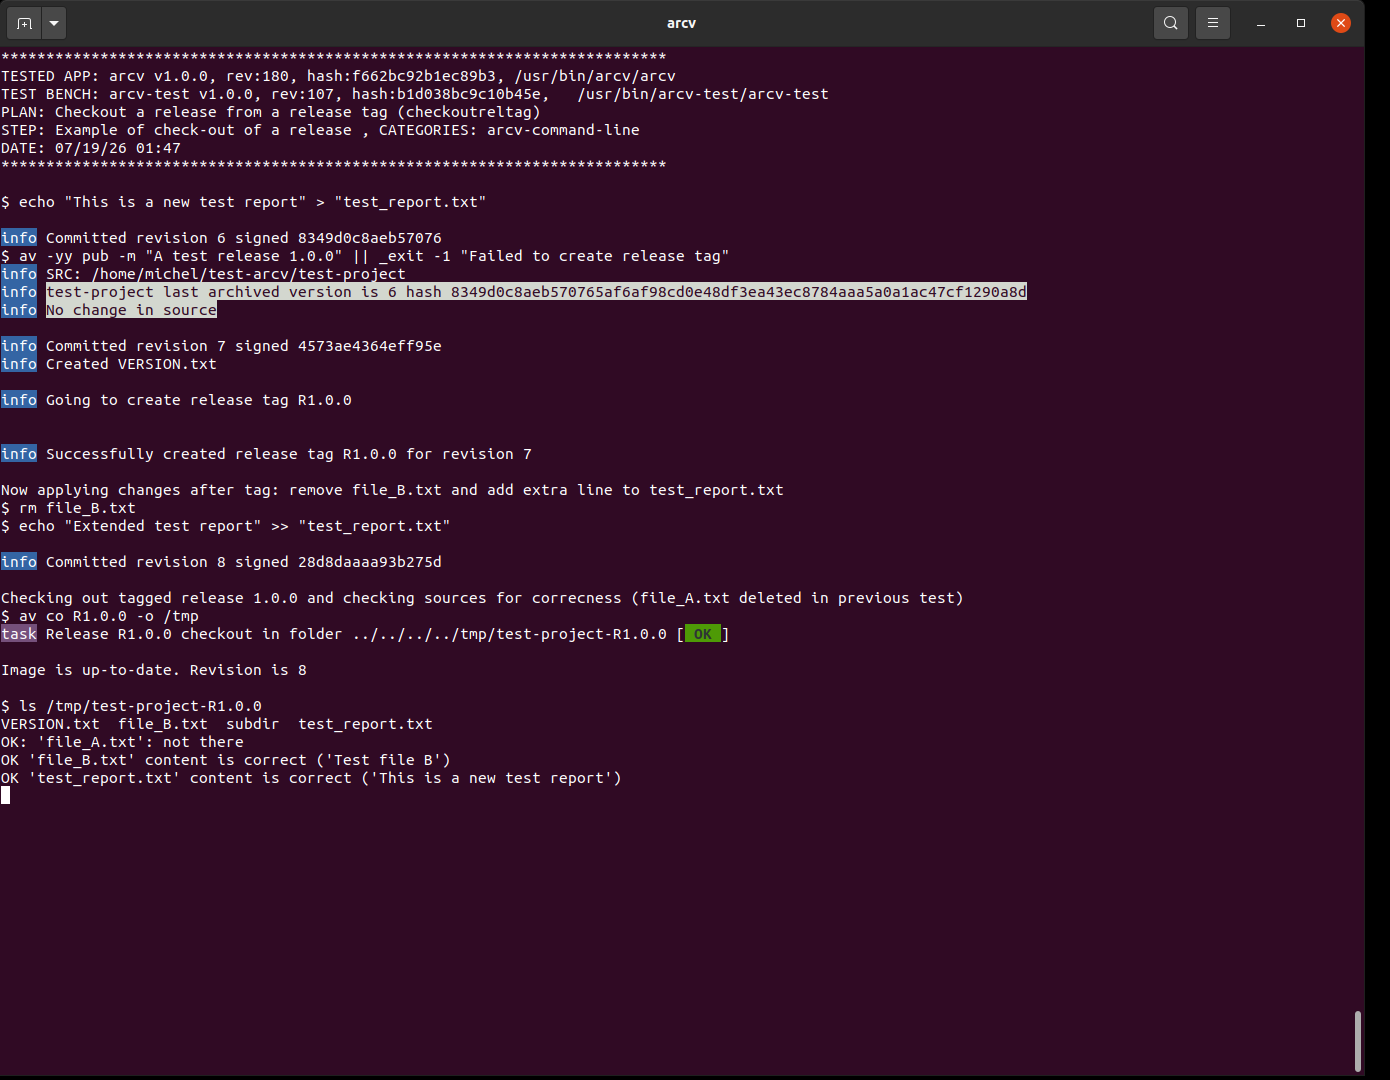
arcv co <release tag> -o <output folder>av co R1.0.0 -o /tmpIn the continuation of 'checkoutfile' test, the source folder is tagged before some modifications (file removal + file change) are applied. Then the release is checked out to verify that files are still in the initial state at the time of the tagging.
In detail:
- The content of test_report.txt is restored to initial state beforehand.
- The head revision is first tagged.
- After release tagging, the file B is removed, content of test_report.txt is changed and commit is done.
- Release 1.0.0 is checked out and all files content are checked for consistency: no file A, test_report.txt’s content is its initial content.
Check-out a file or folder
Any specific file or directory can be checked out either from a random revision number specified as argument to the 'co' command or by default from head revision when no argument is given.
An example of typical use case is when the original file state needs to be restored and changes rolled back.
When a modified file is checked out without being checked-in beforehand, it is saved in the 'dropped' subfolder of the archive. This enables to keep a copy of the changes, should any part of them yet may have to be picked out later.
The format of the backup file name is:
.#modified.<initial file revision>.<yyyymmdd>-<hhmm><file name>
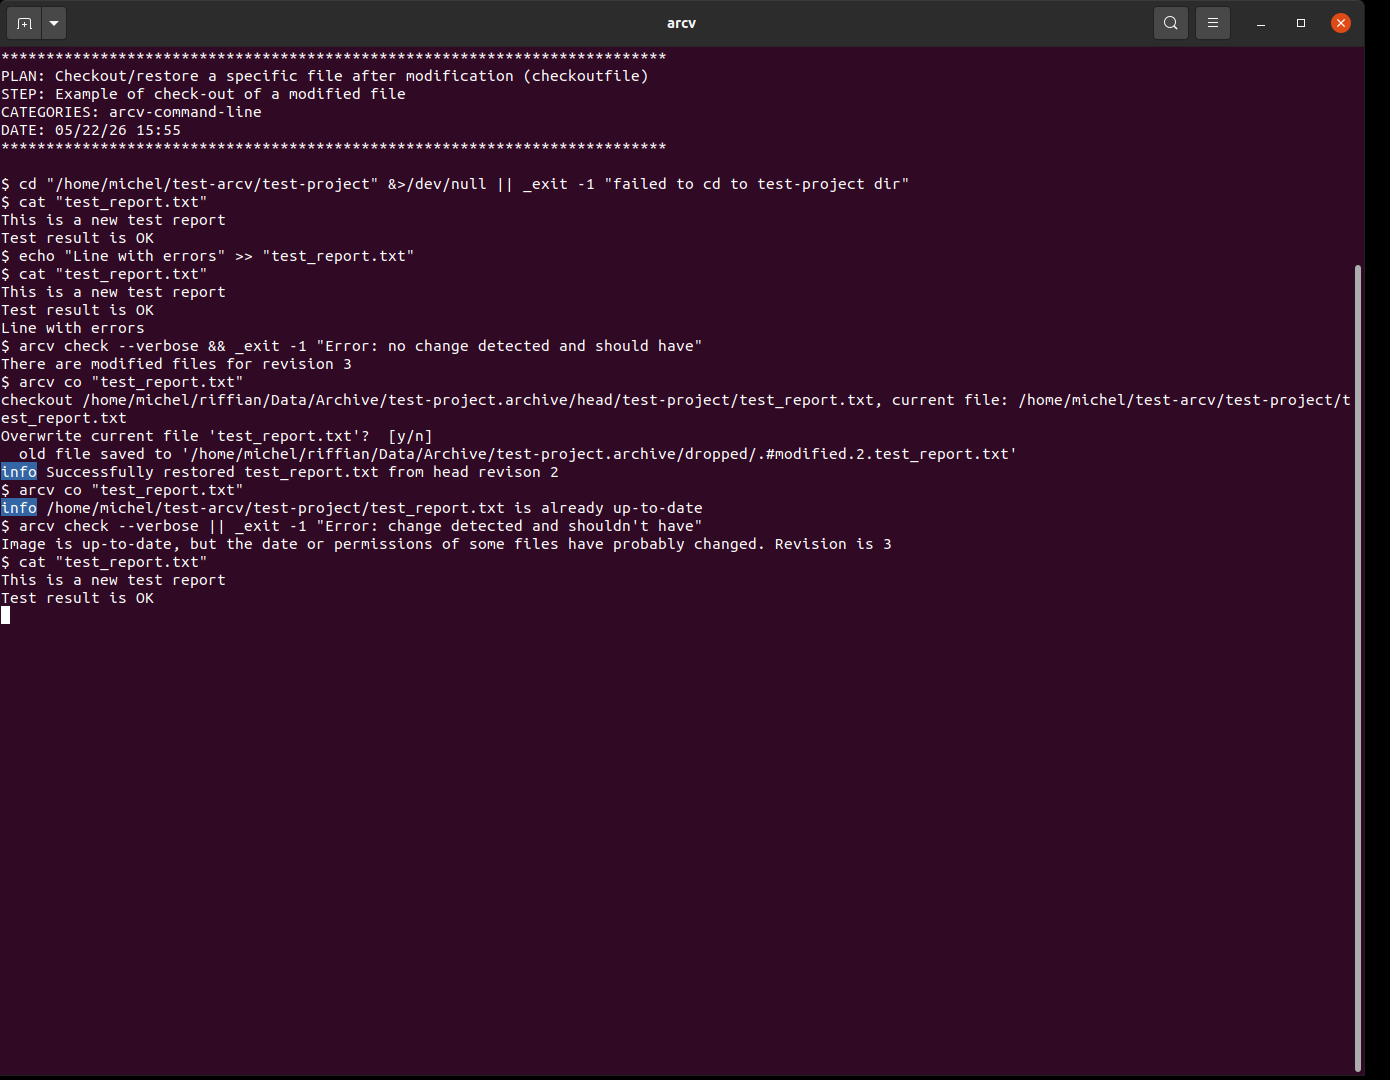
arcv co <filename>arcv -y co "test_report.txt"In the continuation of 'checkoutrev' test, a modified 'test_report.txt' is restored via checkout and the repo content is inspected.
In detail:
- 'test_report.txt' is extended with an extra line.
- It is then restored from the head revision.
- The restored file content is checked for correctness.
- It is checked the expected backup file was created for the dropped file.
- An attempt to restore it a second time is done to check that file is up-to-date.
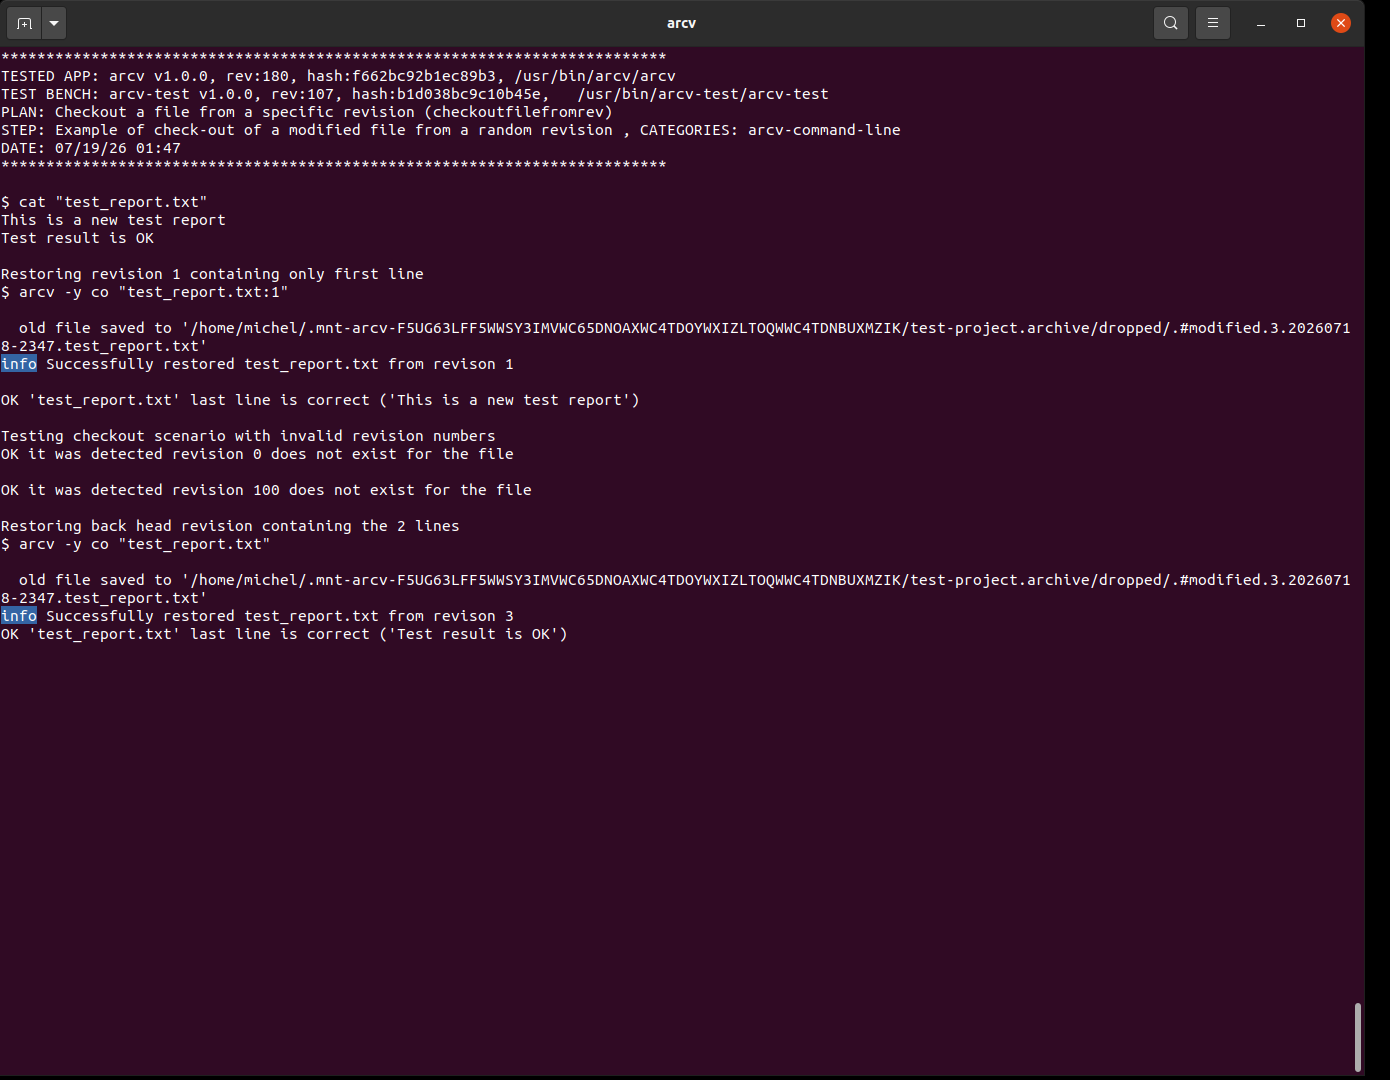
arcv co <filename>:<revision>arcv -y co "test_report.txt:1"In the continuation of 'checkoutfile' test, the initial content of test_report.txt' is restored from rev 1. An error message shall appear when attempting to checkout inexistent revision 0 and revision 100. Then the head revision is restored back.
In detail:
- revision 1 of 'test_report.txt' is checked out.
- Last line of file is checked for correctness
- Attempt to checkout revision 0 and 100
- head revision of 'test_report.txt' is checked out.
- Last line of file is checked for correctness
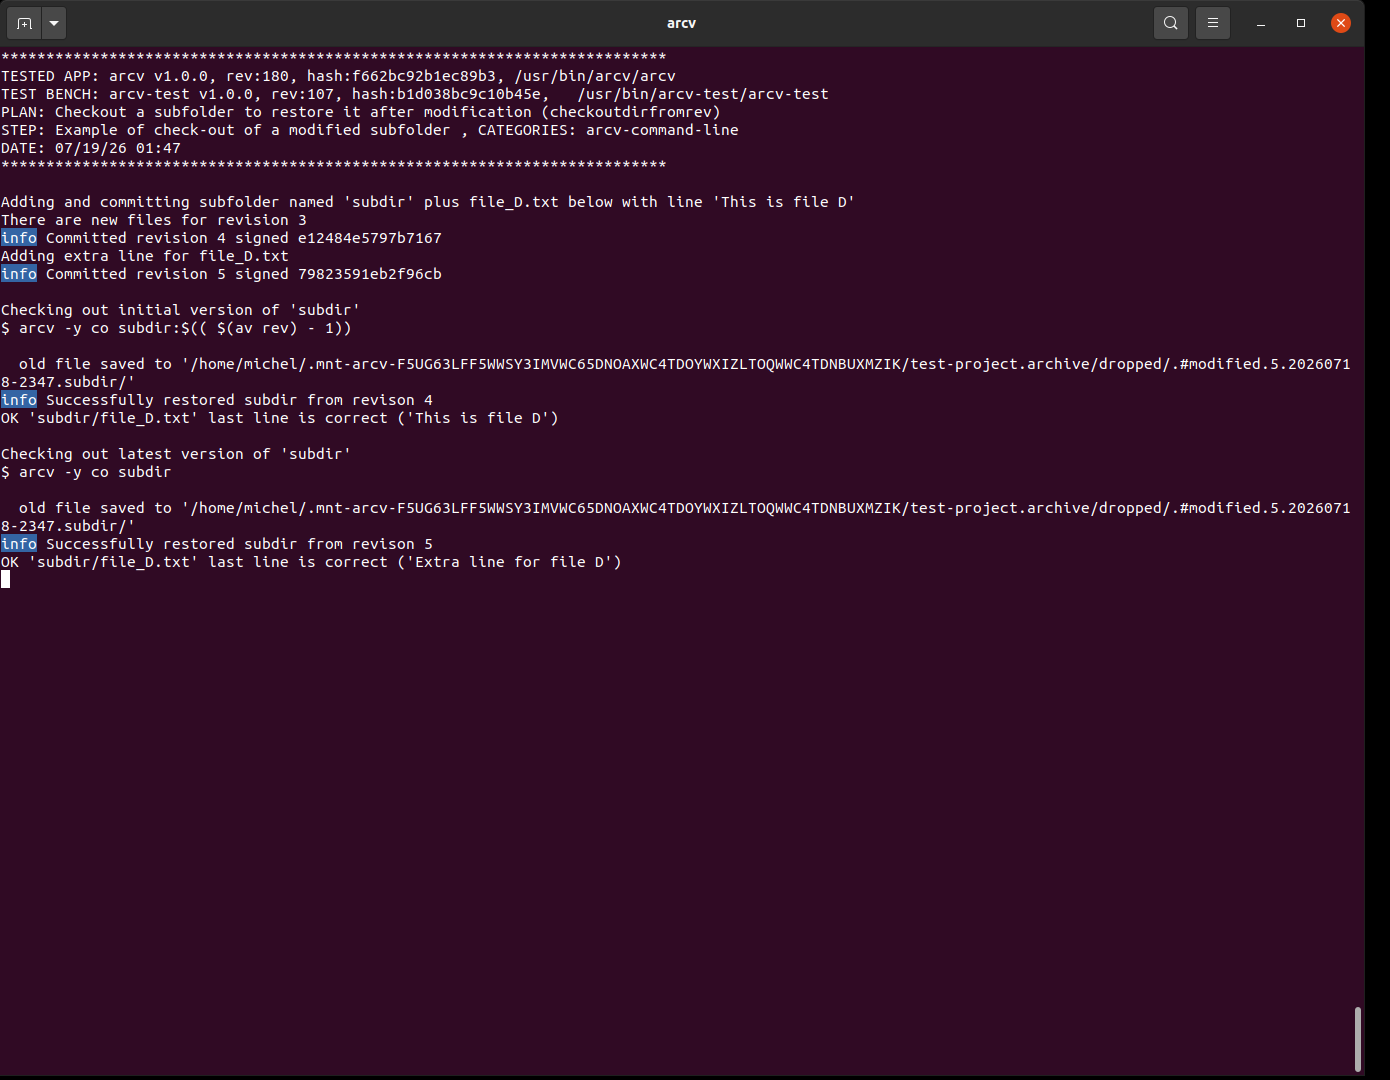
arcv co <folder name>arcv co subdir:4In the continuation of 'checkoutfilefromrev', a subfolder with file file_D.txt is committed, modified in a subsequent rev, finally checked initial subfolder can be checked out.
In detail:
- 'subdir/file_D.txt" is created and checked in.
- 'subdir/file_D.txt" is extended with a line
- the initial revision of 'subdir' is checked out and it is checked file_D.txt content is correct
- The head of 'subdir' is checked out, checking that file_D.txt is in its latest status
Check-out all files of head revision
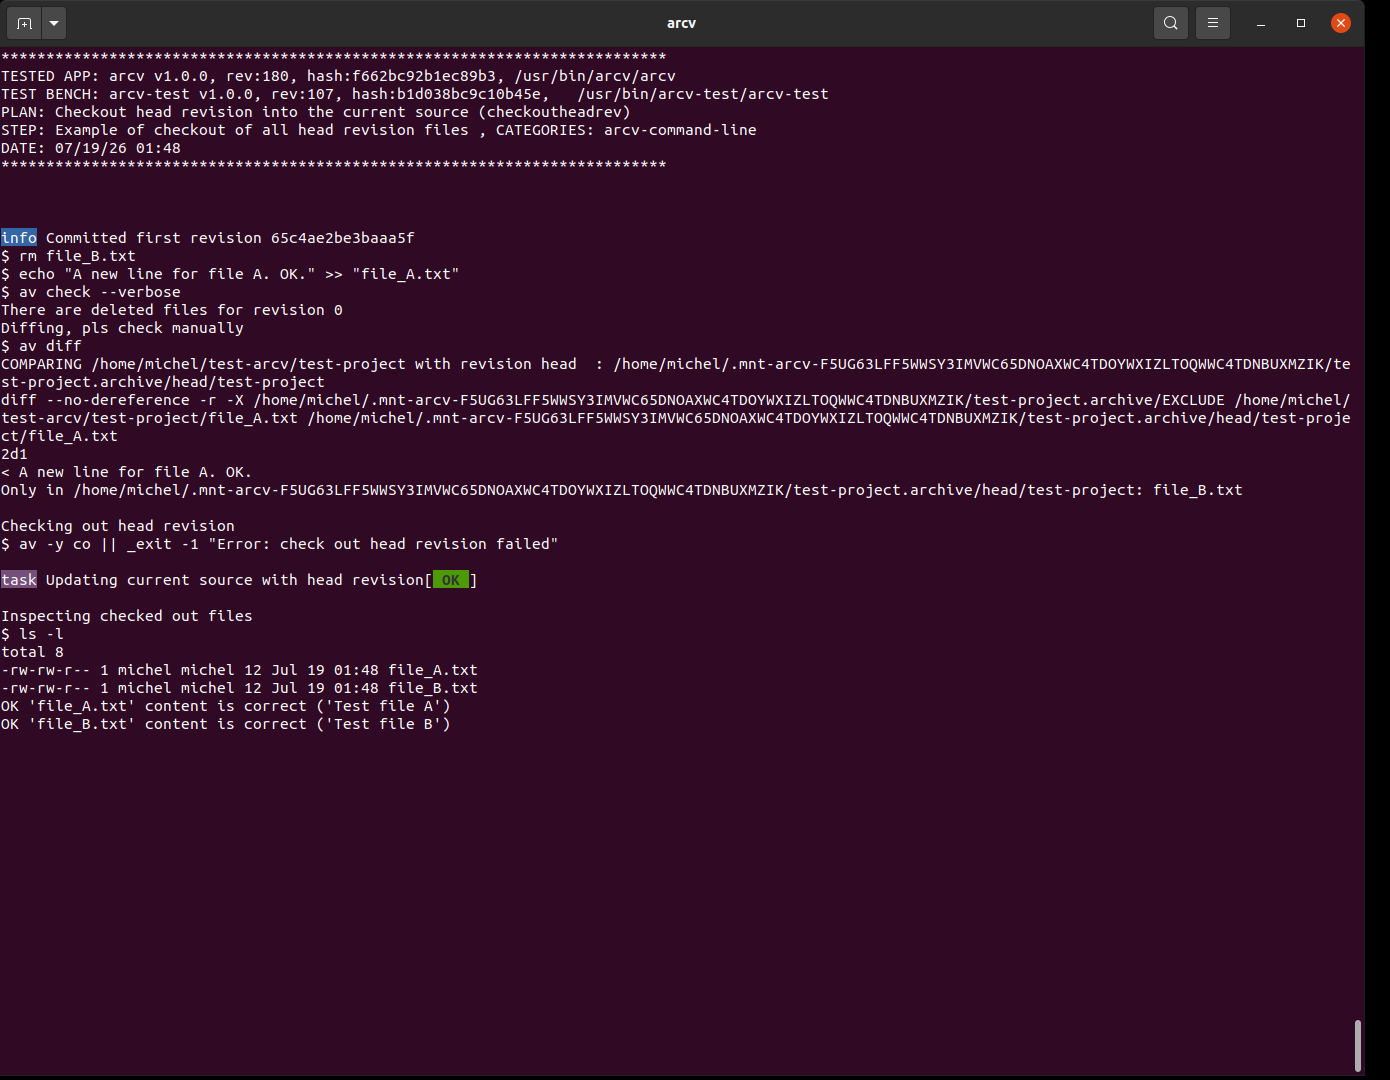
All files and directories can be checked out from the head revision. Unless a file checkout, there’s no backup file created.
An example of typical use case is when all source folder needs to be restored and changes rolled back.
arcv coav coThis test shows how to restore all files by checking out head revision:
- A new source folder 'test-arcv/test-project' is created with 2 files file_A.txt and file_B.txt. The folder is put under version control.
- file_B is removed
- file_A.txt is extended with a line
- The head revision is checked out (in the current image)
- It is tested whether file_A.txt exists and has the initial content 'Test file A'
- It is tested whether file_B.txt exists and has the initial content 'Test file B'
Check-out from repository
It is possible to perform checkouts regardless of the current working directory. The checkout operations are carried out based on a source folder name passed as argument to the --source option. The source name must match a valid source folder of the same name (plus .archive) inside the repository.
The checkout is a pure extraction resulting in a copy of a specific revision of the source folder, either below the current working directory or below a target directory specified with the -o option.
The head revision can be checked out from the repository by using 'co' command without argument. The name of the checked out folder will be the original source folder name, i.e. the one specified with --source option.
A specific revision can be checked out from the repository by passing the revision number, e.g. 10, as argument to the 'co' command. The name of the checked out folder will be the original source folder name suffixed with -rev<revision>.
A tagged release can be checked out from the repository by passing the release tag name, e.g. R1.0.0, as argument to the 'co' command. The name of the checked out folder will be the original source folder name suffixed with -<release tag>.
Below are supplied some examples.
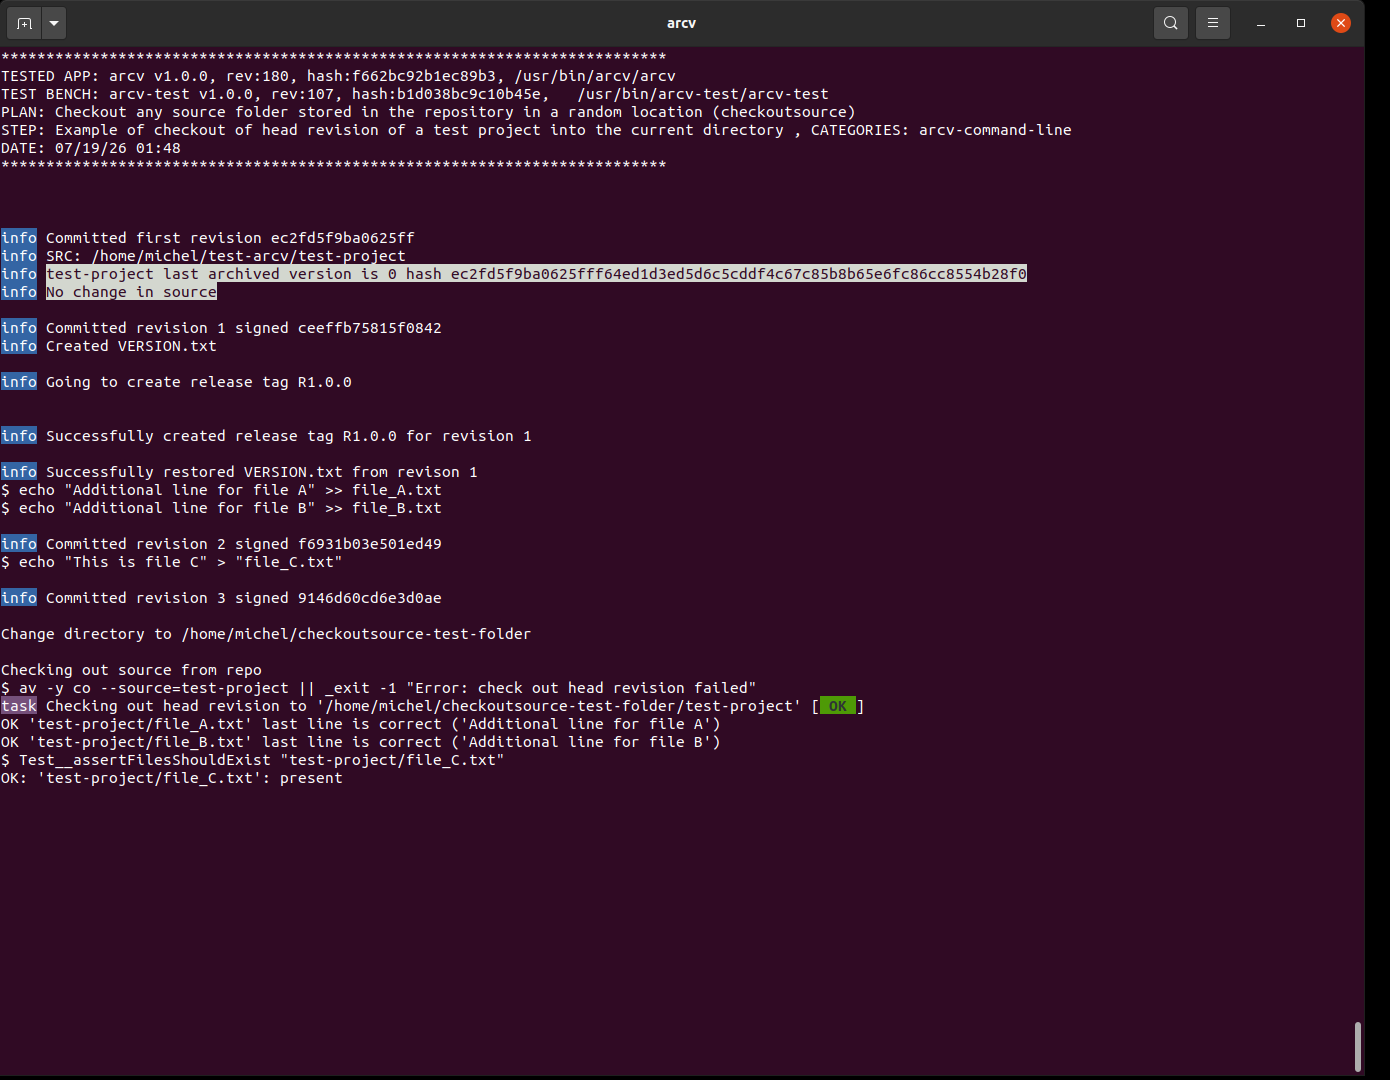
arcv co [ <revision | release tag> ] --source=<source folder> [-o <output folder>]av co --source=test-projectIn this test, the head revision of a test project stored in the repository is checked out into the current directory.
In details:
- revision 0 : A new source folder 'test-arcv/test-project' containing 2 files file_A.txt and file_B.txt is is put under version control.
- revision 1: the initial revision is tagged (R1.0.0), VERSION.txt is auto-added
- revision 2: both files A and B are extended with an extra line
- revision 3: file_C.txt is added
- Head rev is checked out into a new folder 'checkoutsource-test-folder'
- It is checked that the last lines of file A and B are the one added lastly, as well as file C
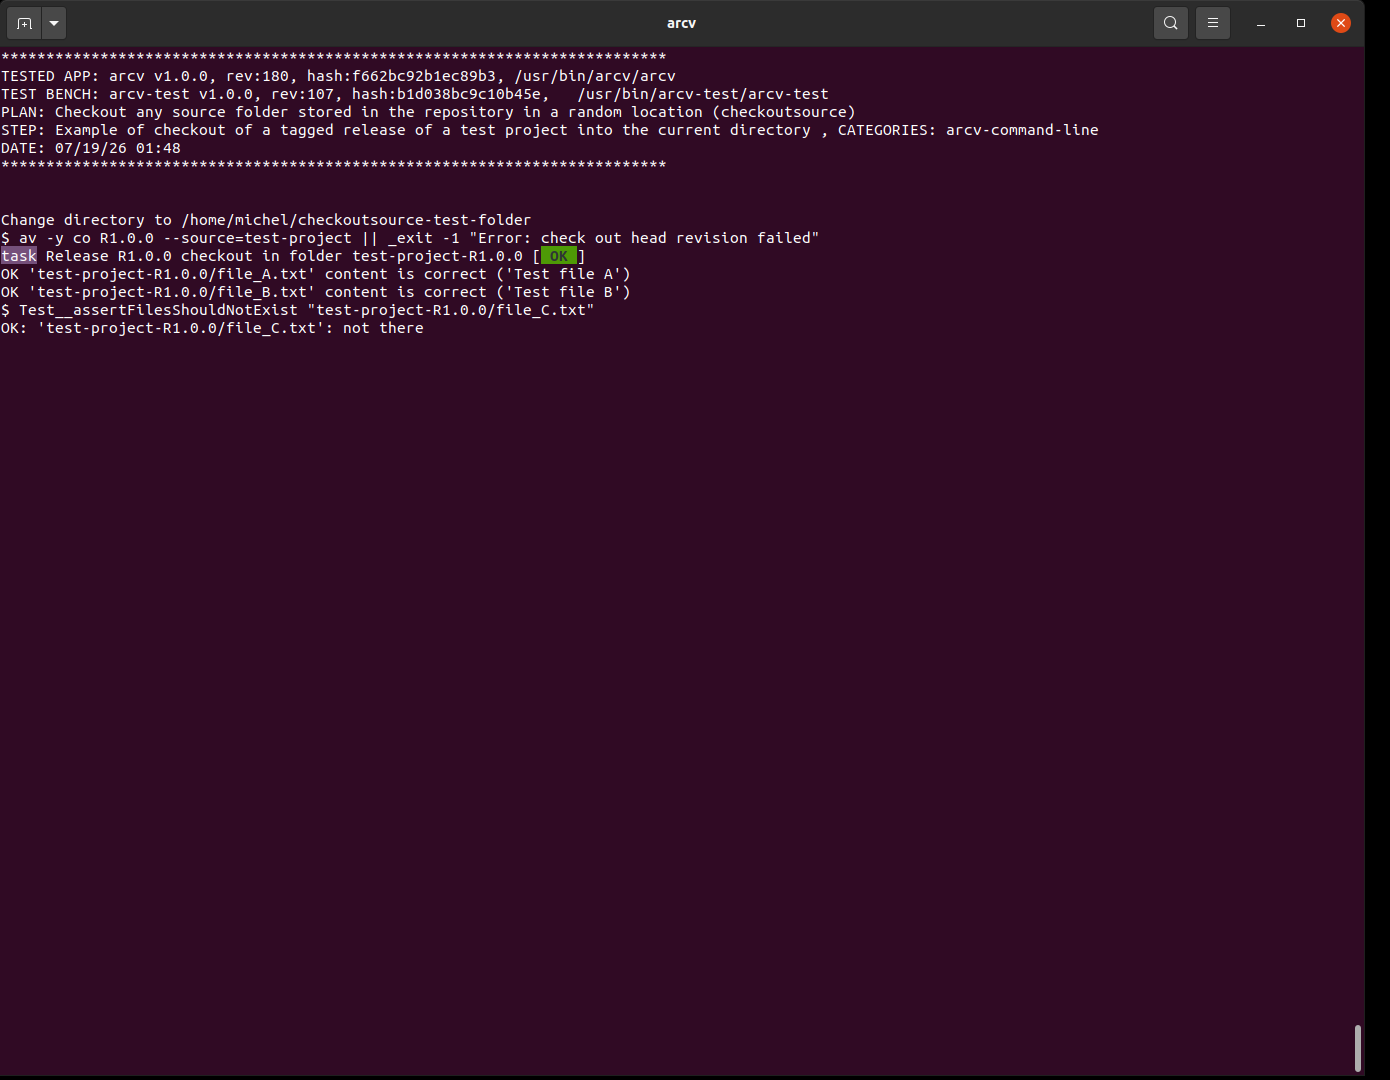
av co R1.0.0 --source=test-projectIn the continuation of the previous test, the tagged release 1.0.0 of the test project stored in the repository is checked out into the current directory (same as before).
In details:
- Release 1.0.0 is checked out into 'checkoutsource-test-folder'
- It is checked that the file A and B contents are the original ones, not the extended ones. Also, there is no file C.
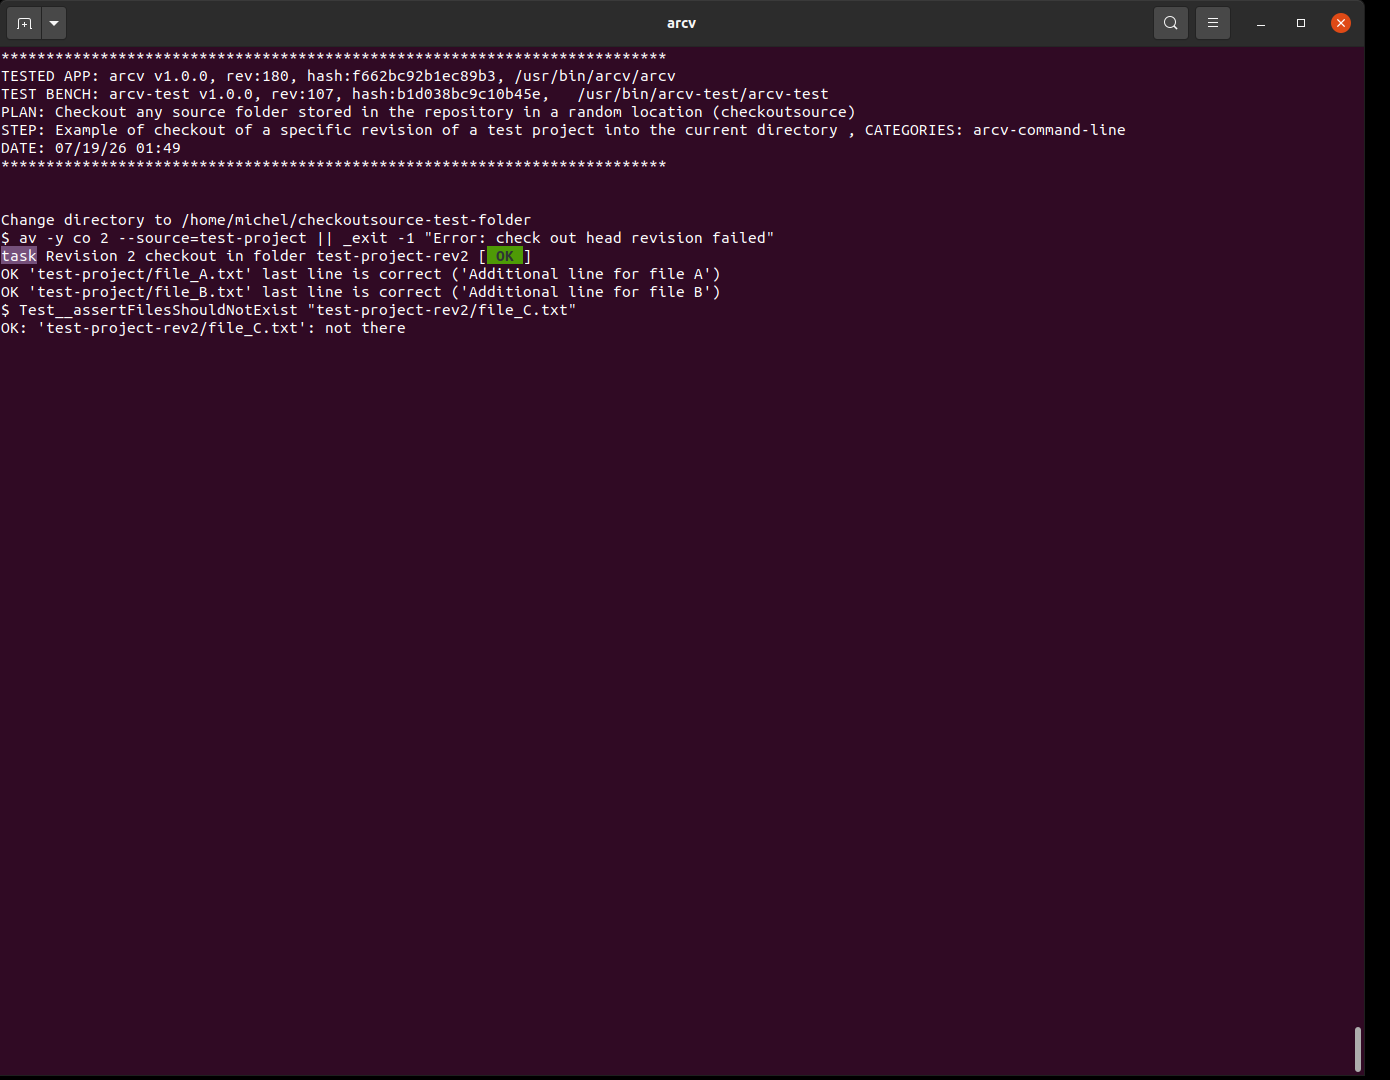
av co 2 --source=test-projectIn the continuation of the previous test, the revision 2 of the test project stored in the repository is checked out into the current directory (same as before).
In details:
- Revision 2 is checked out into a 'checkoutsource-test-folder'
- It is checked that the file A and B contents are the original ones, not the extended ones. Also, there is no file C.
- It is checked that the last lines of file A and B are the extra ones added lastly, but there’s no file C only added in revision 3.
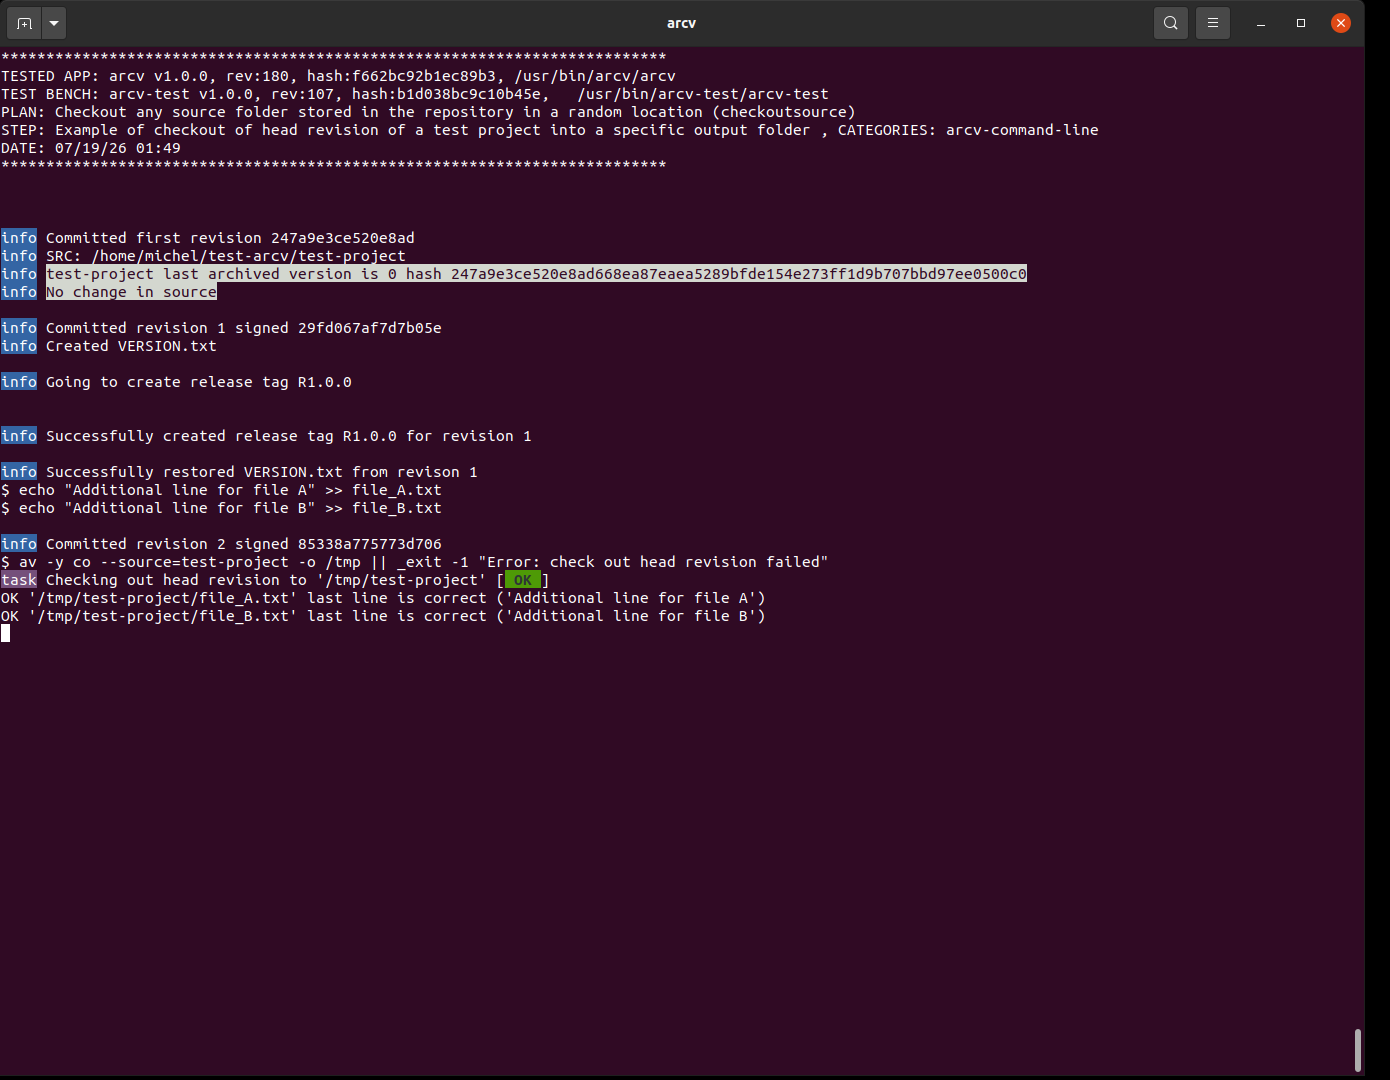
av co --source=test-project -o /tmpIn this test, the head revision of a test project stored in the repository is checked out into /tmp. This is the same test as in previous step, except output folder is /tmp.
In details:
- revision 0 : A new source folder 'test-arcv/test-project' containing 2 files file_A.txt and file_B.txt is is put under version control.
- revision 1: the initial revision is tagged (R1.0.0), VERSION.txt is auto-added
- revision 2: both files A and B are extended with an extra line
- Head rev is checked out into '/tmp'
- It is checked that the last lines of file A and B are the one added lastly
Branching
Create a new branch
It can be branched off a revision or a release tag. Branching here consists of actually creating a new source folder which name is the branch name and which has its own revision control.
The branch operation performs the following, which can also be done manually:
-
Check out the specified revision or release by its tag and rename the checked out fodler to the branch name
-
Check in the branch source folder
-
Initialize the related revision control files in the repo: BRANCH_ROOT and BRANCH_ROOT_REV
By default, the branch folder will be created at the same level as the original source, that means .. relatively to the branched root source folder. Another destination can be specified using the -o option.
arcv branch <branch folder name>:[<revision | release tag>] [ -o <output folder> ]av branch fun-project
av branch fun-project:2
av branch fun-project:R1.0.0
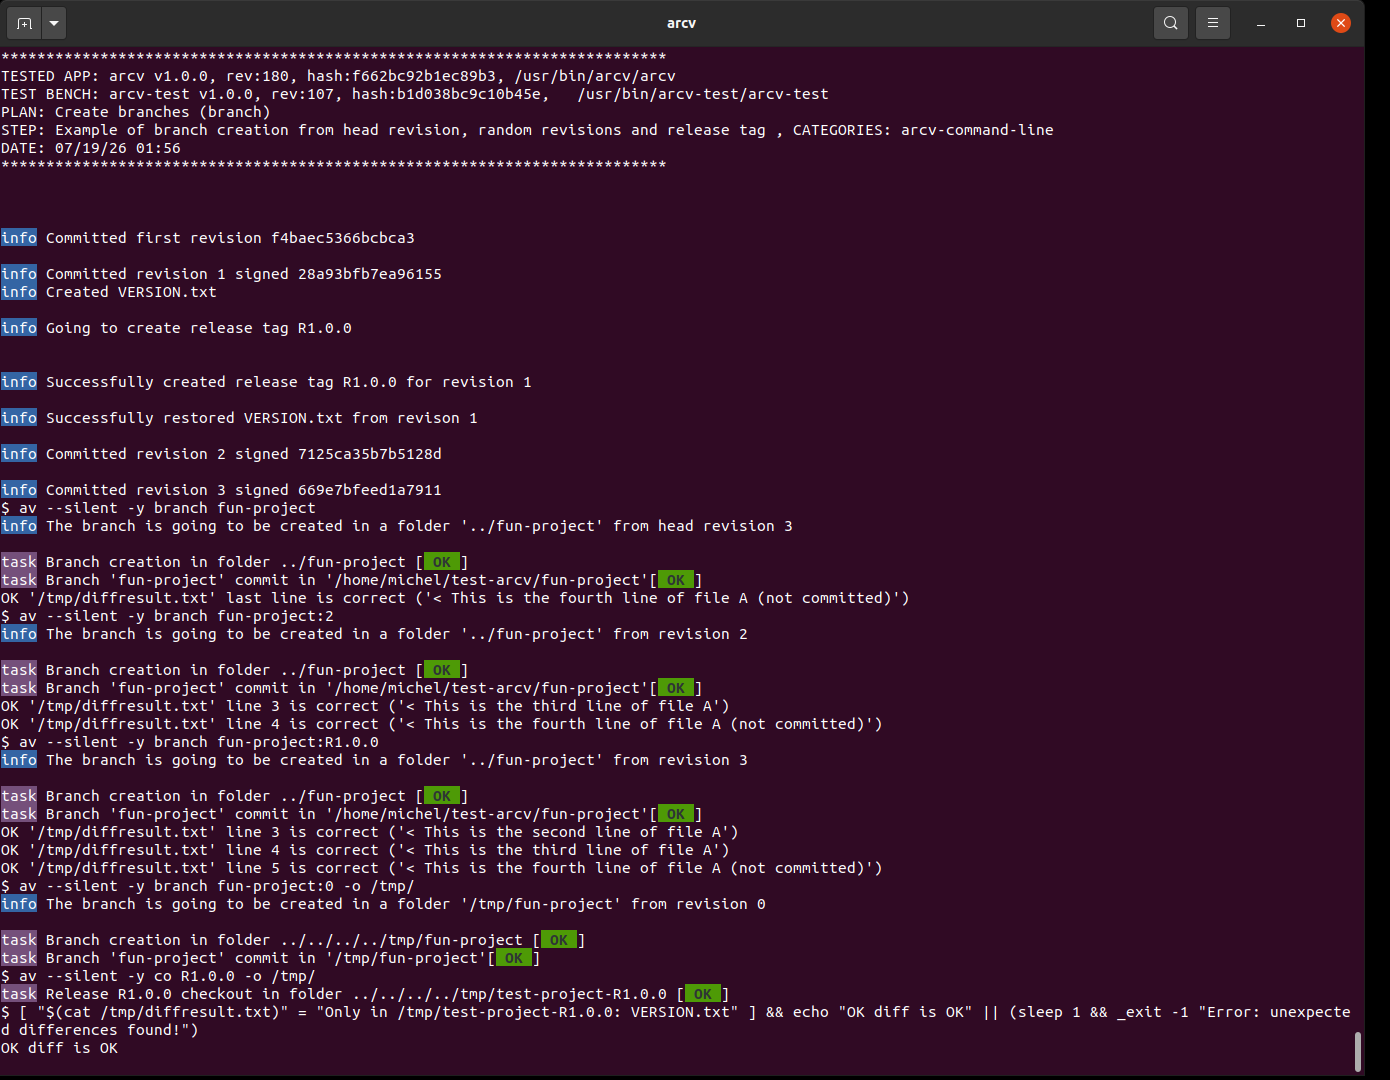
av branch fun-project:0 -o /tmp/This test exercises different branching scenarios: branching off a random revision, branching off a releae tag, branching off with an explicit output folder.
In detail:
- A new source folder test-arcv/test-project is created with 2 files file_A.txt and file_B.txt and put under version control
- revision 0: file_A.txt has a one line
- revision 1: release tag added (TAG R.1.0.0)
- revision 2: 2nd line is added to file_A.txt
- revision 3: 3rd line is added to file_A.txt (HEAD)
- (working dir): 4th line is added to file_A.txt
The following branches are created and resulting diff results:
- off head revision: head revision shows the extra 4th line.
- off revision 2: head revision shows the extra 3rd and 4th lines.
- off release tag R1.0.0: head rev shows the extra 2nd, 3rd and 4th lines.
- off revision 0: a different output dir is used. The branch is checked against a checkout of the release tag. The diff shall show that VERSION.txt is only present in the release checkout.
Merge branches
At the moment, there’s no built-in mechanism for tracking branches from the main source and reversely, nor for merging and follow up changes between random branches.
These operations can be done manually, simply using any diff tool by selecting the relevant source folders.
Even though the file BRANCH_ROOT and BRANCH_ROOT_REV enable some level of tracking, it’s unsure whether such feature will be implemented in the future.
Information and status request
Poll for modification
The 'check' command is a basic polling for checking whether the head revision is up-to-date with regard to the source folder, i.e. whether there’s any modified, new or removed files in that source folder.
The command returns 0 if everything is clear, 1 otherwise, meaning the source folder state is not in line anymore with the head revision, or simply that the source folder is not yet under revision control.
The --verbose option enables to show additional information like the computed checksum and the relevant files which are not inline with the head revision.
| The 'check' command only polls the current status without giving details. Get the list of changed files, see next section. |
arcv check [ --verbose ]arcv check
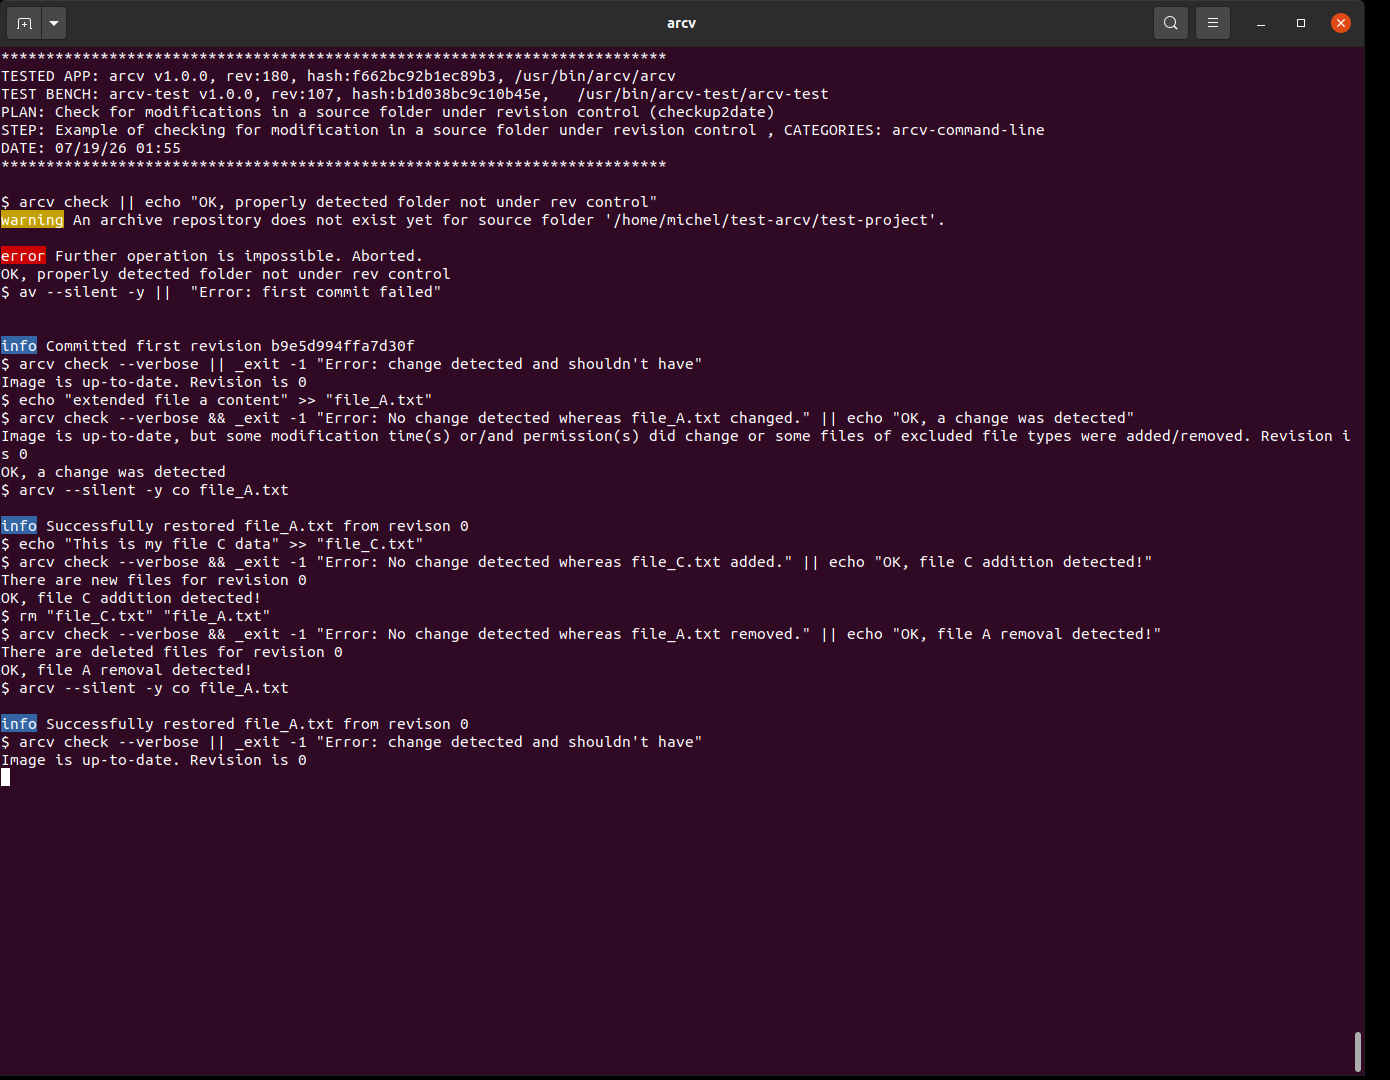
arcv check --verboseChange detection is tested in various scenarios: folder not under revision control, no change, modified file, added file, removed file.
In detail:
- A new source folder holding 2 files is created.
- Requesting status shows a message warning the user the folder is not under revision control.
- The folder is then put under version control.
- Requesting status returns 0 with a message informing everything is up-to-date.
- Then file A is changed and requesting status returns 1 meaning a change was detected compared with the head revision.
- file A is restored and a file C is added. requesting status returns 1
- file A is removed. Rquesting status returns 1
- file A is restored. Rquesting status returns 0
Listing new, removed and modified files
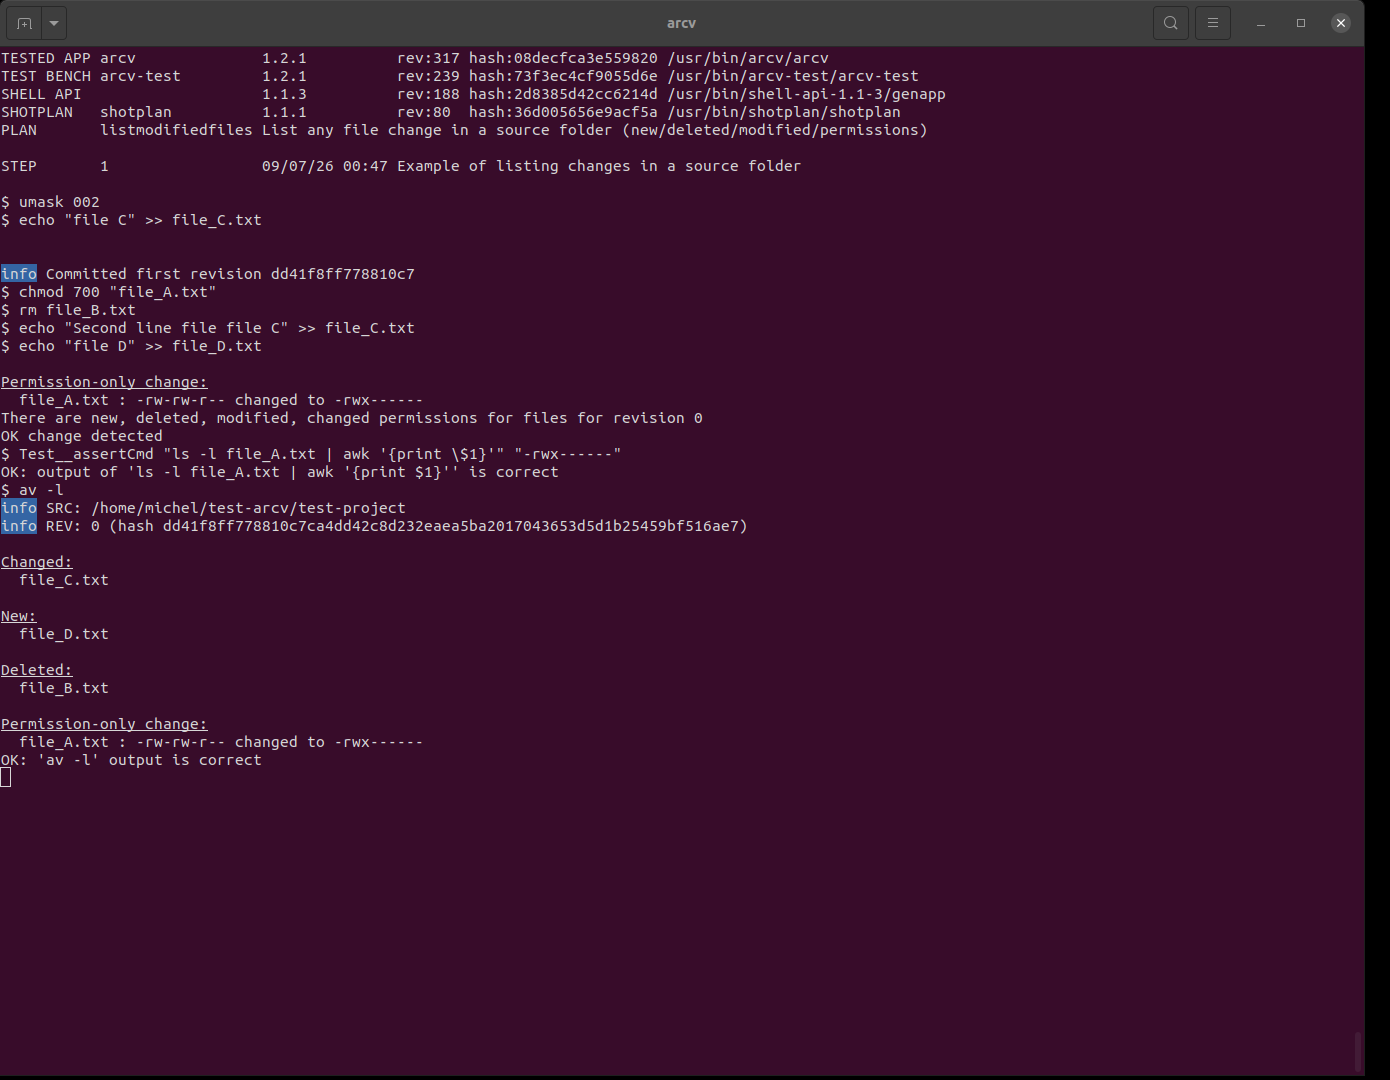
arcv -lav -lAll types of detected changes are probed using -l option: added/removed/changed file, permission-only change.
In detail:
- A folder with file_A.txt, file_B.txt, file_C.txt are put under revision control.
- Then the following changes are applied: Changed perms for file A, removed file B, modified file C, added file D
- The changes are listed using -l option and it is checked every change is listed as expected.
|
Alternatively, |
Display current revision
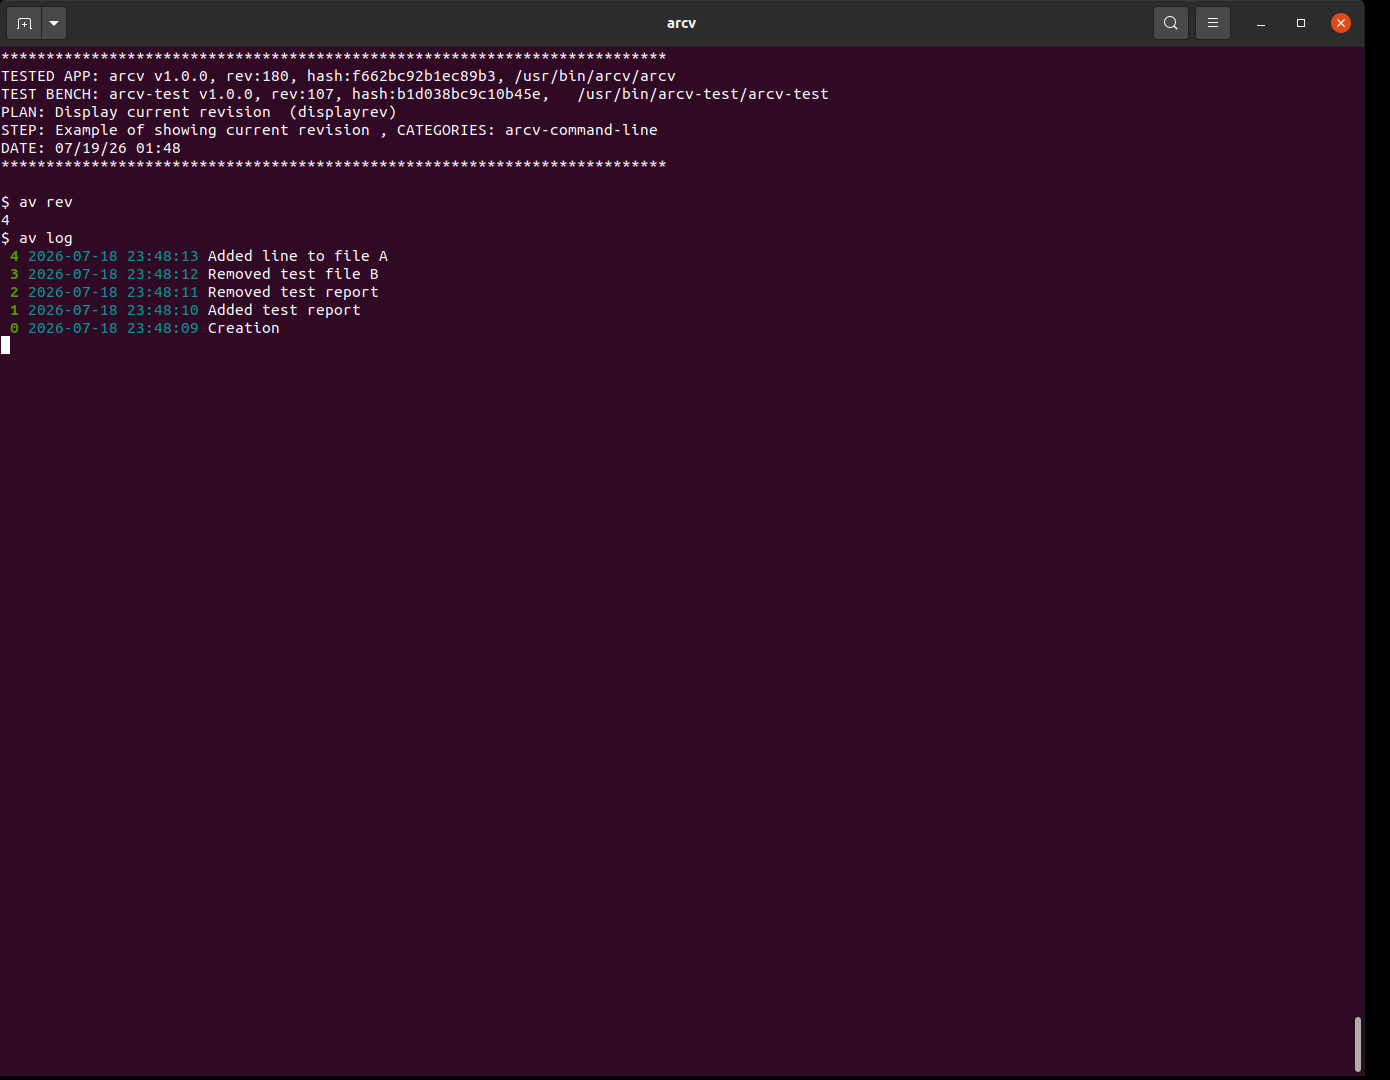
arcv revav revIn the continuation of the test 'checkoutfile_with_removed_files', the revision is displayed. It should be 4. The short log is also displayed.
Display current hash signature
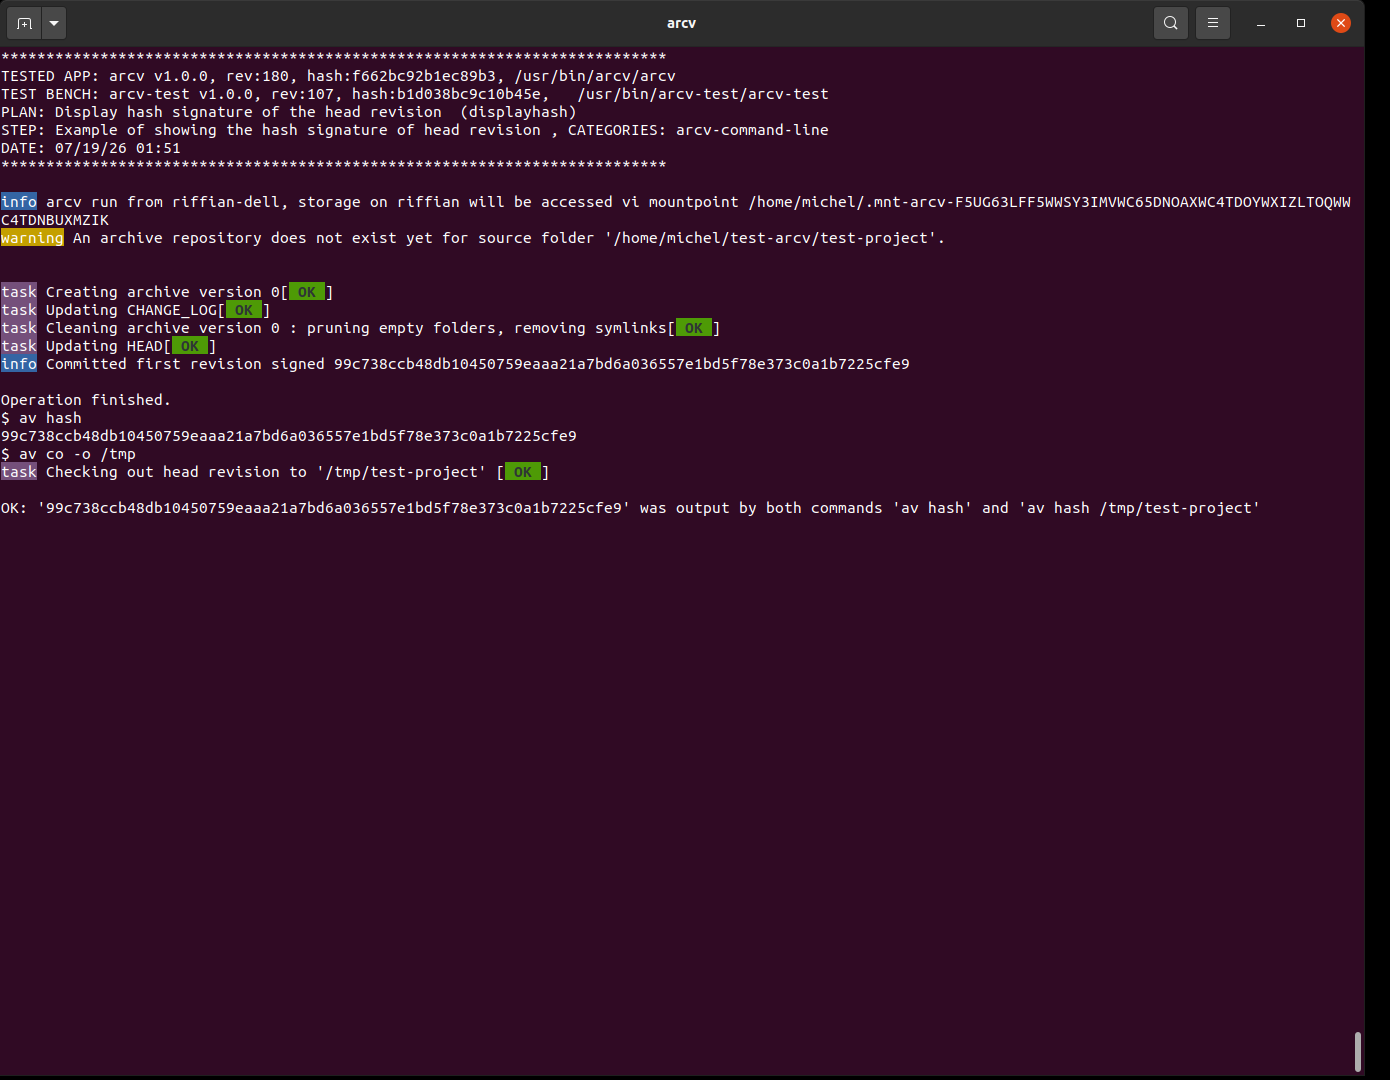
arcv hashav hashIn this example, the hash of the head revision is displayed and compared with the one computed over a copy checked out in a separate folder. They should be the same.
In detail:
- A simple source folder 'test-arcv/test-project' containing 2 files file_A.txt and file_B.txt is put under version control.
- The hash is displayed.
- Then the head is checked out in /tmp
- It is requested to display the hash computed over the checked out folder
- Original and computed hash values shall be the same
Check the hash signature of a checkout
arcv hash <directory>av hash /tmp/test-project
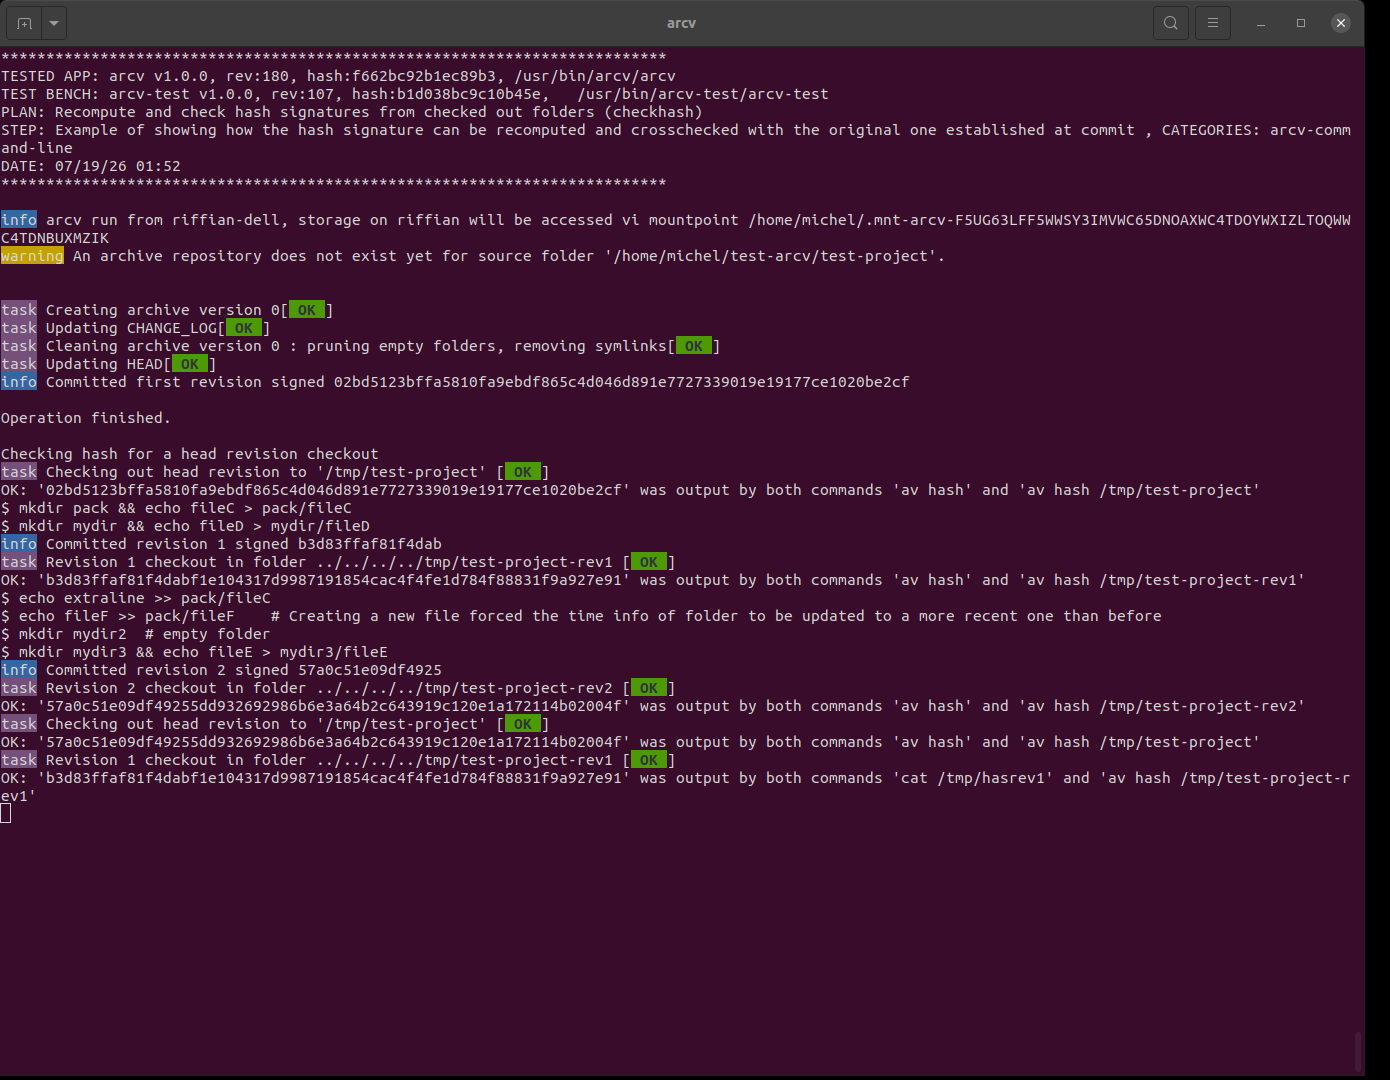
av hash /tmp/test-project-rev1In this example, there are multiple revisions for which a checkout is done and the hash is recomputed and checked for correctness against those known in the repository for each of them.
Showing the revision history and checking changes
The log messages of the revision history can be displayed in either in short or long format depending on whether --verbose option is used. In the short format, only the log messages are listed, whereas the following is shown additionally in the long format: added or modified files in blue, removed files in red.
By default text is formatted as follows:
-
The log are arranged as paragraphs to fit a maximum width
-
Each log entry is shown in an alternating color
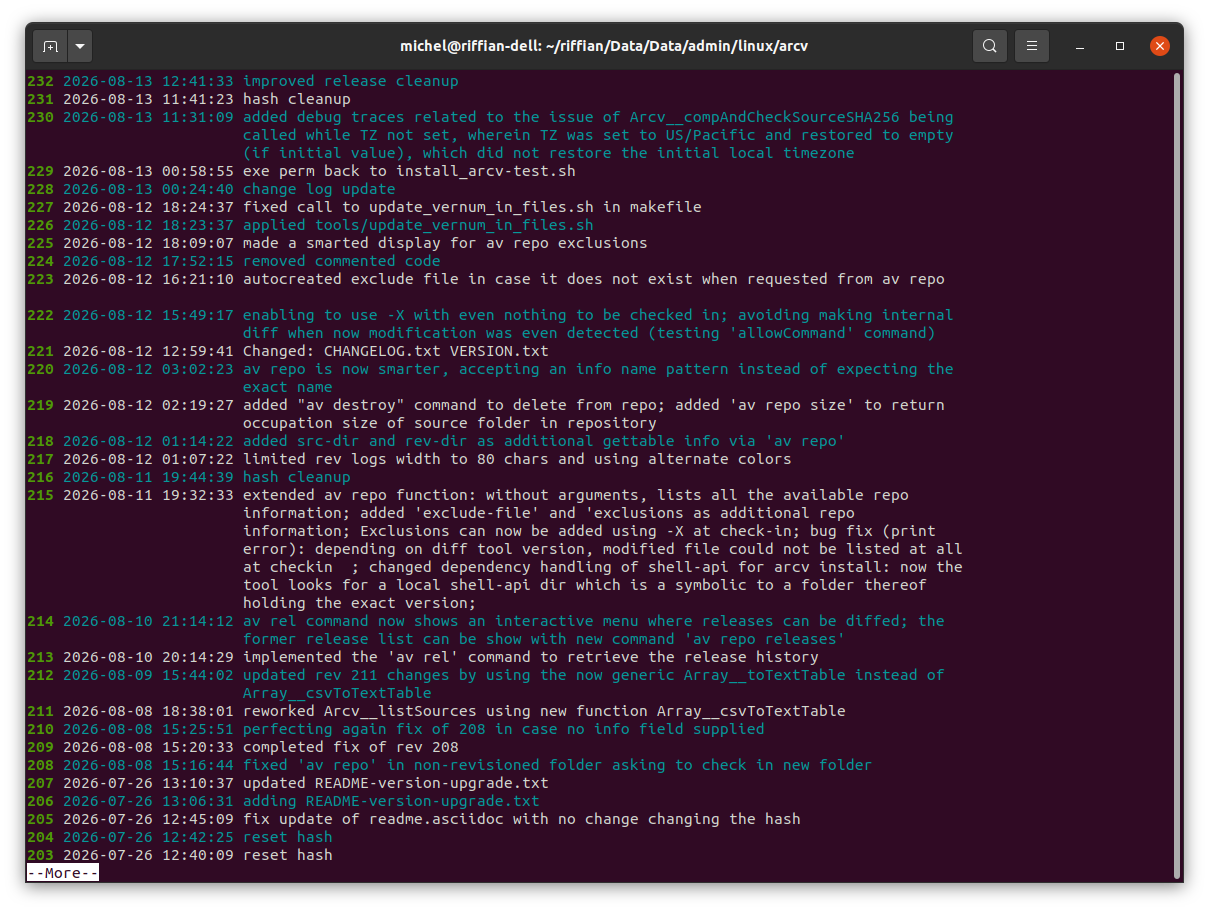
When the -y option is supplied, the revision history is shown as a terminal menu in which the differences of any revision can be checked either with the previous one (<ENTER> key) or the current head ('h' key).
arcv log [ --verbose ] [ --from=<revision> ] [ --to=<revision> ] [ -y ]av log
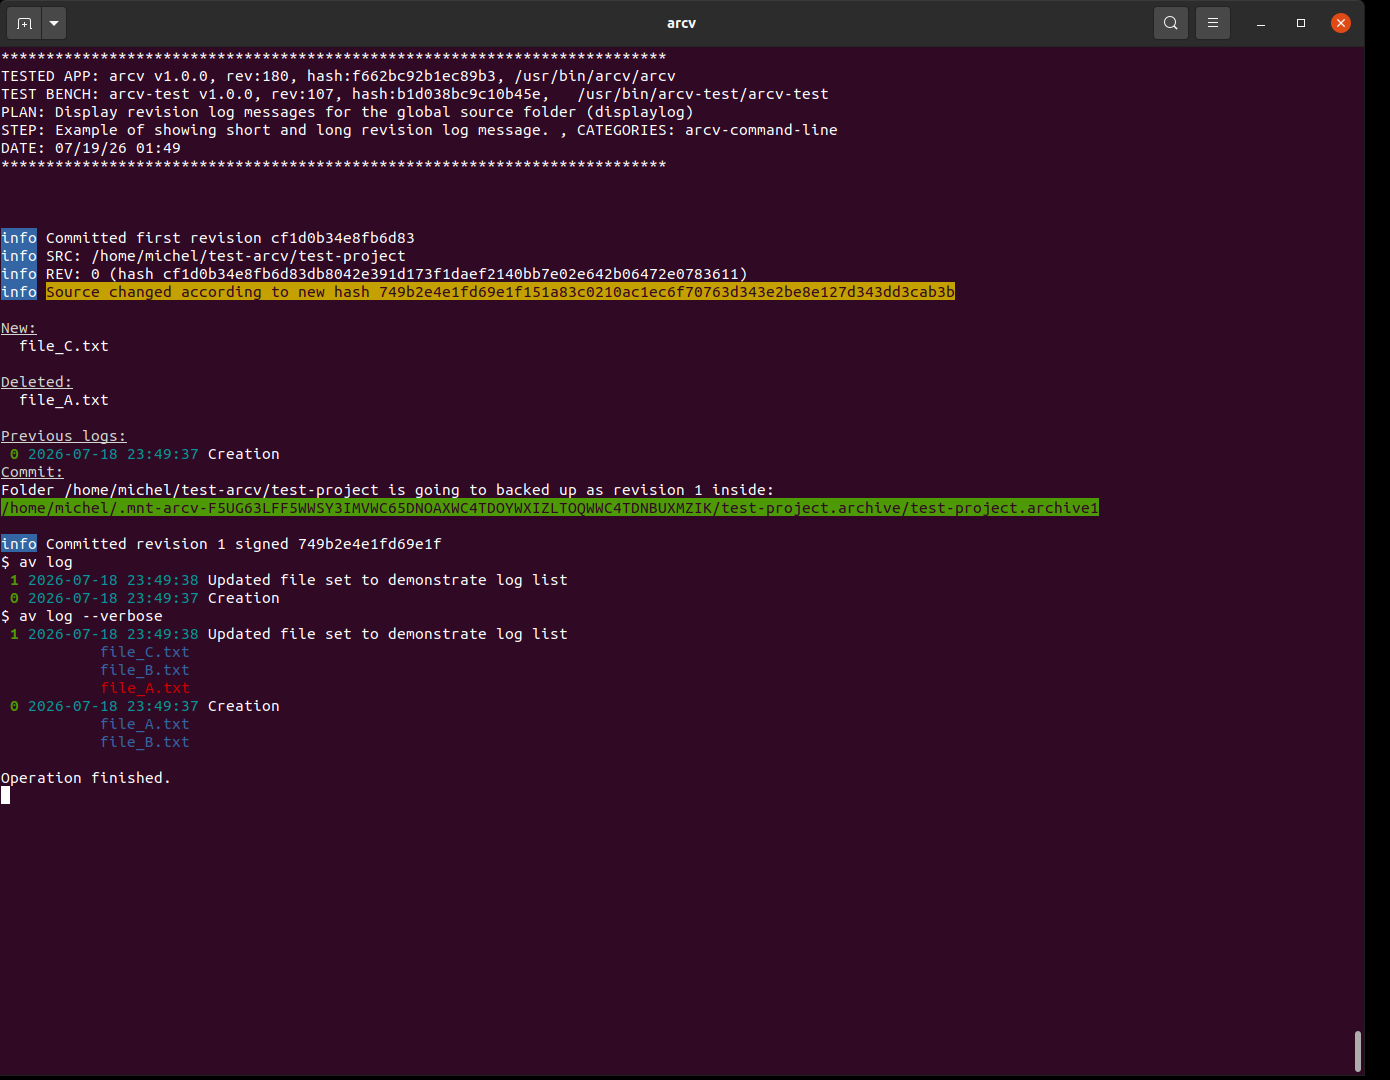
av log --verboseThis test shows the short and long versions of log messages for a basic source folder containing added, removed and modified files in the revision history.
In detail:
- A new source folder holding 2 files is put under version control.
- File A is removed, file C is added and a line is appended to file B.
- The short log is displayed. There should be 2 entries
- The long log is displayed. There should be 2 entries as follows.
* The initial log for the creation is "Creation": file A and B are shown in blue.
* The second log reflects the applied changes and the entered log message: file_A.txt shown in in red (deleted), file_C.txt and file_B.txt are shown in blue (new or modified)
- The plain output is automatically checked at each stage
av log
av log --verbose
av log --from=0
av log --from=2
av log --from=4
av log --to=4
av log --to=2
av log --to=0
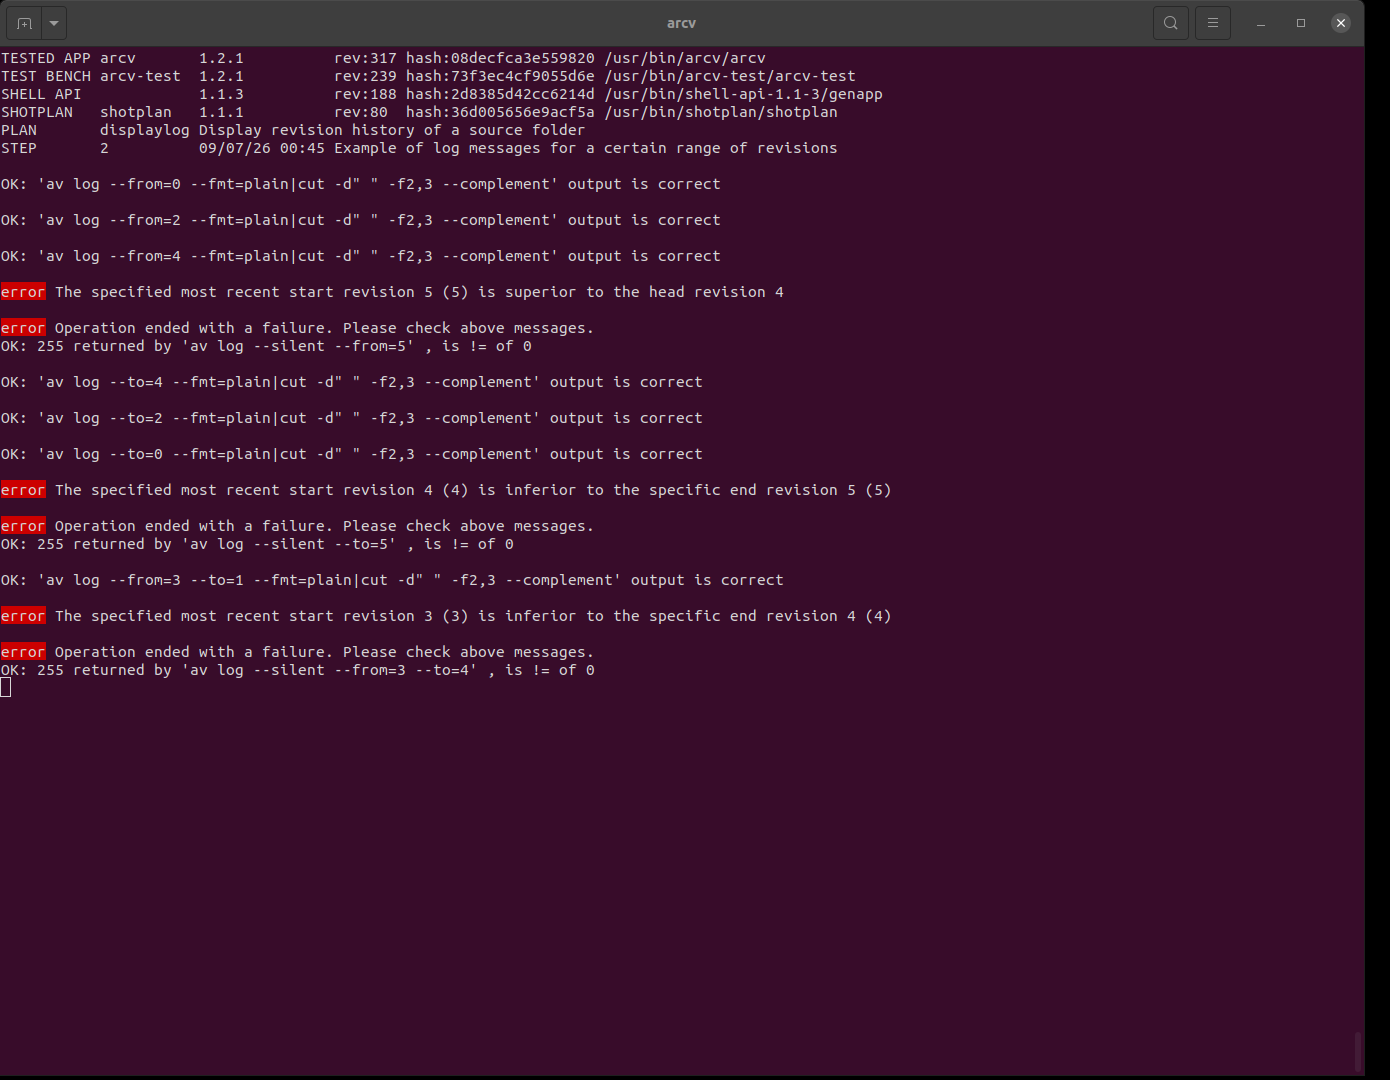
av log --from=3 --to=1The log messages for various ranges of revisions are displayed.
An initial folder is put is put under version control and
then 4 successive commits are done creating a file name file_no_<iter>.txt,
where 'iter' ranges from 1 to 4. Among the 5 commits, the following ranges are displayed:
* first from rev 0
* first from rev 2
* first from rev 4
* first from rev 5 (error case)
* from latest to rev 4
* from latest to rev 2
* from latest to rev 0
* from latest to rev 5 (error case)
* first from 3 to rev 1
* first from 3 to rev 4 (error case)
Video |
Comments |
Example of interacting with the revision history menu to perform diffs
|
This example demonstrates how the revision history can be shown as terminal menu, where differences can be checked either with the previous revision or with the head revision. In detail:
|
Showing a file revision history and checking history changes
It is possible to display the revision history of a file only.
When the -y option is supplied, the revision history is shown as a terminal menu in which the differences of any file revision can be checked either with the previous one (<ENTER> key) or the current head ('h' key).
arcv log <filename> [ --from=<revision> ] [ --to=<revision> ] [ -y ]av log file_A.txt
av log file_A.txt --from=0
av log file_A.txt --from=2
av log file_A.txt --from=4
av log file_A.txt --to=4
av log file_A.txt --to=2
av log file_A.txt --to=0
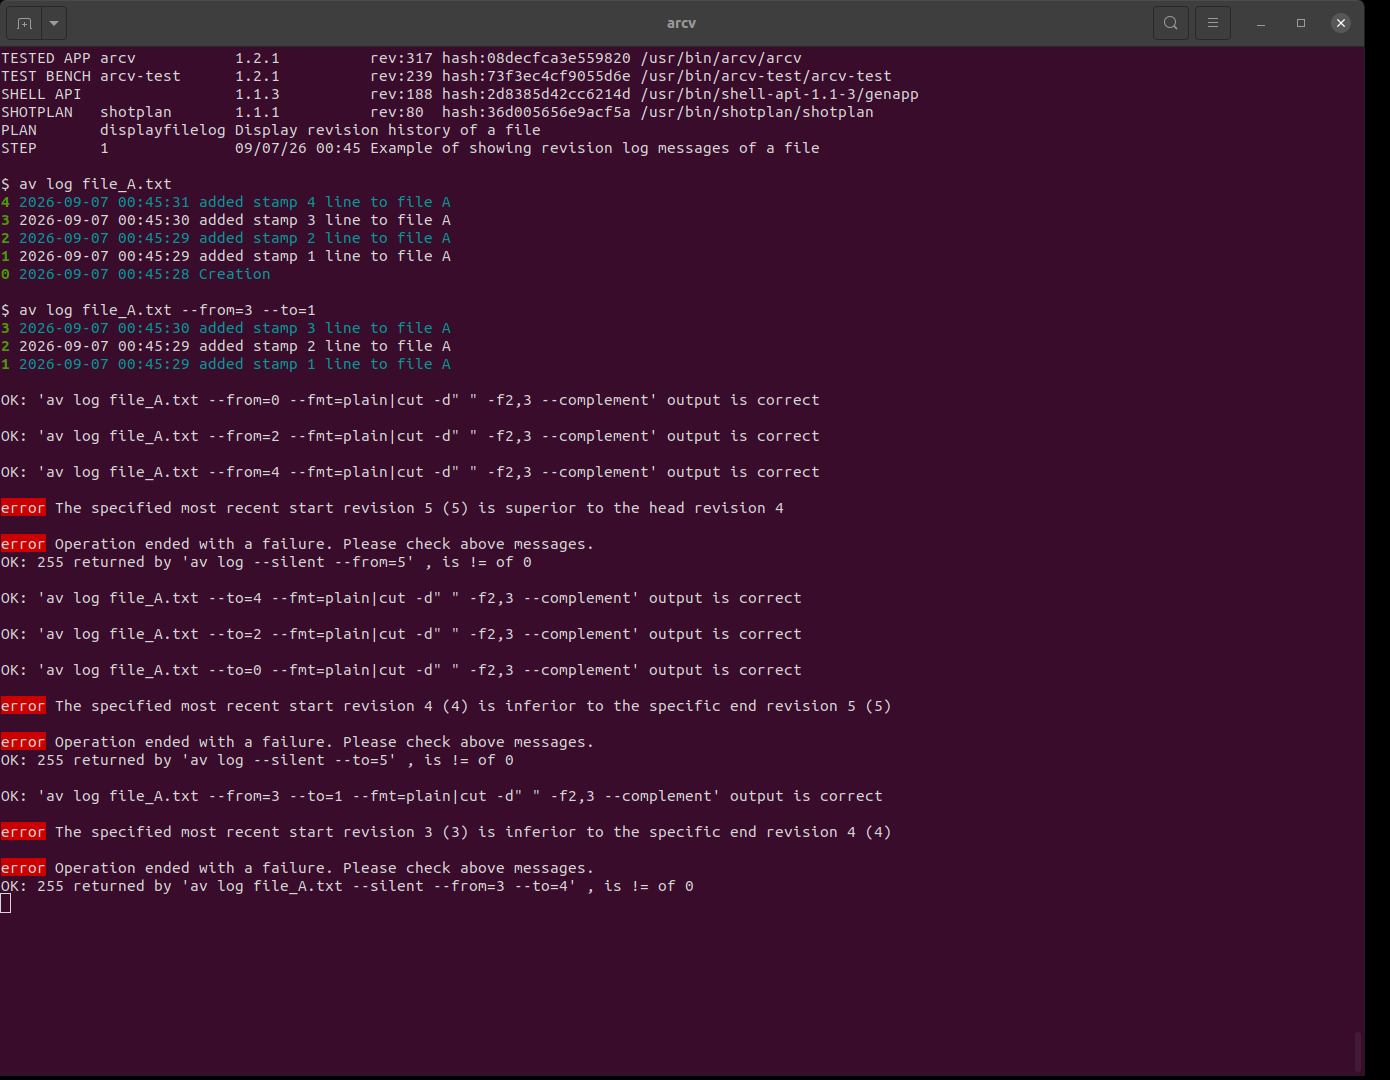
av log file_A.txt --from=3 --to=1The log messages for various ranges of revisions are displayed.
An initial folder is put is put under version control and
then 4 successive commits are done each time adding a stamp line to file_A.txt
where 'iter' ranges from 1 to 4.
First the normal file history is displayed, then only from revision 3 to 1.
Afterwards, among the 5 commits, the following ranges are tested, but not displayed:
* first from rev 0
* first from rev 2
* first from rev 4
* first from rev 5 (error case)
* from latest to rev 4
* from latest to rev 2
* from latest to rev 0
* from latest to rev 5 (error case)
* first from 3 to rev 1
* first from 3 to rev 4 (error case)
Video |
Comments |
Example of interacting with the file revision history menu to perform diffs
|
This example demonstrates how the file revision history can be shown as terminal menu, where differences can be checked either with the previous revision or with the head revision. In detail:
|
Showing the release tags history and checking changes
It is possible to display the revision history of all release tags.
When the -y option is supplied, the release tag history is shown as a terminal menu which offers the following actions:
-
<ENTER> key: check the differences with the previous release
-
'h' key: check the differences with the head revision
-
'w' key: show the revision log of the currrent selected tag.
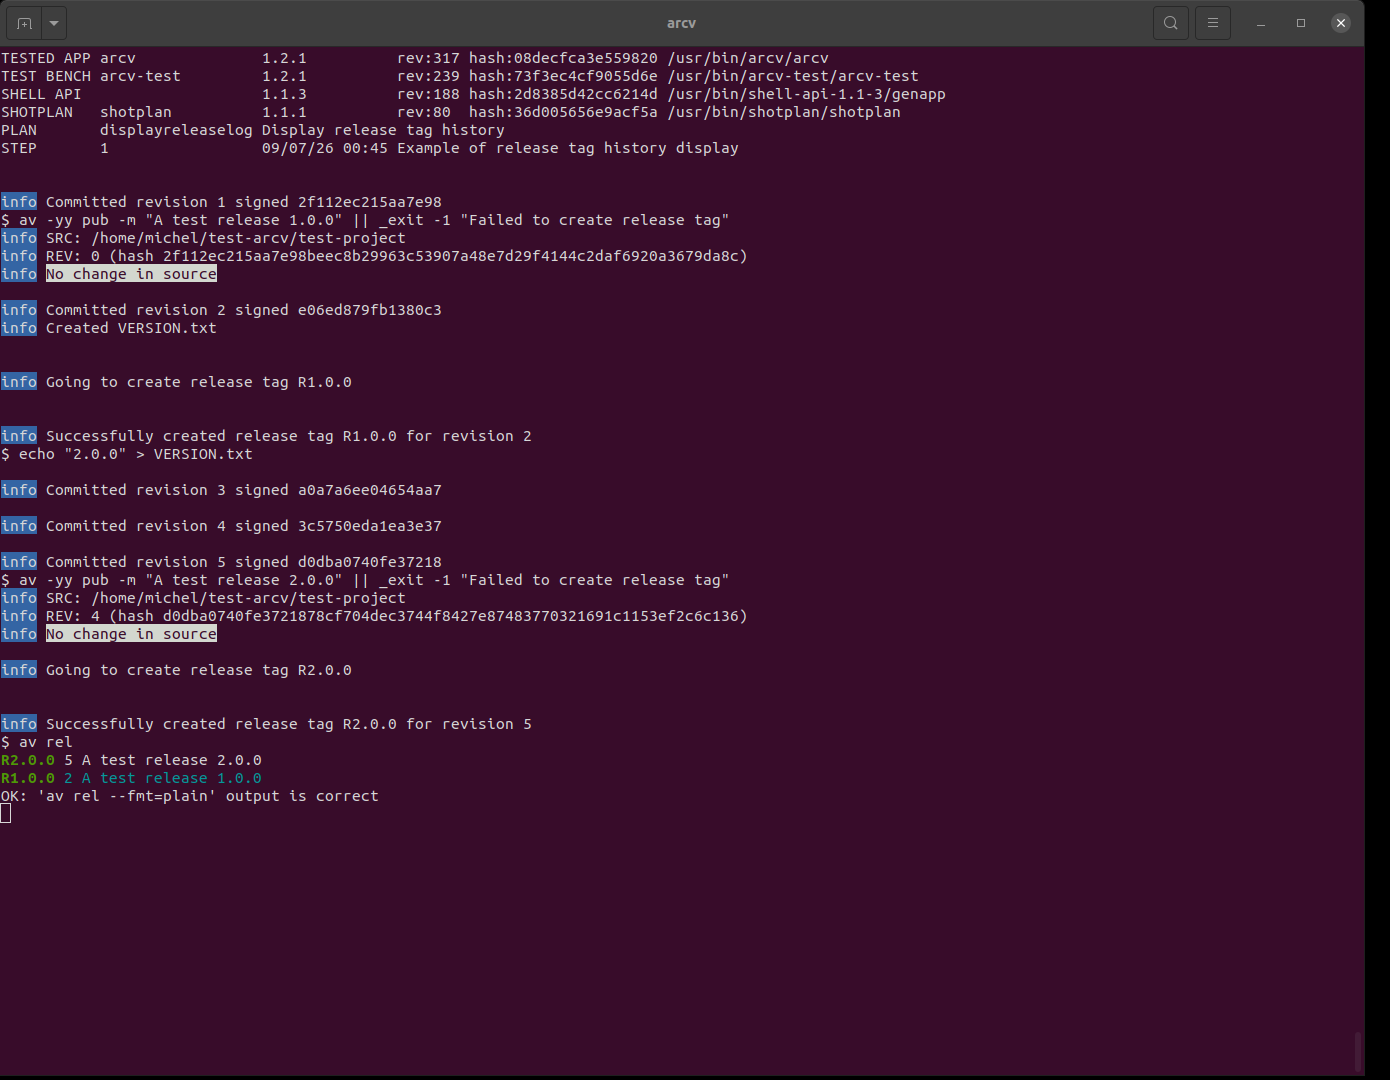
arcv rel [ -y ]av relAn initial folder is put is put under version control and
then 4 successive commits are done creating a file name file_no_<iter>.txt, where release 1.0.0 is created after first file was added. Release 2.0.0 is created after last file was added.
av rel -yVideo |
Comments |
Example of interacting with the release menu to perform diffs
|
The release history is shown as a terminal menu, where differences can be checked either with the previous release or with the head revision. |
Display available sources in repository
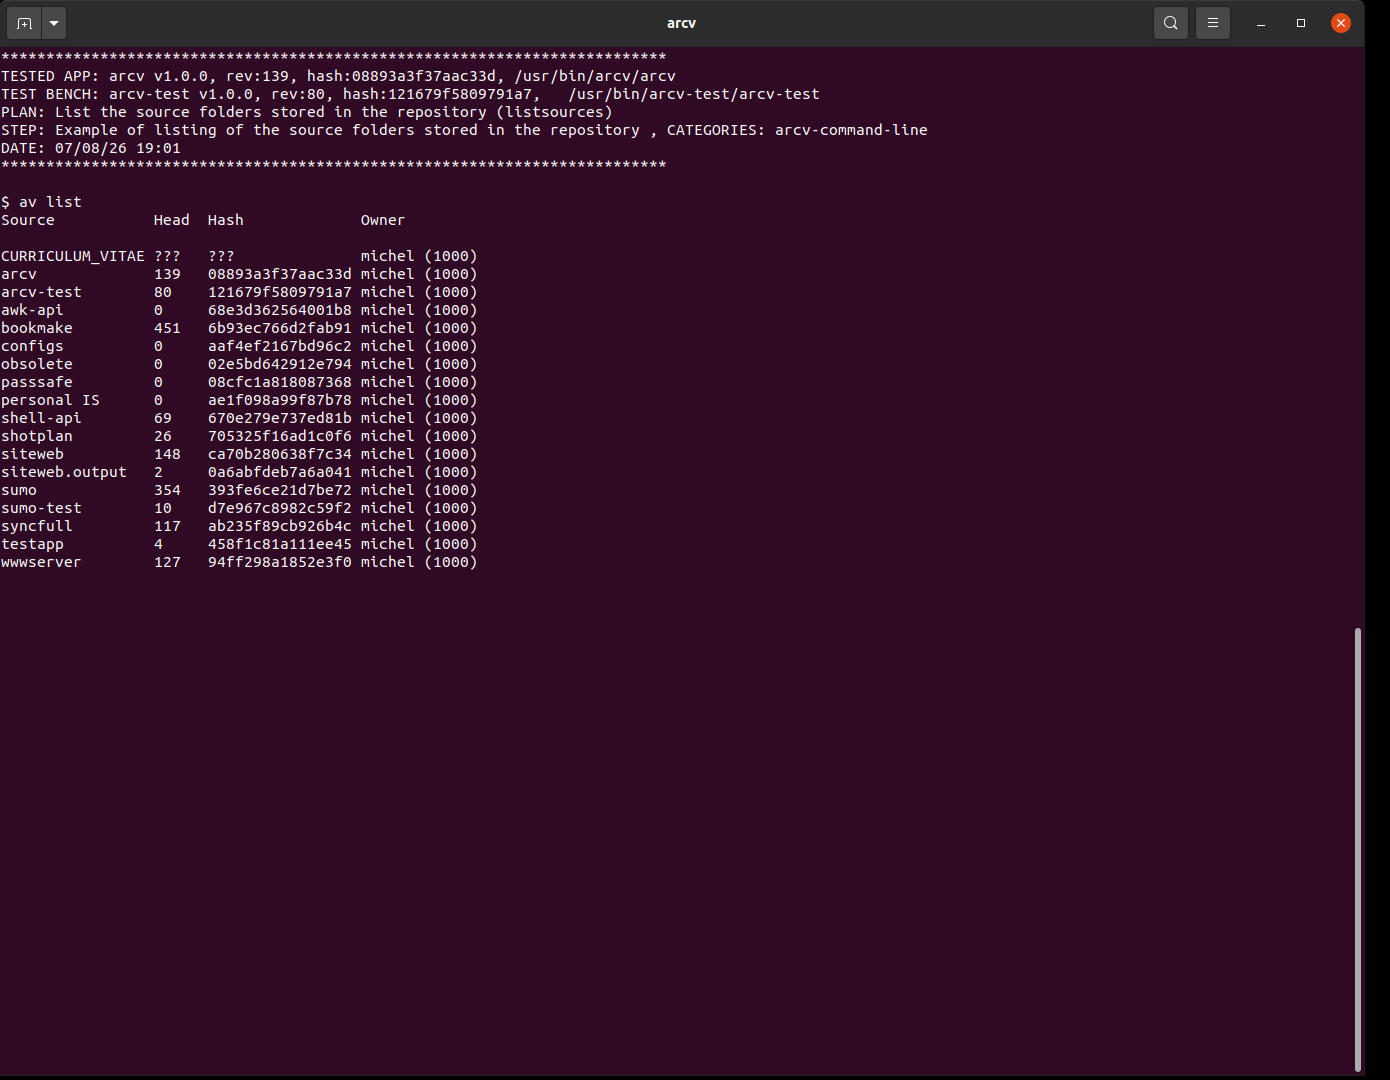
This operation lists the name of the folders, without the .archive extension, which are available in the repository.
arcv listav listTwo test folders are put under revision control and then the matching entries in the repository are listed.
Tags and release tags
The current (head) revision can be tagged with a release tag built from the version number hold in file VERSION.txt under revision control at the time of the tag creation. If there’s no VERSION.txt available, a default one will be automatically created and committed.
The release tag is automatically formatted as follows:
Rx.y.z
where x, y, z are numbers and x.y.z matches the content of VERSION.txt.
It is also possible to create a tag for a random revision. The tag is here freely defined by the user.
| Creating a tag actually only consists into creating a symbolic link to the archive folder corresponding to the revision on which was applied the tag. |
| The user will be warned if changes are pending in the current source tree before proceeding. |
arcv pub [ -m <log message> ]av -y pub -m "A test release 1.0.0"In this test, first revision is tagged, the new VERSION.txt and the repo revision data are inspected. After applying some changes on the current source, the release revision is checked out to verify that the file status corresponds to the initial check-in.
In detail:
- A new source folder holding 2 files is created and put under rev control.
- Then a release tag is created, selecting 1.0.1 as version follower beyond this release.
- After tag creation, a change is detected in source folder, since VERSION.txt should have been updated with value 1.0.1.
- Note that release will be bound to revision 2 and not 1, because an automatic commit of the auto-created VERSION.txt is carried out, due to the 'y' option.
- Then, file A is removed and file B is changed.
- Release 1.0.0 is checked out and all files content are checked for consistency. Last applied changes should not be part of it.

av -y pub MYTAG:1 -m "A version tagged with 'MYTAG'"After applying some changes on the current source, the revision is tagged. The repo revision data are inspected. Then, the tagged revision is checked out to verify that the file status corresponds to the last applied changes.
In detail:
- A new source folder holding 2 files is created and put under rev control.
- file A is removed and file B is changed.
- Then a tag 'MYTAG' is created
- After tag creation, no change is detected and no VERSION.txt should have been created
- At this point file_C.txt is created and file B modified again.
- A regular release tag is created
- Tag 'MYTAG' is checked out and all files content are checked for consistency. First applied changes should be part of it and not second changes done after tagging.
- Release tag is checked out and all files content are checked for consistency. Second applied changes should be part of it.

Comparing
Diffing tool
There are 3 tool options to perform a comparison, which can be selected by argument as detailed hereafter.
The following table lists the diff tool used depending on the command line argument :
| Argument | tool |
|---|---|
diff |
|
meld |
|
git |
|
Comparing source folder revisions
The following comparisons can be carried out:
-
between current source folder and head revision, i.e. the current applied changes not yet committed
-
between current source and a random revision
-
between current source and a release tag
-
between head revision and a random revision
-
between two random revisions
-
between a random revision and release tag
When diff tool ised used, the command returns 0 when no difference was detected, 1 otherwise.
|
It is presently not possible to specify a release tag as first argument when using the 'vs' notation. Consequently, it is not yet possible to compare 2 release revisions. A workaround to this limitation is to check out the two release revisions and then compare the checked out folders using |
|
The user has the opportunity to check current, uncommited changes during check-in. See Checking changes at check-in |
arcv diff [ <revision> | head | current[vs<revision | release tag>] ]
arcv meld [ <revision> | head | current[vs<revision | release tag>] ]
arcv git [ <revision> | head | current[vs<revision | release tag>] ]av diff # diff between working dir and head revision
av diff 2 # diff between working dir and revision 2
av diff R1.0.0 # diff between working dir and tag R1.0.0
av diff headvs2 # diff between head and revision 2
av diff 2vs0 # diff between revision 2 and revision 0
av diff 1vs0 # diff between revision 1 and revision 0
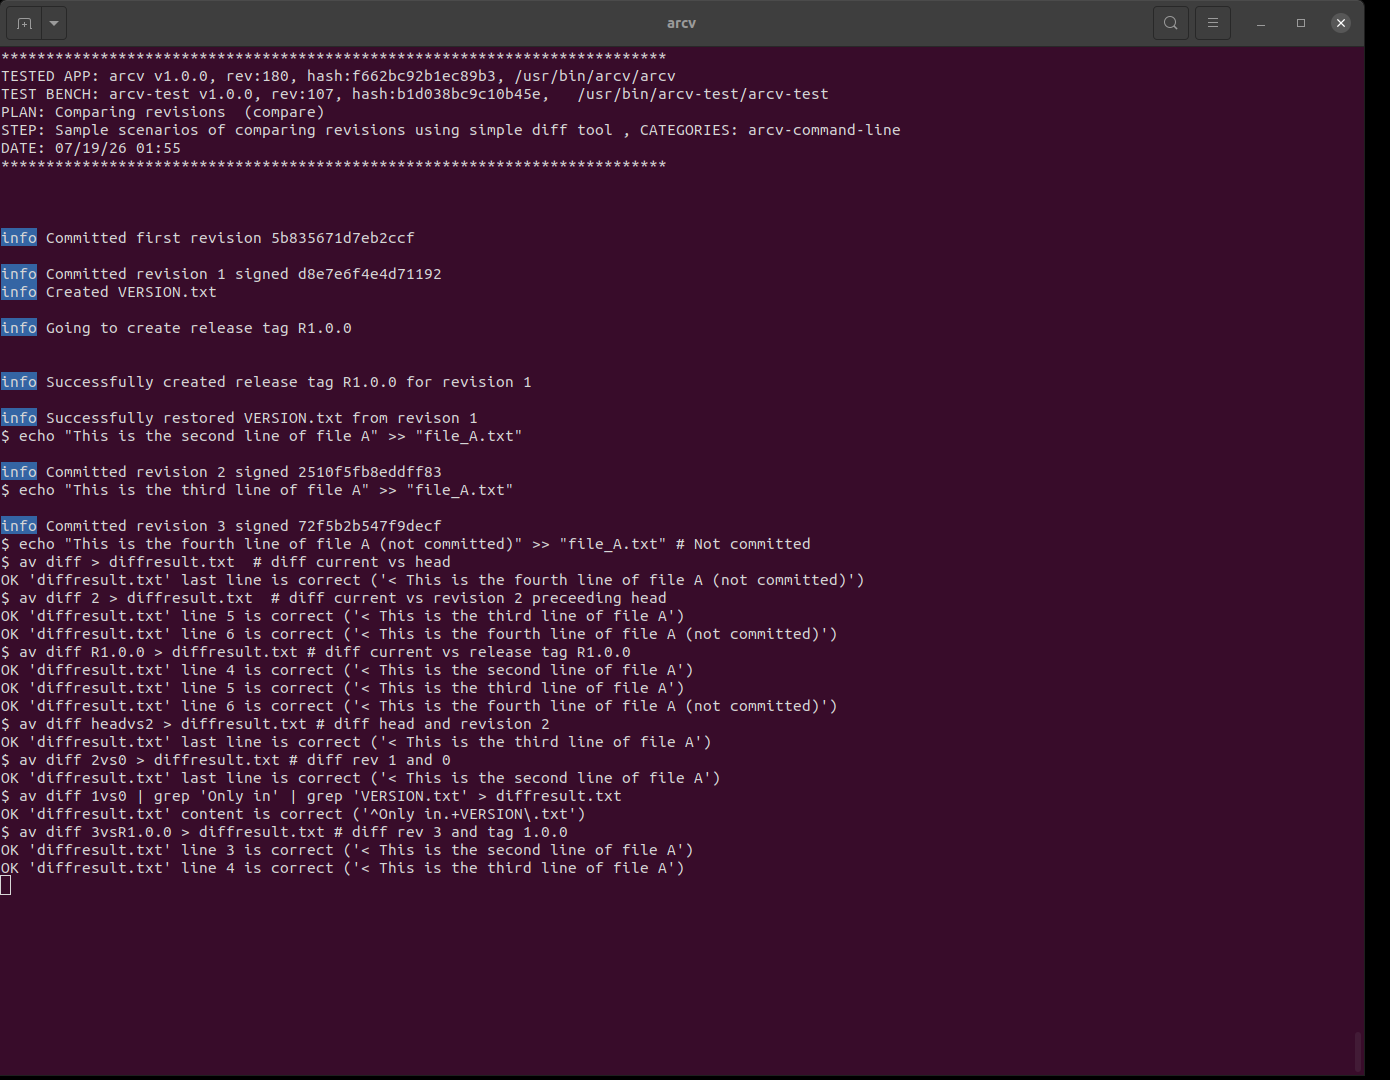
av diff 3vsR1.0.0 # diff between revision 3 and tag R1.0.0In this test, various diff scenarios are exercised. Between workdir and resp. head, random revision and a release tag. Between a revision and random other revisions, between head and a random revision.
In detail:
- A new source folder test-arcv/test-project is created with 2 files file_A.txt and file_B.txt is put under version control
- revision 0: file_A.txt has a one line
- revision 1: release tag added (TAG R.1.0.0)
- revision 2: 2nd line is added to file_A.txt
- revision 3: 3rd line is added to file_A.txt (HEAD)
- (working dir): 4th line is added to file_A.txt
The following diffs are carried out between:
- working dir and head revision, showing the extra 4th line.
- working dir and revision 2, showing the extra 3rd and 4th lines.
- working dir and tag R1.0.0, showing the extra 2nd, 3rd and 4th lines.
- head and revision 2, showing the extra 3rd line.
- revision 2 and revision 0, showing the extra 2nd line.
- revision 1 and revision 0, showing that VERSION.txt is only in rev
- revision 3 and tag R1.0.0, showing the extra 2nd line and 3rd line.
Comparing file revisions
It is possible to view the revision history of a specific file and to check differences between :
-
Two successive revision
-
Any revision and the head revision.
Exporting
Export revision histories to AsciiDoc
Revision and release histories can be output in AsciiDoc format. The output can then be redirected to a file for which an HTML or PDF version can be generated from it using resp. 'asciidoctor' and 'asciidoctor-pdf'.
Here are sample commands:
# Output the full revision from the creation.
av log --fmt=adoc --to=0

# Output the release history
av rel --fmt=adoc
Example: Arcv full revision log page
Export diff and history output to plain text
Diff and log histories can be output in plain text format, without text formatting, colors and headers. The output can then be used for processing by other tools.
Here are sample commands:
# Output the release history in plain text
av rel --fmt=plain
Export current source to tarball
A tarball of the current source folder can be created using the 'tarball' command without argument.
If the source folder is 'clean', i.e. in line with head revison, the tarbar file name will be the following:
<source folder name>-<head revision>.tar.gz
If the source folder contains any modification, the tarbar file name will be the following:
<source folder name>-<head revision>M-<year><month><day>.tar.gz
A tarball can also be created for a specific revision by passing the revision number as argument. In that case, the tarbal file name is:
<source folder name>-<specified revision>.tar.gz
arcv tarball [ <revision> | head ]av tarball -o /tmp # Create tar for current source in /tmp
av tarball head -o /tmp # Create tar for head revision in /tmp
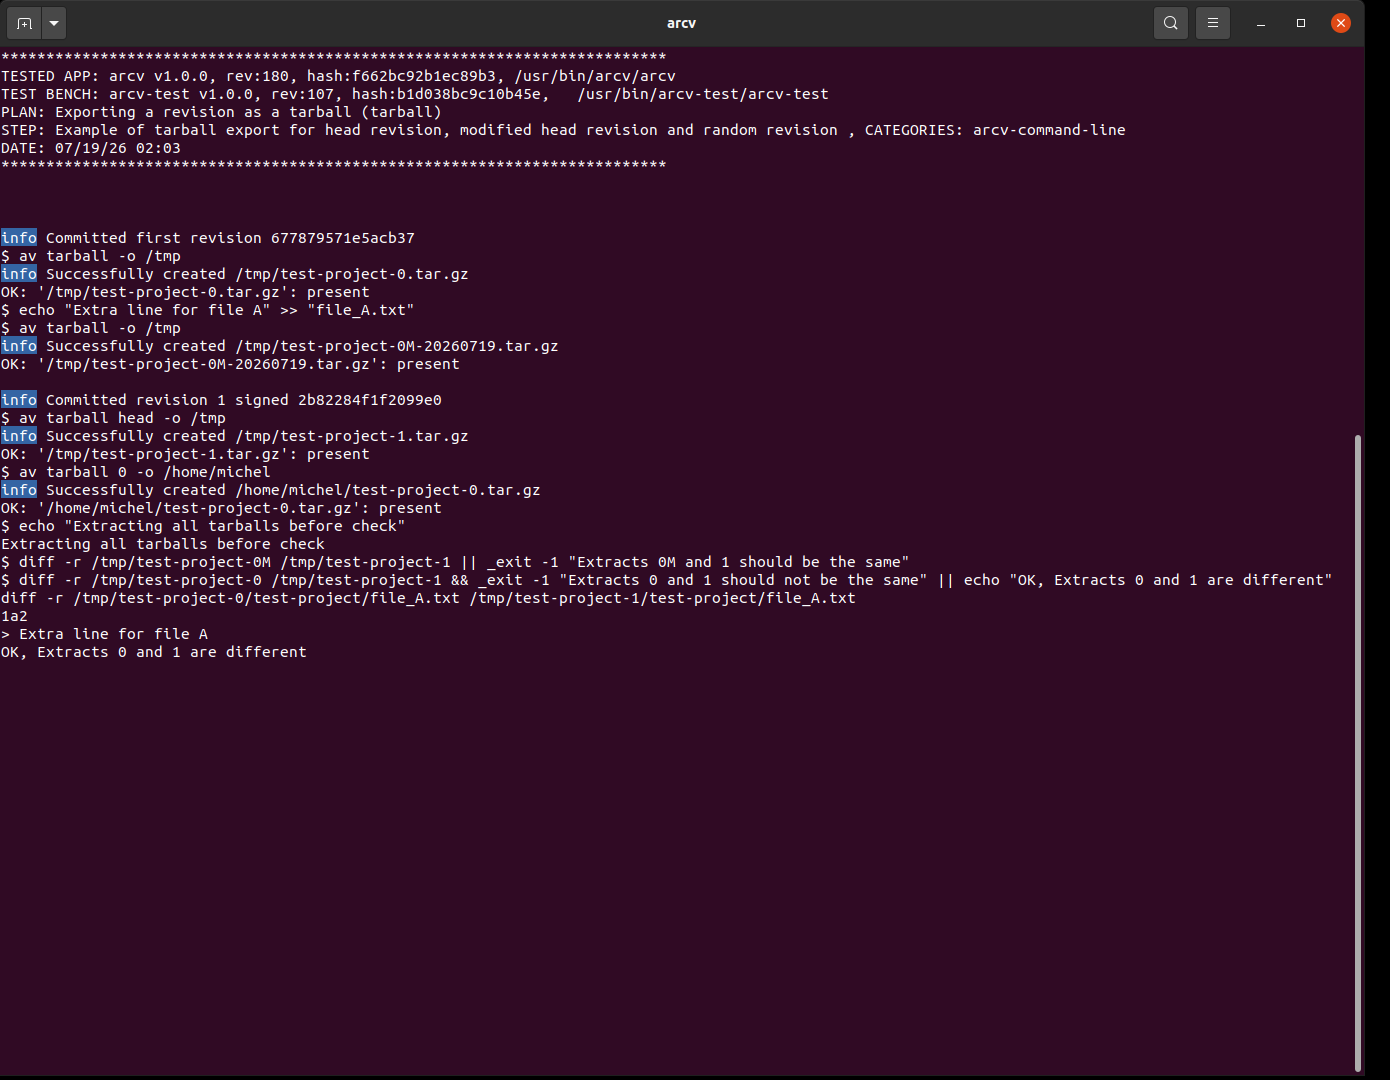
av tarball 0 -o $HOME # Create tar for very first revision in user's homeThis test exercises different tarball creation scenarios: from a random revision, from head revision, using different output folders.
In detail:
- A new source folder holding 2 files file_A.txt and file_B.txt is created and put under rev control.
- A tarball is generated for revision 0. It is checked test-project.0.tar.gz was created.
- File A is modified and a tarball is generated for modified revision 0. It is checked test-project-0M.tar.gz was created.
- File A change is committed and a tarball is generated for revision 1. It is checked test-project-1.tar.gz was created.
- Finally, a tarball is created for explicit revision 0, in a different folder (HOME).
- At the end, all tarballs are extracted and it is checked that:
* test-project-0M.tar.gz and test-project-1.tar.gz contain the same files
* test-project-0.tar.gz and test-project-1.tar.gz contain differences matching the above applied ones.
- test-project-0.tar.gz and test-project-0.tar.gz of HOME contain the same files
Export head revision to GitHub
The head revision of a source folder under revision control can be exported to a Git repository hosted by GitHub using the 'export' command without argument.
It is also possible to export a random folder, e.g. a release folder where files were processed and filtered, by passing the folder path as argument to the 'export'. Note that the command must still be executed from a valid source folder.
For a successful export, the following conditions must be met:
-
A file
GITHUB.txtexists in the source folder, containing the URL of a valid, existing repository. E.g.git@github.com:michelm33/arcv.git -
The parameters
user-nameanduser-emailare defined in the operational configuration file -
The files
VERSION.txtandCOPYRIGHT.txtare defined. These also help determining whether the selected folder is actually a correct source folder.
The exported source folder will be copied in the git subdir located inside the top archive directory. This directory can then be used further on to export subsequent revisions or any other source folder in order to synchronize with GitHub.
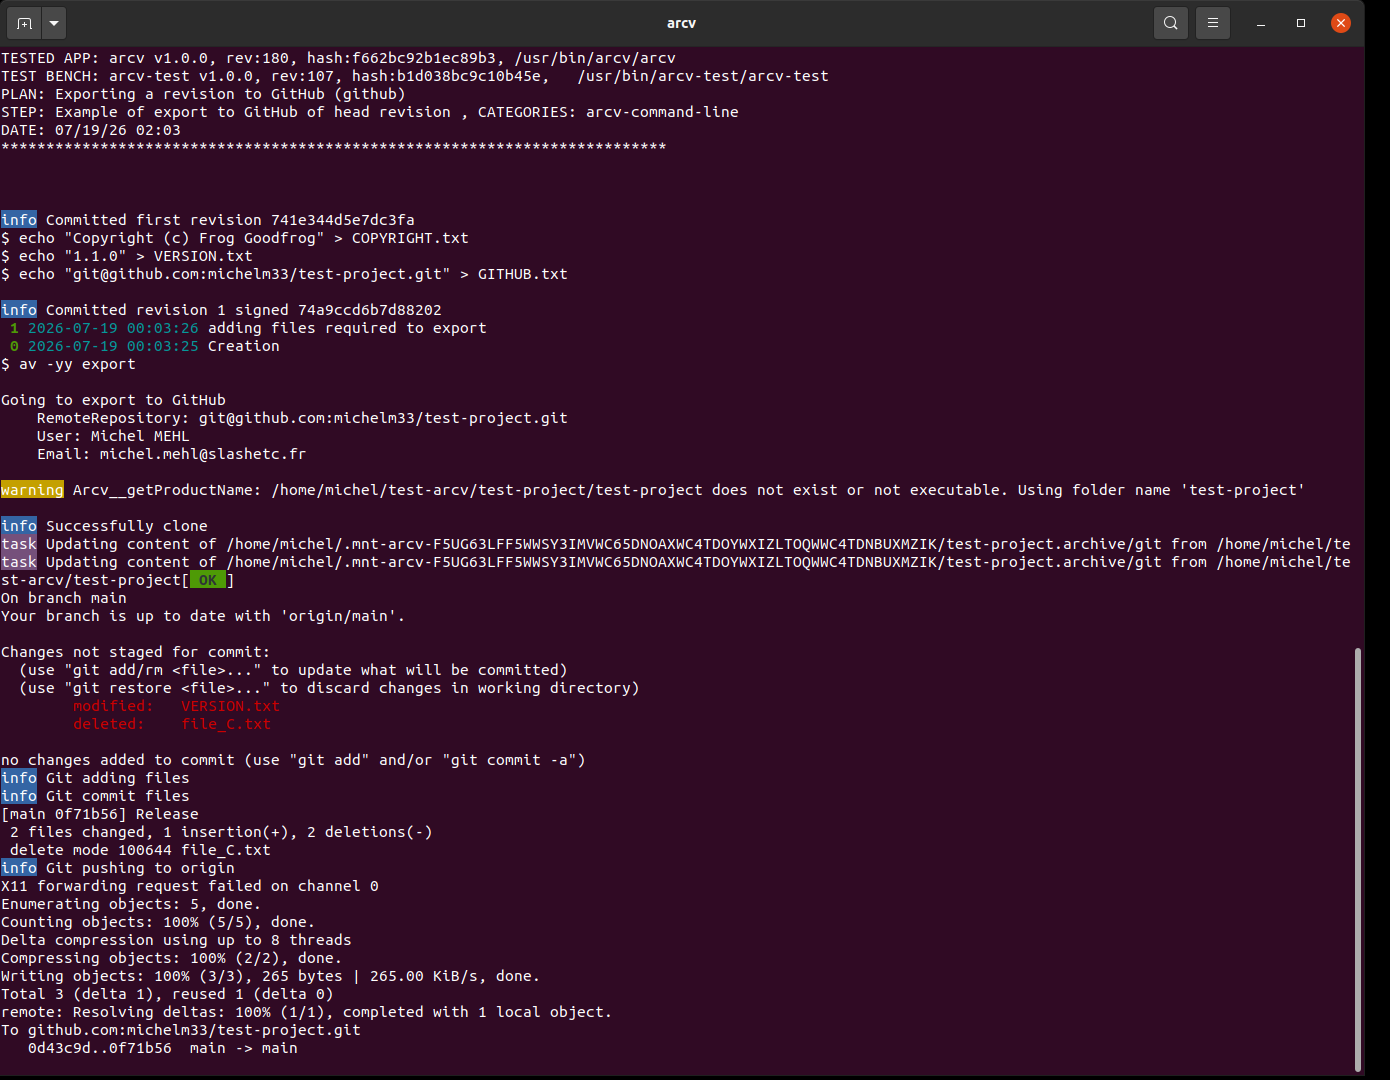
arcv export [ <directory> ]av exportThis test exposes how a source folder in its current state under revision control can be exported to GitHub.
In detail:
- A new source folder holding 2 files file_A.txt and file_B.txt is created and put under rev control.
- The test source folder is completed with the following files: COPYRIGHT.txt, VERSION.txt, GITHUB.txt for the sake of preparing the export to GitHub.
- On GitHub, create the 'test-project' repo on GitHub.
- On GitHub, add the SSH key for the local host from which the test is run.
- On GitHub, if step 2 was already run in a previous test, ensure to remove file_C.txt out there.
- The current source is then exported and it is checked GitHub was updated.
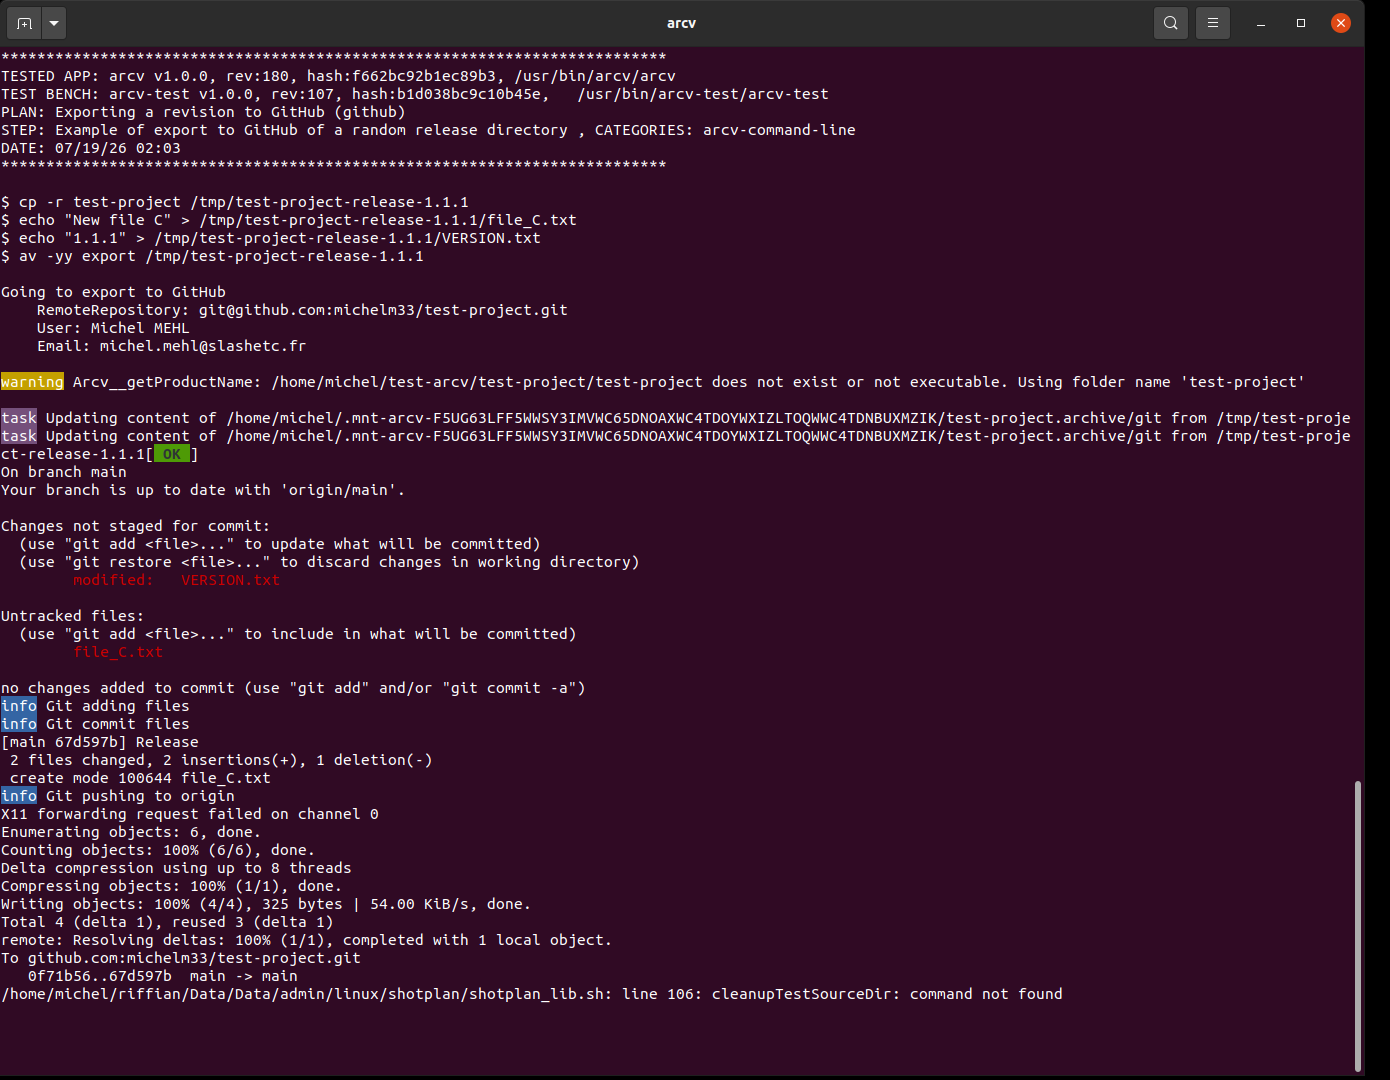
av -yy export /tmp/test-project-release-1.1.1In the continuation of previous step, this shows how an explicit, random folder can be exported from a source folder under revision control.
In detail:
- A release folder is created with version 1.1.1 in a temporary folder, as a copy of 'test-folder', to which file file_C.txt is added.
- The fabricated release folder is exported
- It is checked that GitHub was updated:
* VERSION.txt is set to 1.1.1
* file_C.txt is present.
|
To push to GitHub through SSH, a SSH key must be generated for the host from which git push is done and copy/pasted on the GitHub site. If no key is available yet, run |
| The user will be warned if changes are pending in the current source tree before proceeding. |
Logging
The log file is the following:
$HOME/.local/arcv/log.txt
At the moment, it will be endless growing and survive over successive runs.
Testing
Test tools and environment
arcv-test provides the official test suite for arcv and contains all necessary ressources to run the tests. The package version is deemed to be always the same as arcv.
| Platform | Comment |
|---|---|
Ubuntu 20 |
The screenshots and videos are generated there using the |
Ubuntu 26 (docker[1]) |
Only the standard output is used for the report. The tests requiring video capture are not run. |
Test reports
The traces and results produced during the tests on the standard output is redirected into a single, timestamped file which serves as report. For each test, there’s an identification timestamped banner indicating version and revision numbers of tested items, test tools and dependencies
| There are also screenshots and videos generated during the tests, which are used in the official documentation. |
The test report in text format may contain terminal color escape sequences. They are best viewed using the command line cat tool.
|
| Platform | File |
|---|---|
Ubuntu 20 |
|
Ubuntu 26 (docker) |
Lifecycle
Configuration management
The configuration management of the original software is managed on a non-disclosed server with arcv. The original revision log of arcv can be tracked on this page: Full revision log page, generated by itself.
The releases are the following:
| Release tag | Revision | Log |
|---|---|---|
R1.2.1 |
317 |
Significant check-in fixes (undetected permission-only changes for folders - not checked-in), changed binary files not reported at check-in - not displayed). Release hooks feature |
R1.2.0 |
299 |
Critical fixes (SHA computing, permission-only changes), numerous new options/features, improved diffs handlings |
R1.1.0 |
232 |
3rd release supplying 'rel', 'repo' and '-X' commands |
R1.0.1 |
207 |
2nd release for hotfix |
R1.0.0 |
187 |
First release |
The clean release packages and the release source code files are available on GitHub at https://github.com/michelm33/arcv
Communication
Posts and announcements:
| Platform | Comment |
|---|---|
Patreon |
Bug tracking
Reported bugs are tracked via the GitHub page https://github.com/michelm33/arcv
Tests
See section Testing earlier.
External platforms
Donating and gifts
How you can support this work and how to claim your gifts is reported on this page: Donate & Gifts online page.
Thanks
-
The Linux community
-
The stack overflow community which is a precious source of support and information that may save your day sometimes!
-
help2man an utility to generate man pages
-
meld diffing tool
-
Libreoffice, especially its drawing tool
-
Inkscape, as SVG editor
-
Google Translate for checking or improving translations
Probably this list may be completed over time, sorry if I missed anyone!
Support and maintenance
All test reports
| Platform | File |
|---|---|
Ubuntu 20 |
|
Ubuntu 26 (docker) |