Overview
MountPilot integrates into one tool the multitude of mount methods which exist for different types of data source media, while also providing a live dashboard for monitoring and interacting with active or past mounts.
The integrated mount functions enable to mount on the local file system a large variety of data sources from a single unified command-line interface (CLI). Once mounted, the files of the source can be accessed locally from the mountpoint folder, as if they were local files. Data sources may be as diverse as local disks, mobile devices, network connections and disk files.
The mount functions are supplemented by auto-installation of dependency packages and auto-login setups to access remote sources.
In addition, it also provides basic disk creation and manipulation functions, with seamless handling of encryption.
MountPilot can be used for Linux administration purposes, as diagnosis tool or for domestic use.
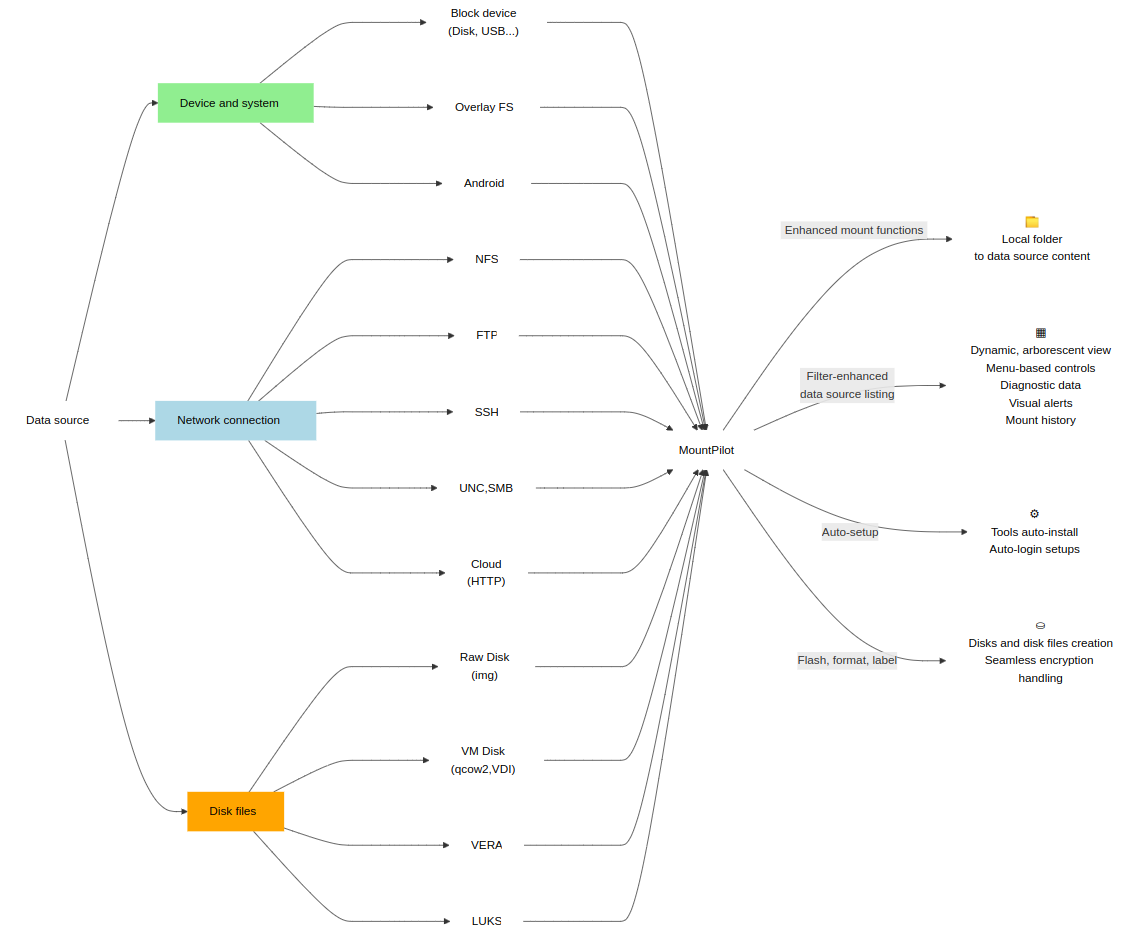
How it works?
MountPilot can be run in two ways, via command line on the one hand (sumo), as an interactive control dashboard on the other hand (mountpilot).
MountPilot is intended to be run by a regular user account with 'sudo' priviledges.
Sumo command
sumo is the back-end command line tool which perform the mount/unmount operations and disk operations.
Most operations are actually achieved by sumo, which is either launched manually by the user or launched in background from the dashboard.
sumo stands for "SUper MOunt".
In its simplest form, a sumo command typically looks as follows:
sumo [<OPTIONS>] <data source> [<mountpoint>]The command usage and list of possible arguments are detailed in the manpages.
# This mounts google drive cloud on the local folder _mydrive_
sumo https://drive.google.com mydrive
MountPilot dashboard
With the interactive console, you’re just a keystroke away from most common mounting and disk operations.
The console shows a steady list of mounted and unmounted sources, which is automatically refreshed according to a configured timeout. The list also shows the hierarchical relation between data sources.
The list behaves like a terminal menu on which the user can select a source and carry out an operation on it. Most operations are achieved with a single keystroke.
Optionally, additional information can be displayed at the bottom part, e.g. the history of sources lastly unmounted.
The dashboard can be launched in one of the following ways 😄 :
sumo -ior
mountpilotor
mp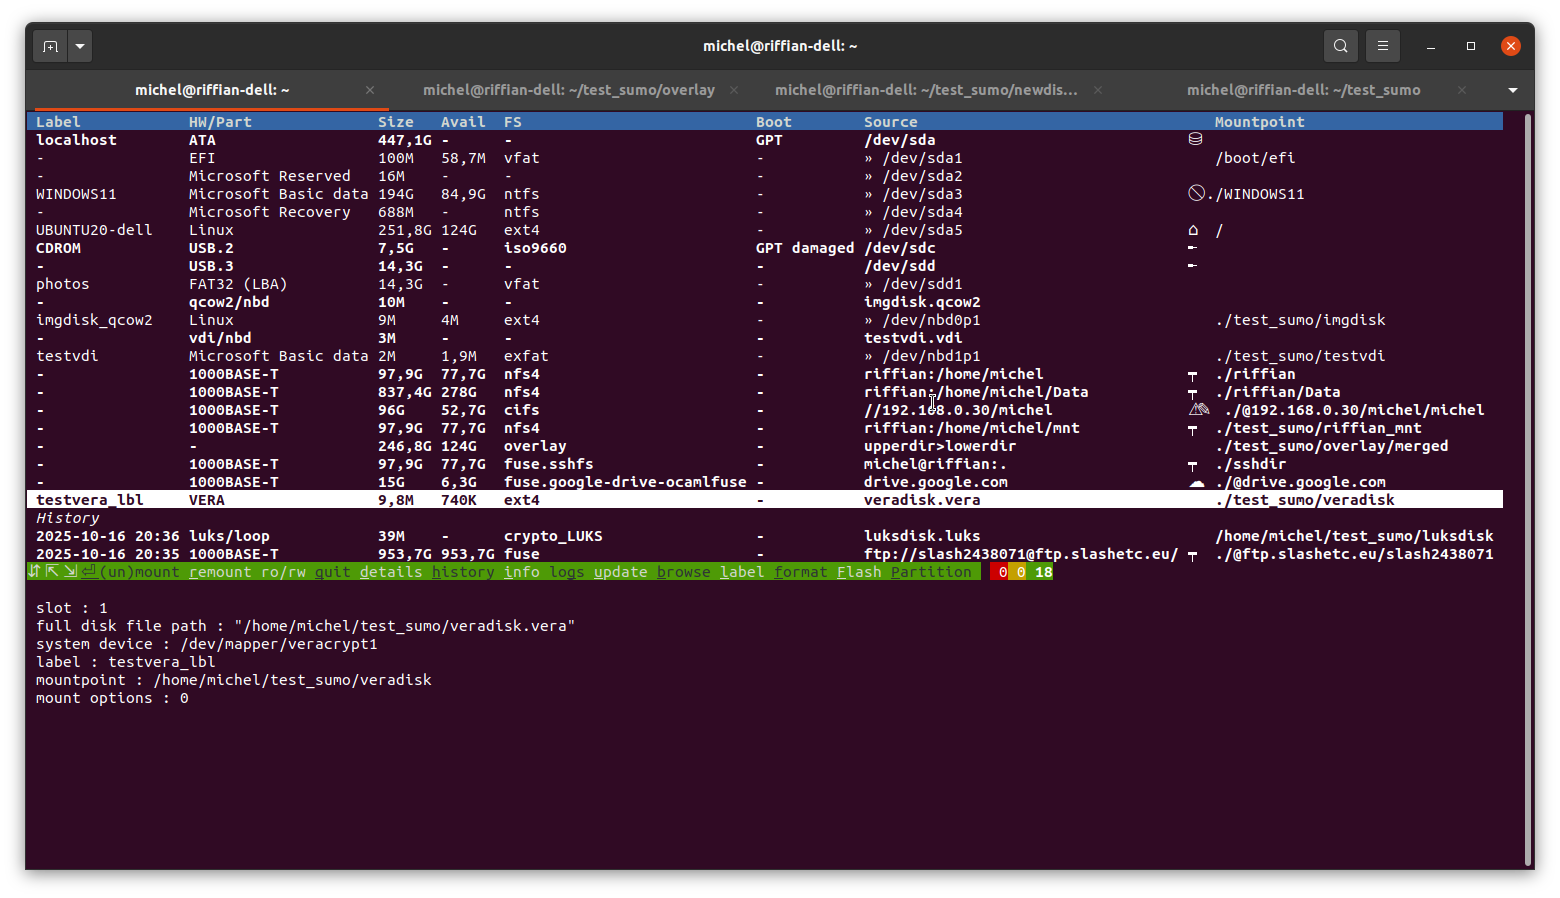
Key features
| MountPilot feature | Details |
|---|---|
Quick, comprehensive overlook of all data sources |
|
Enhanced mount features |
|
Seamless disk files management |
|
Mount history management |
|
Diagnostic and security functions |
|
Disk creation functions |
|
Auto-installations and Auto-setups |
|
Installation and platforms
Debian package (.deb)
Download the mountpilot_2.0-1_amd64.deb package and run:
sudo dpkg -i mountpilot_2.0-1_amd64.deb| this installs folder /usr/bin/mountpilot |
ZIP package
Choose a target installation folder and run:
unzip mountpilot-2.0-1.zipUser account setup
MountPilot is intended to be run by a regular user account with 'sudo' priviledges. For that purpose, an exising personal account may simply be used or a new one created dedicated for that use.
If this account cannot 'sudo', section User account with sudo priviledges explains how to do so. A bash script is a supplied to carry out the setup, creating the account beforehand if the entered one does not exist yet.
Once the used account has already 'sudo' priviledges, it is also highly recommended to setup 'sudo' with no password, as described in section sudo with no password for intense uses. Alternatively, you can sudo with increased reentry timeout.
Platforms
Built upon BASH, AWK and standard system tools, MountPilot is deemed to offer a high compatibility level on most common Linux platforms.
It was primarily used and tested on Ubuntu 20 to 24. It was also tested the older system Debian 9. Requests for new platforms are to be submitted to michel.mehl@slashetc.eu
Prerequesites and Dependencies
MountPilot is implemented in BASH and AWK and relies upon standard system tools to operate. If not yet, gawk package is automatically installed at start.
For specific data sources, the dependency packages are installed on demand the first type these data sources are addressed. This is typically the case for VERA volumes and FUSE-based mounting tools like SSHFS. Therefore, packages are only installed when actually needed.
To get an exhaustive list of used packages depending on the data source, please refer to section System tools and packages
sumo command line
General usage
The exhaustive command usage and accepted arguments are documented in the manpages and can be checked on the command line by typing :
sumo -hListing the data sources and mounting status
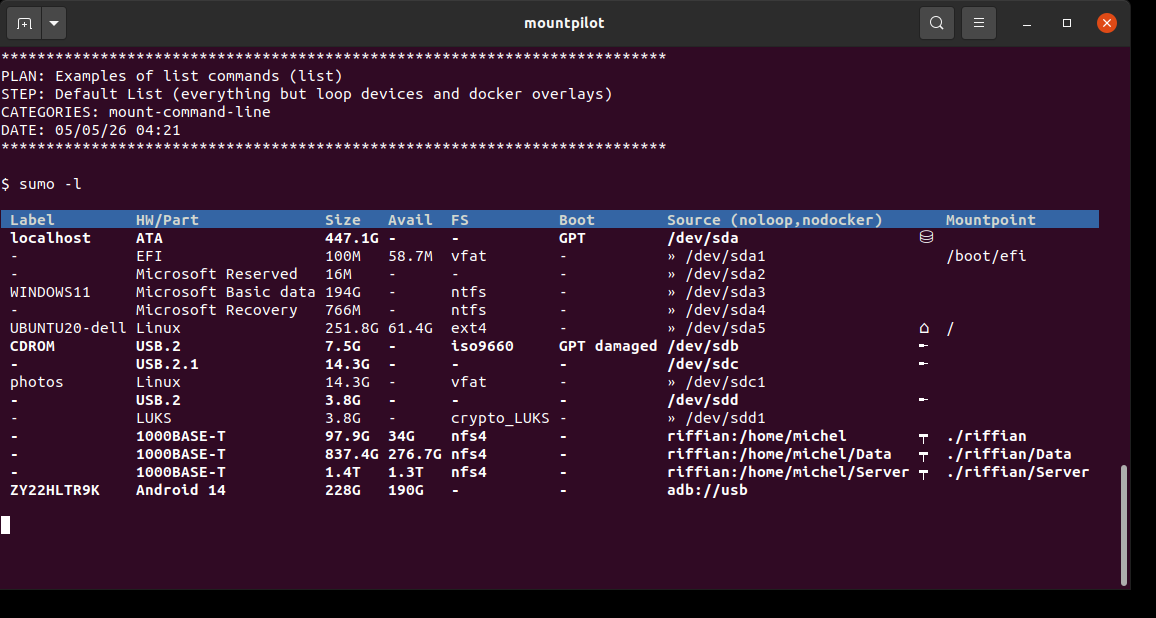
General usage
For listing the available data sources (devices and network connections) along with their mounting status and other information:
sumo [--display-format=<color scheme>]Using the -l option, a filter name can be specified to filter the displayed sources.
sumo -l <filter name> [--display-format=<color scheme>]The available data sources are presented in the form of a table which columns are described in the next section.
The --display-format is a pure comestic option which enables to control the list color scheme according to the desired look&feel. The default value can be defined by configuration. See General configuration for the possible values.
|
Data source table layout
| Column | Description | ||
|---|---|---|---|
label |
The label assigned to the file system, if the entry reflects a file system of a block device |
||
HW/Part |
The partition type, if the entry reflects a partition, otherwise the type of the hardware interface through which the data source is accessed. |
||
Size |
Overall size of the data source |
||
Avail |
Remaining space left |
||
FS |
Type of the file system if entry reflects a file system installed on a partition |
||
Boot |
Type of boot partition, e.g. GPT, MDR. |
||
Source |
Data source location (see section Data source location) |
||
Mountpoing |
If mounted, the folder path the data source is mounted on.
|
List filters
| Filter name | Description |
|---|---|
all |
Display absolutely all data sources, including loop devices and docker’s internal overlay file systems. |
free |
Show only not mounted data sources |
<BLK_TYPE>[1] |
Only list data sources of the specified type of block device. E.g.: 'disk', 'loop'. |
<FS_TYPE>[2] |
Only list data sources of the specified type of file system. E.g. 'ntfs', 'ext4'. |
<SEARCH STRING>[3] |
Do list those data sources which file system type or source location contains the specified string'. |
docker |
Show only docker’s internal overlay file systems. |
no<filter name> |
Excludes data sources that would have been selected using the specified filter name. E.g. 'noloop' excludes all loop devices, 'nodisk' excludes all disks. |
1 a device type as returned by lsblk.
2 a file system type as returned by blkid --list-filesystems.
3 the string is searched only after its has been searched for a block type or FS type matching exactly that string.
| By default, the loop devices are not displayed. This behavior is programmed in the configuration file and can be changed there. |
Examples
Default List (everything but loop devices and docker overlays)
sumo -lHere the list shows up the SSD of the running laptop (SATA interface) mapped to system device /dev/sda and
a connected USB key mapped to /dev/sdb.
The SDD features a dual boot system containing of 5 partitions, where Windows is installed on 2nd, 3rd and 4th partitions, and Linux on 5th (/dev/sda5).
The Windows data partition and Linux partitions are labeled resp. WINDOWS11 and UBUNTU20-dell
The USB key is labeled Boot-Repair-Disk 64bit.
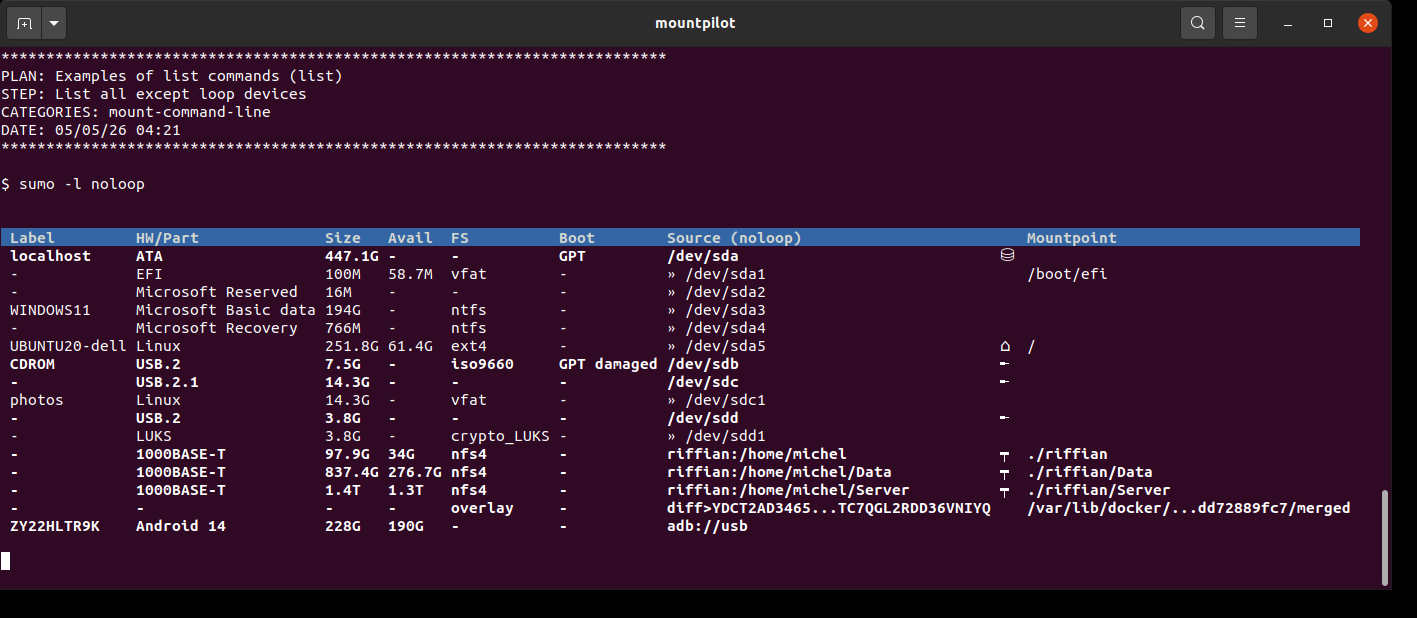
List all except loop devices
sumo -l noloopThis example is highlighted only for demonstration purposes to show what executes the default list.
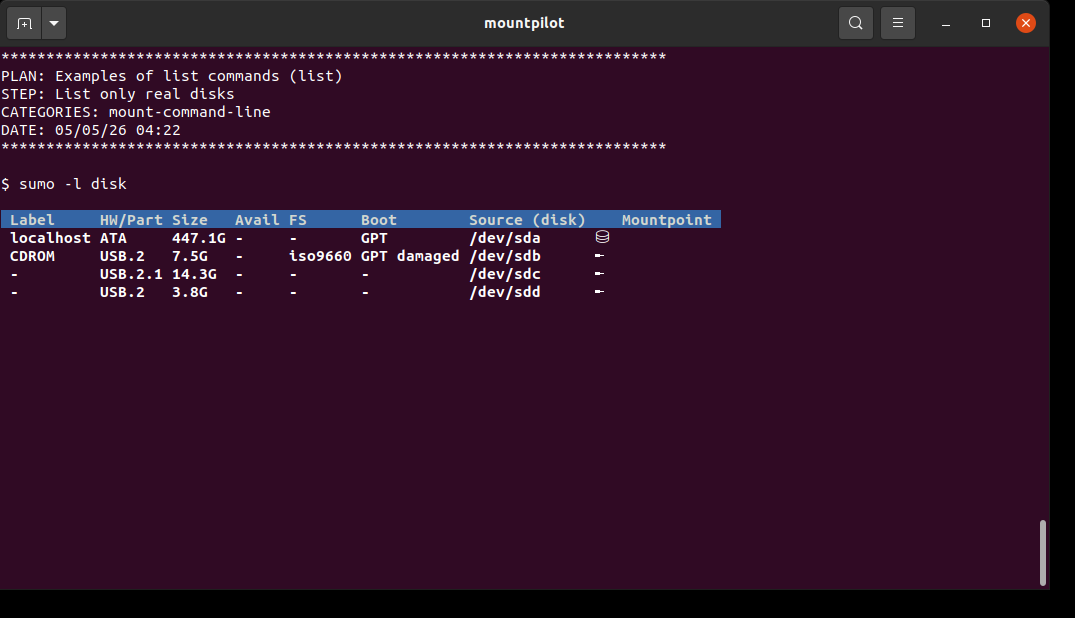
List only real disks
sumo -l diskThe list here shows only the actual disks, i.e. the SSD of the running laptop (SATA interface) and the USB key as described in the first example.
List only NTFS partitions
sumo -l ntfs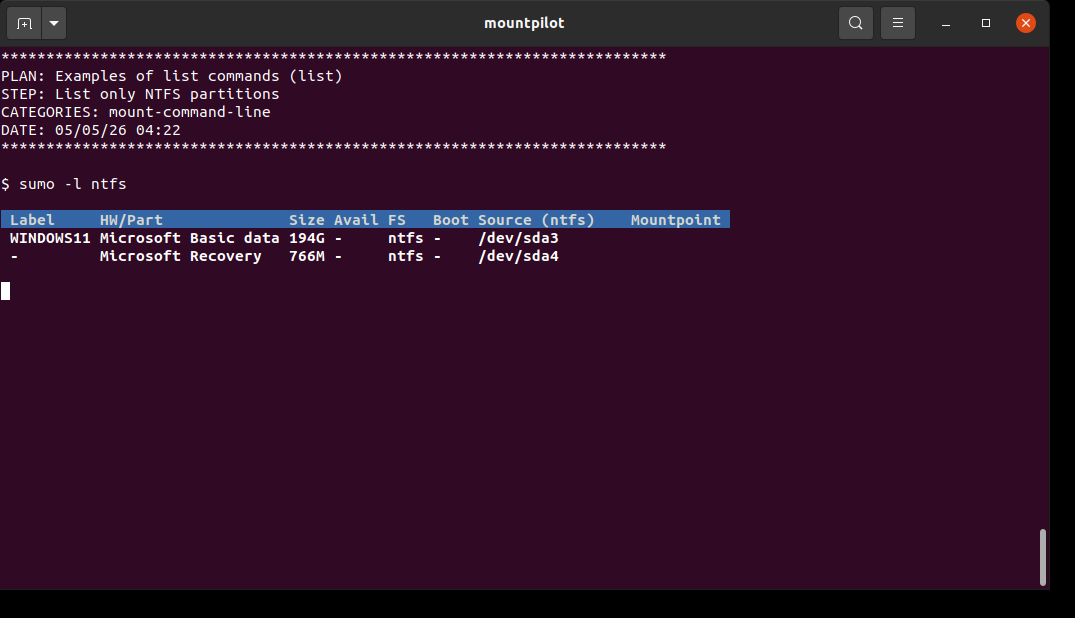
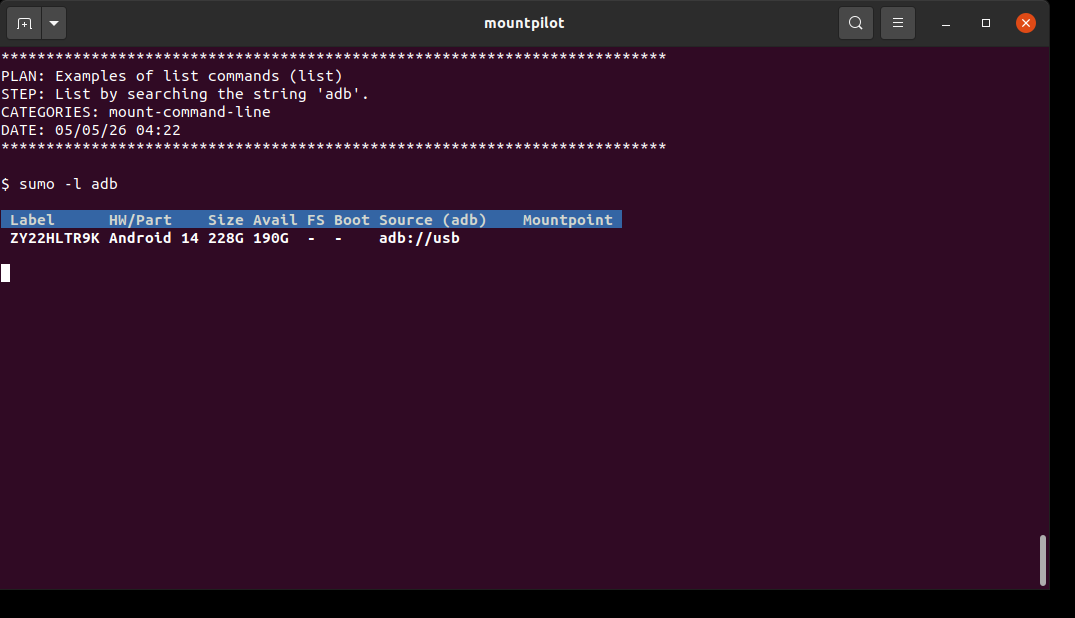
List by searching the string 'adb'.
sumo -l adbThis example highlights how to list data sources which file system name or/and location string contains the string 'adb'.
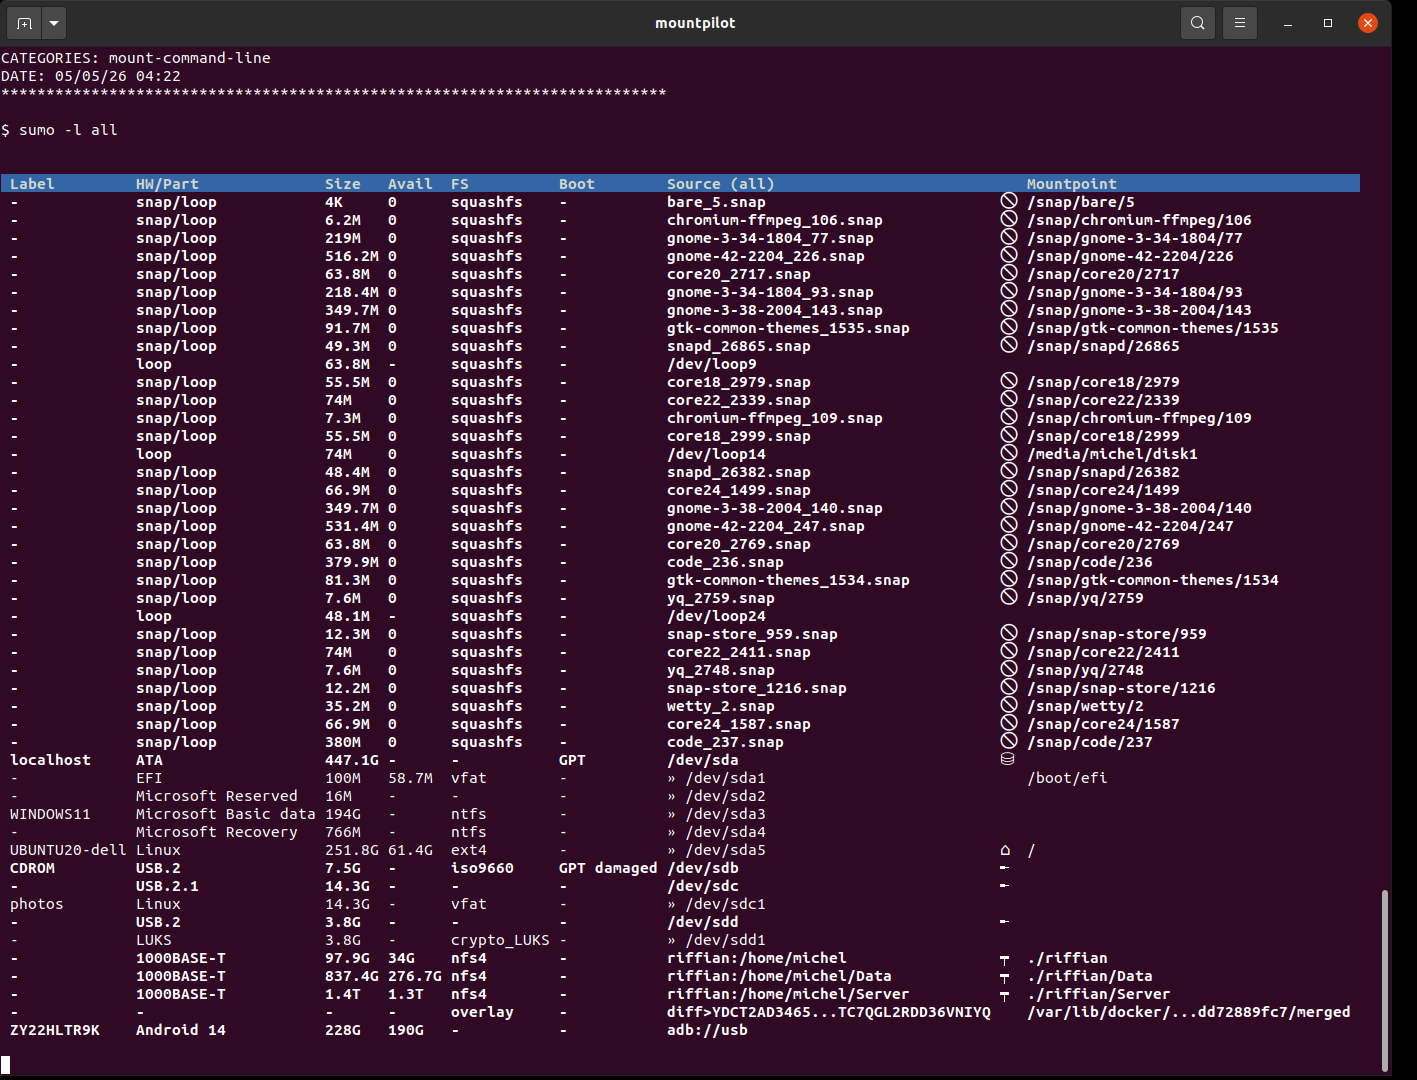
List all available data sources incl. loop
sumo -l allThis example highlights how to list absolutely all available data sources of any type, inclusive loop devices.
Default list using the 'bgcolor' display format
sumo -l --display-format=bgcolor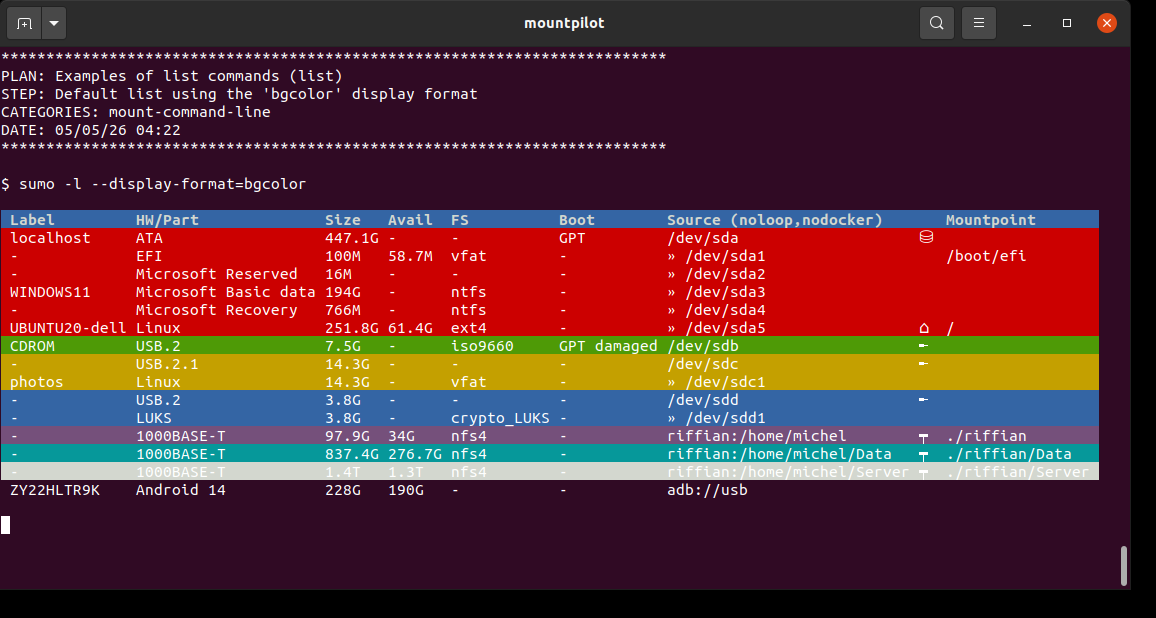
Default list using the 'color' display format
sumo -l --display-format=color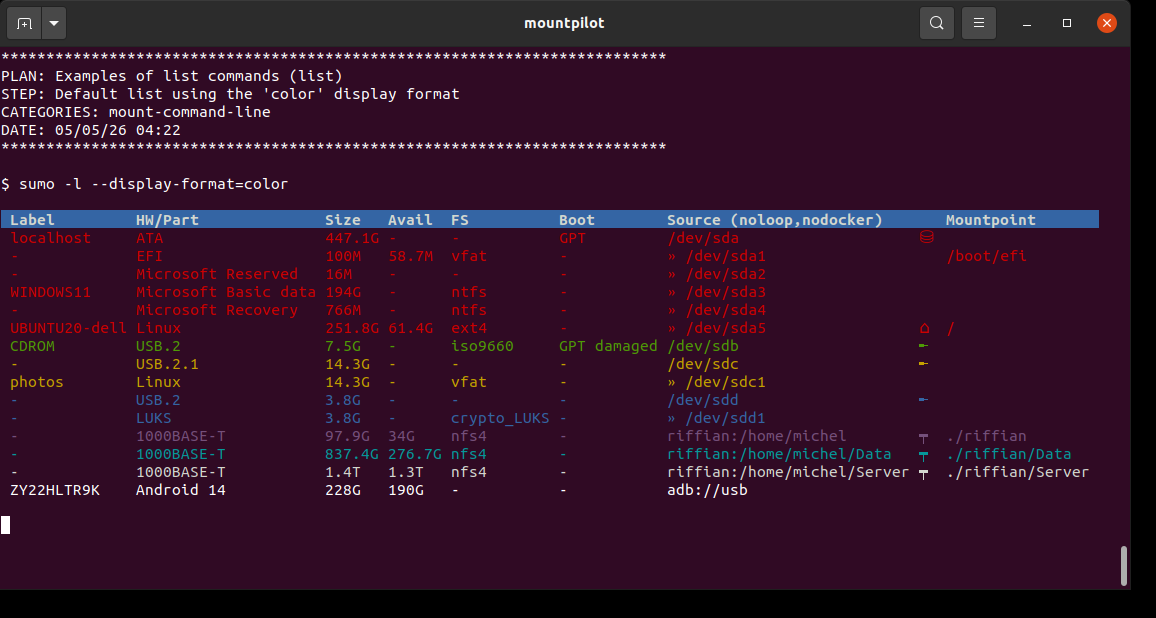
Mounting a data source
General usage
sumo [<OPTIONS>] <data source> [<mountpoint>]
sumo [<OPTIONS>] -L <label> [<mountpoint>]
A data source can be mounted by specifying the location string that identifies the data source (path, URL…) on the one hand and a destination folder on which the data source will be mounted on the other hand.
Alternatively to the location string, the data source can be selected using the label bound with it on system level (only when the data source is a block device).
The accepted format of the data source location is described in section Data source location.
If destination folder is not specified, a default one will be picked as described in section Destination mount folder.
Once mounted, the files stored on the data source can be accessed from inside the destination folder as if they were local files.
| The mountings are not persistent and do not survive reboots. |
Data source location
The following table describes the format of accepted strings for data sources.
| Strings enclosed within brackets are optional. |
| Strings enclosed within < and > are arguments which are replaced with actual values. |
| Data source type | String format | Comment |
|---|---|---|
block device |
<Device file path> |
System device path, e.g. |
overlay FS |
<upperdir>><lowerdir>[><lowerdir2>]* |
Note the '>' char separating upperdir and lowerdir. Lowerdir is the folder that will be overlayed by upperdir. No changes can be made on lower dir. It is possible to have multiple lower directories. |
NFS |
[nfs://]<host>:<dirpath> |
Dirpath is the remote folder to be mounted locally. Host can be a hostname or an IP address. e.g. |
SSH |
[ssh://]<login>@<host>:[<port>]/<path> or <login>@<host>[:<path>] |
e.g. mounting my remote home dir: |
UNC / SAMBA |
//<host>/<share> or smb://<host>[/<login>[:password]][/<share>]] |
e.g. |
FTP |
ftp://[<login>@]<host>[:<port>] |
e.g. |
Cloud |
<URL> |
|
Raw disk image |
<Disk file path>.img or <Device file path> |
A VERA encrypted volume can be either a file or directly mapped to partition on a device. e.g. |
VERA |
<Disk file path>.vera or <Device file path> |
A VERA encrypted volume can be either a file or directly mapped to partition on a device. e.g. |
luks |
<Disk file path>.luks or <Device file path> |
A LUKS encrypted volume can be either a file or directly mapped to a partition on a device. e.g. |
qcow2 and vdi virtual machine disks |
<Disk file path>.qcow2 <Disk file path>.vdi |
|
android |
adb://usb |
|
Destination mount folder
The following sections describe the usage of destination folders.
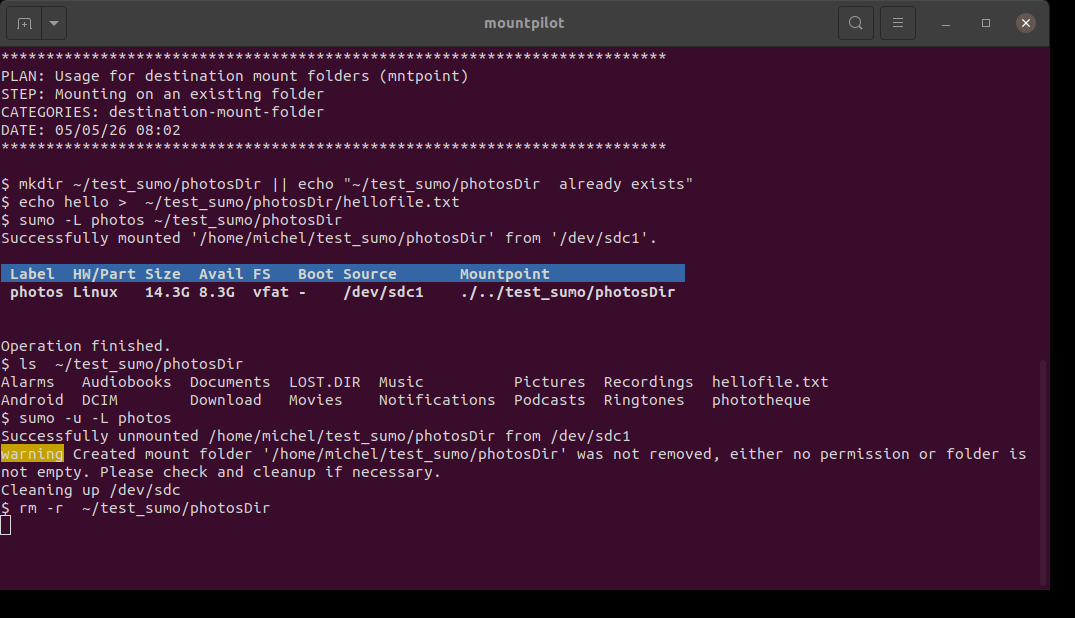
Folder already exists
When mounting on an existing folder which is not empty, the mounted content will mask the previous content and not change it.
Here mounting a USB key labeled 'photos' on the existing folder ~/test_sumo/photosDir created by this test beforehand.
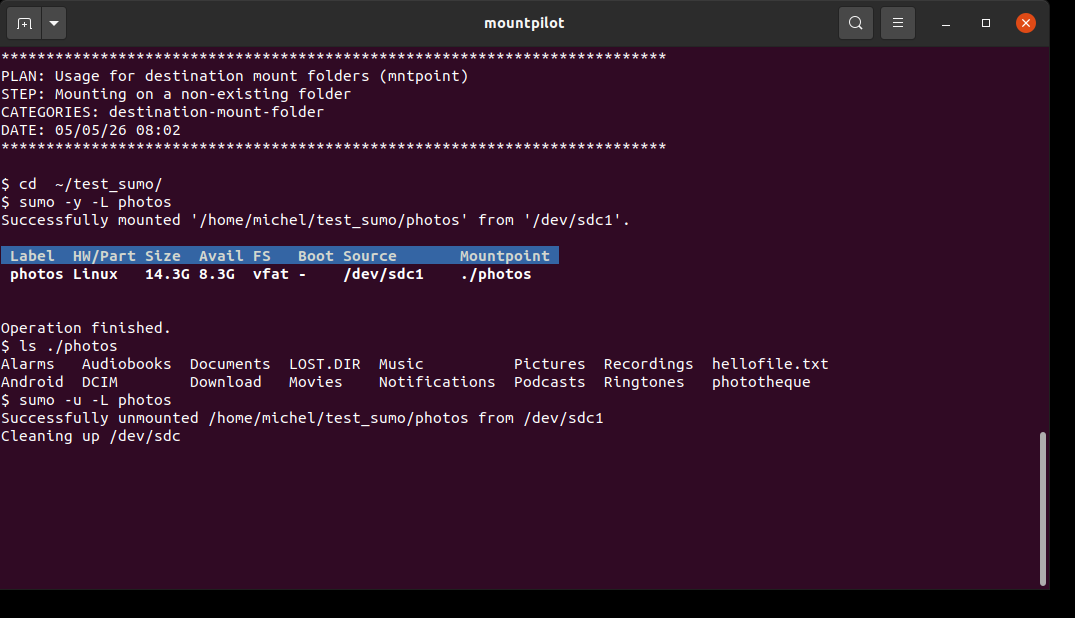
Folder does not exist
When mounting on a folder which does not exit yet, a default one is proposed in the current working directory as follows:
* If a label is associated with the data source, a folder which the name is the label
* In absence of any label, a folder holding the name of the last path component of the data source (e.g. sdc1 when device is /sdc/sdc1)
The user accepts the default value by typing enter key ↵ or by entering a name of its own.
If option -y is specified, the folder is created automatically using default value without prompting the user.
Here mounting a USB key labeled 'photos'. The default mount folder name is 'photos' and
is automatically created thanks to the -y option.
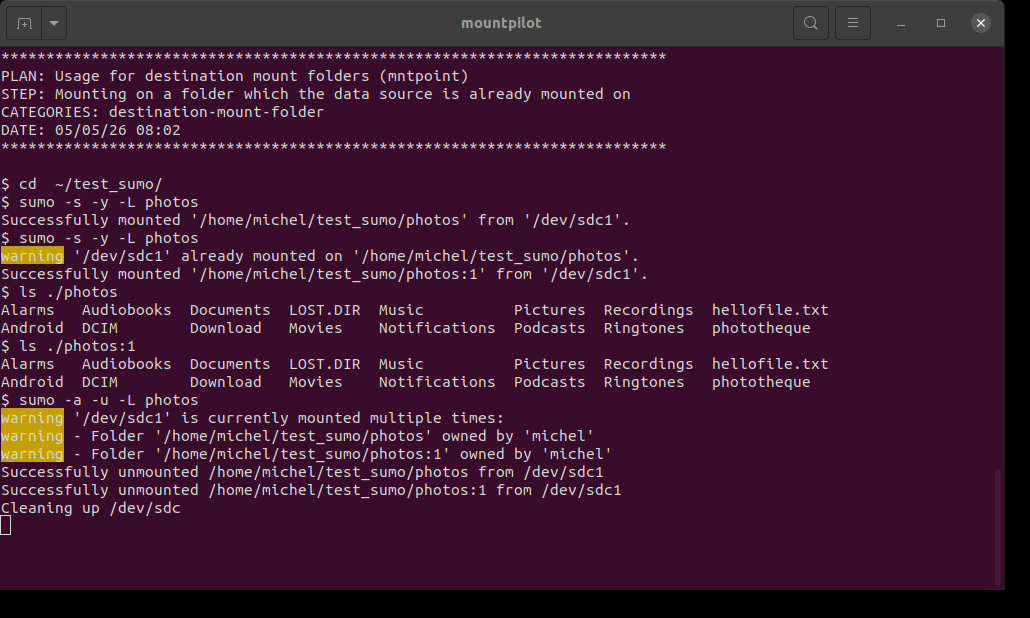
Data source already mounted on the same folder
When mounting on an existing folder which is the same data source is already mounted on, the default proposed destination folder will be supplemented with an index.
Here mounting twice the USB key labeled 'photos' using the proposed default value.
At the end, the two mounts are removed (unmounted) using option -a.
Mounting by label
Mass storages are usually assigned a label for easy identification. The label is associated with the hosted file system. When mounting a data source, the label can be specified using the -L option instead of the data source location.
sumo [OPTIONS] -L|--label= <volume label> [<mount folder>]sumo -y -L photos ./photosDirAn USB stick labeled 'photos' is mounted on the folder 'photosDir' and its content listed. At the end, the device is unmounted using the label as well.

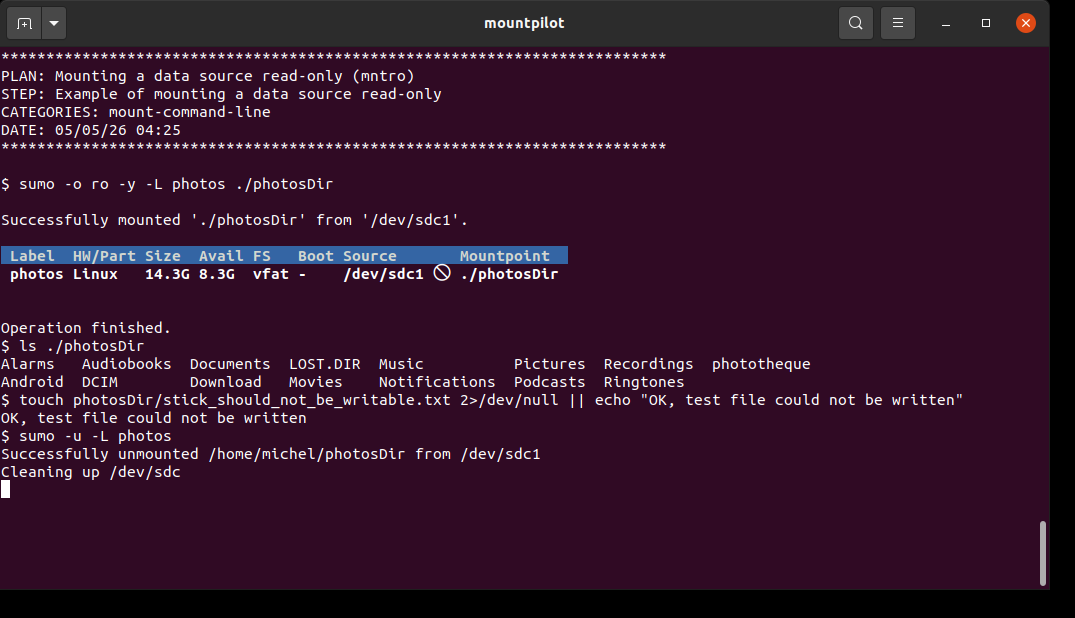
Mounting read-only
A data source can be mounted read-only by specifying option value 'ro' along with the option -o e.g. -o ro.
sumo [OPTIONS] -o ro <data source> [<mount folder>]sumo -o ro -y -L photos ./photosDirA USB stick labeled 'photos' is mounted read-only on the folder 'photosDir'. When the USB stick source is listed after its mounting, the round 'forbidden' symbol is shown. An attempt is made to write a file on it, which must not succeed.
Mounting a block device (disk, USB key…)
A block device is for example any of the following:
-
local disk
-
external mass storage device (e.g. USB key)
-
other devices appearing below /dev/ on the file systems
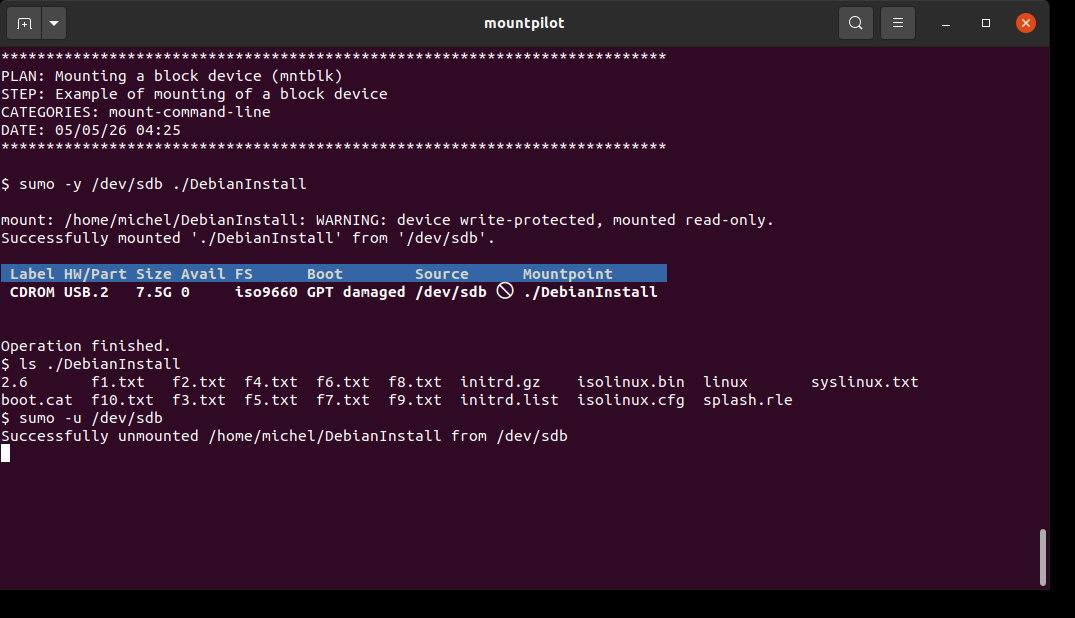
When a mass storage contains a file system and is partitionless, it can be mounted as shown in the example.
sumo [OPTIONS] <block device path> [<mount folder>]sumo -y /dev/sdb ./DebianInstallAn USB key contains a flashed image of a Debian installation image. There is no partition. The stick is mounted and its content listed. At the end, the device is unmounted using the device path.
Mounting a partition
sumo [OPTIONS] <partition device path> [<mount folder>]sumo -y /dev/sdc1 ./photosDirAn USB key which partition is mapped to device /dev/sdc1 is mounted on the folder 'photosDir'.
The content folder is listed. At the end, the device is unmounted using the device path.

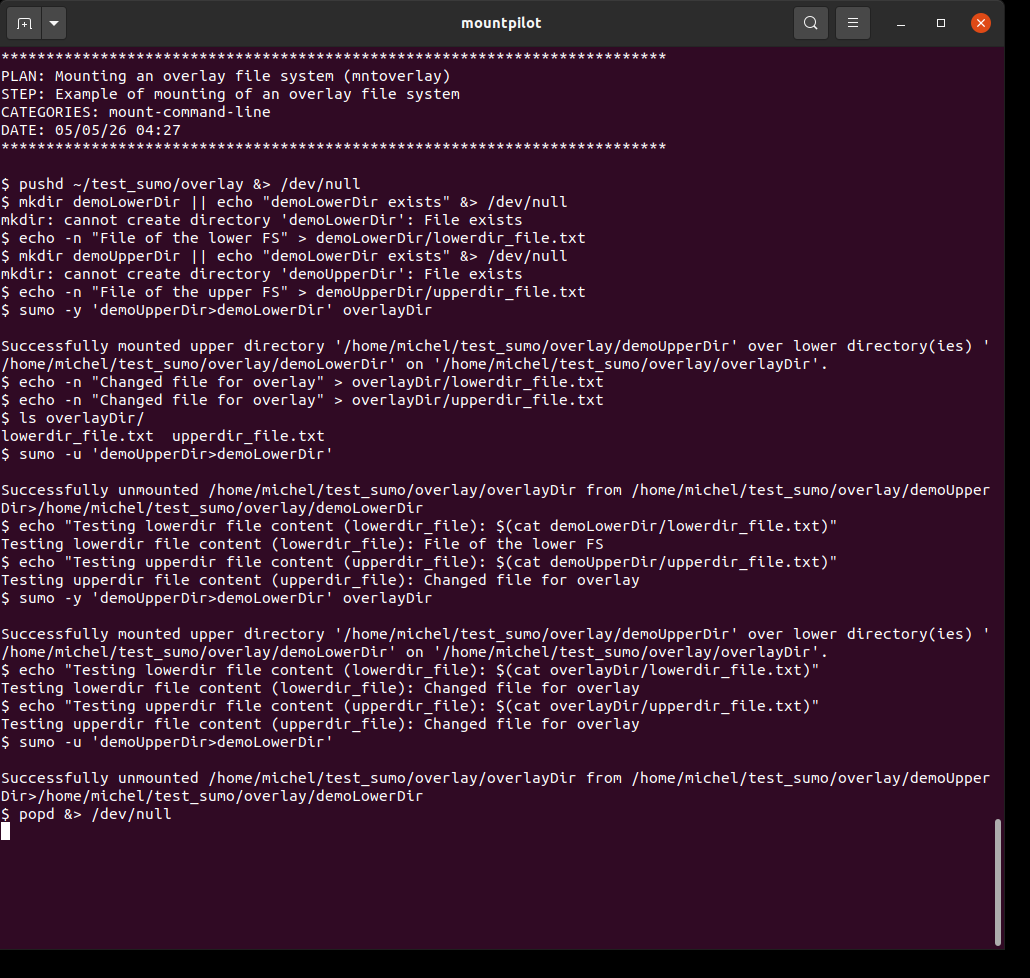
Mounting an overlay FS
An overlay FS enables to overlay a file tree, referred to as the lower file system, with another file called the upper file system. For futher information, please refer to the mount(8) manpages.
sumo [OPTIONS] <overlay path> [<mount folder>]where <overlay path> is of the form: upper_dir>lower_dir
where the upper directory and the lower directory are separated by '>'.
When there are multiple lower dirs, the lowest is always put at the right most position and all dirs are separated by '>' as well.
sumo -y 'demoUpperDir>demoLowerDir' overlayDirAn overlay FS is created where 'demoUpperDir' is the overlaying upper dir and 'demoLowerDir' the overlaid lower dir. Both files 'lowerdir_file.txt' of the lower dir and 'upperdir_file.txt' of the upper dir are modified. After unmounting, it is checked that the file of the upper dir holds the modifications, whilst the file of the lower dir is unchanged. After remounting, it is checked that the files of the mounted overlay dir still contains the modifications.
Mounting an Android device via adb
adb stands for Android Debug Bridge. It enables to inspect the content of an Android device via its debug interface.
| See also adbfs auto-installation. |
sumo [OPTIONS] adb://usb [<mount folder>]TODO exlain prerequesites
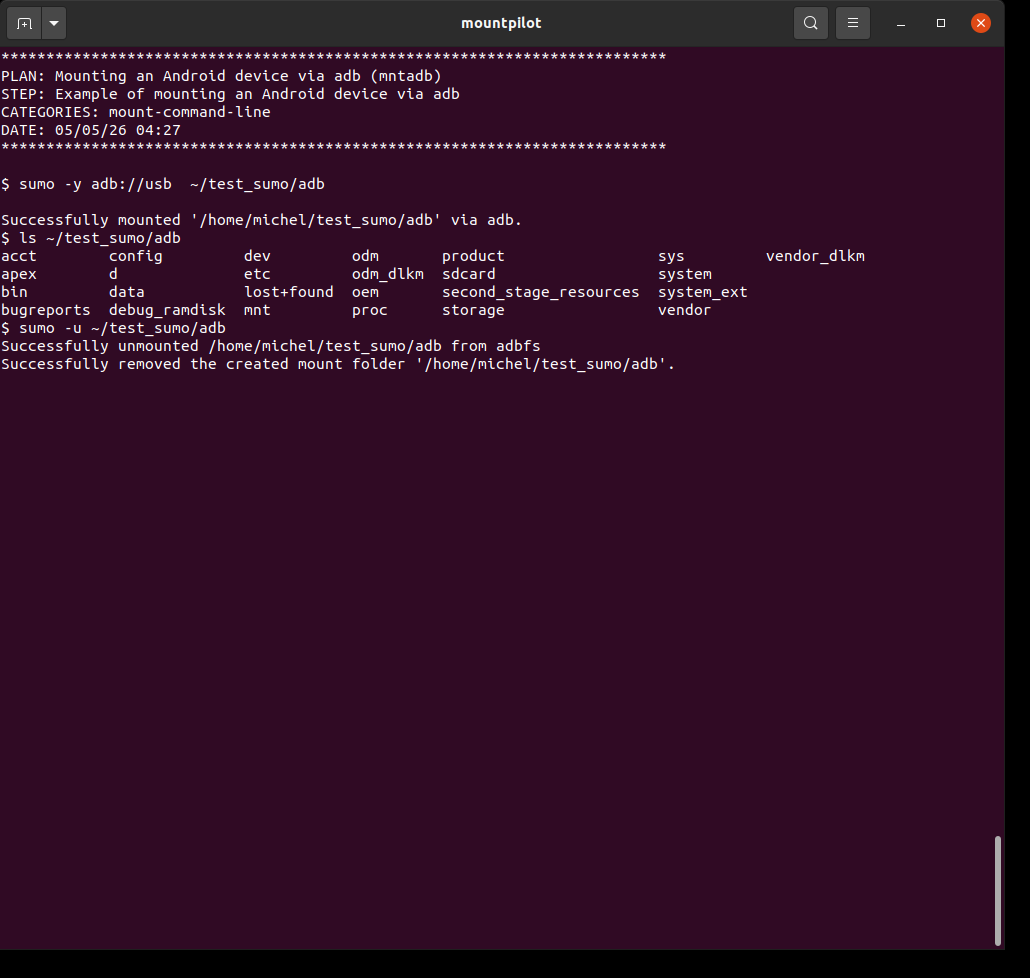
sumo -y adb://usb ~/test_sumo/adbAn Android tablet is mounted on folder '~/test_sumo/adb'. The folder content is listed. At the end, the folder is unmounted.
Mounting a NFS shared directory
NFS stands for Network File System. It is a protocol mainly used in the UNIX ecosystem which enables to share a folder on a LAN with high performance.
| MountPilot can detect whether a NFS server is running and install one when none, upon user’s confirmation. It also detects whether the NFS export file needs to be updated for the NFS mount to succeed and do so when requested. See section NFS exports setup on remote host and [NFS server installation]. Some configuration parameters may have to be adjusted for installation (see NFS setup and mount options). |
sumo [OPTIONS] <NFS URL> [<mount folder>]where <NFS URL> is of the form: nfs://host:remote directory path
The client-side and server-side NFS mount options can be controlled by configuration. See section NFS setup and mount options
sumo -y 192.168.0.12:/home/michel testNFSDirThe remote home of another host is mounted on folder 'testNFSDir'. The folder content of remote 'mnt' folder is listed. At the end, the NFS share is unmounted using the mounted folder itself.

Mounting a remote directory via SSH
The SSH protocol enables to open a session on a remote directory with a login and a password. SSH is secure because all communications are encrypted. SSH also allows to spare one from entering password for each session using SSH keys (auto-login).
| MountPilot offers, upon user’s confirmation, to setup an SSH auto-login by generating a SSH key and installing it on the remote host. This process is totally transparent to the user. Further information in section SSH auto-login. |
sumo [OPTIONS] <SSH URL> [<mount folder>]where <SSH URL> is of the form: login@host[:_port_]
The client-side SSHFS mount options can be tuned by configuration. See section SSH setup and mount options
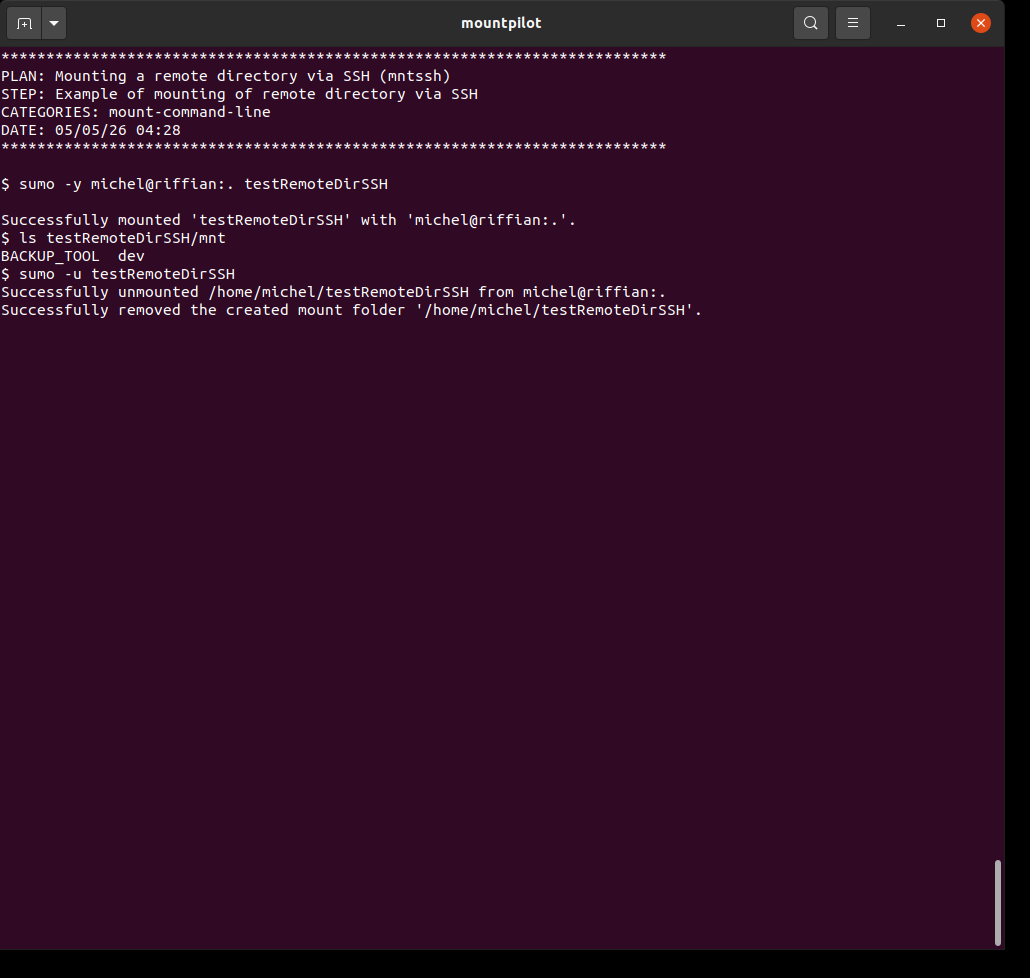
sumo -y michel@riffian:. testRemoteDirSSHThe remote home of another host is mounted on folder 'testRemoteDirSSH'. The folder content of remote 'mnt' folder is listed. At the end, the SSH folder is unmounted.
Mounting a Windows share
A remote Windows share can be mounted by specifying the address of the remote host (UNC or SAMBA URL), as well as the login and password of the remote account to open the SAMBA session. If either or both user and password are not given, the user will be prompted to enter them.
In contrast with SSH, password must be entered for each session. MountPilot may integrate such a feature in the future, either via a fstab entry or via a file like .netrc for FTP.
|
sumo [OPTIONS] <SAMBA URL | UNC address> [<mount folder>]where SAMBA URL is of the form: smb://[login:[password]@]host/share
where UNC address is of the form: //host/share
sumo -y //192.168.0.30/michel --user=michel --password=TH1_password ~/windows/The home of the remote Windows host 192.168.0.30 is mounted on folder 'windows'. The folder content of remote 'AppData' is listed. At the end, the Windows share is unmounted.

Mounting a FTP site
The FTP protocol enables to transfer files to and from a distant host through a session opened with login and password. FTP also allows to spare one from entering password for each session thanks to the .netrc file (man netrc).
MountPilot makes usage of .netrc transparent to the user. It generates and manages a .netrc file each accessed FTP site, which is saved with the proper permissions in the user’s home.
|
| MountPilot can detect whether a FTP server is running and install one when none, upon user’s confirmation. See [FTP server installation]. Some configuration parameters may have to be adjusted for installation. See section FTP setup and mount options. |
sumo [OPTIONS] <FTP URL> [<mount folder>]where FTP URL is of the form: ftp://host[:_port_] [target folder]
If password is not given, the user will be prompted to enter one. If login is not specified in the URL, the current user login is used by default.
The client-side FTP mount options can be tuned by configuration. See section FTP setup and mount options
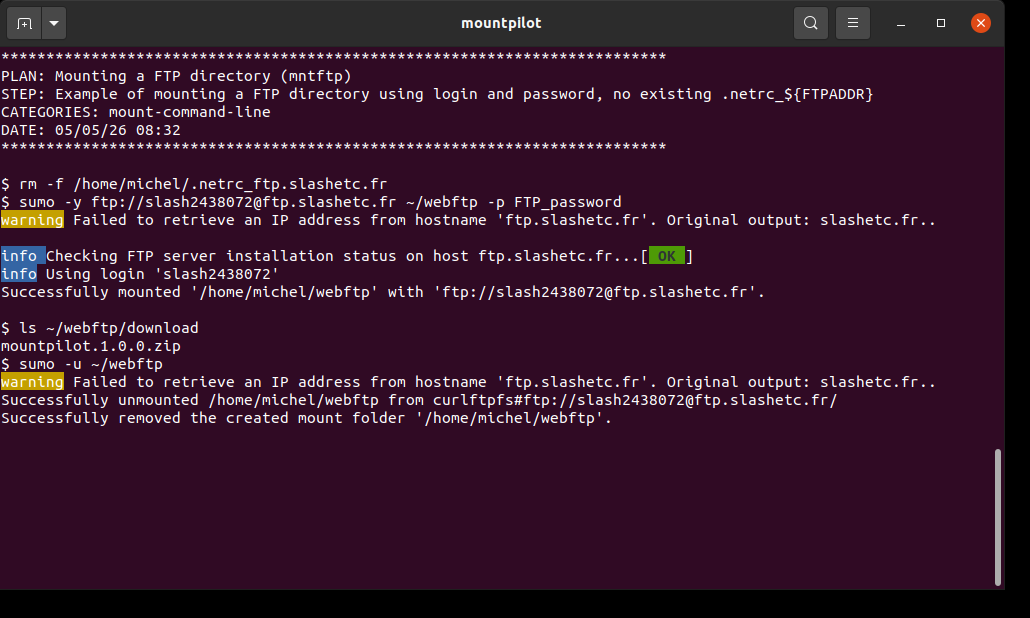
sumo -y ftp://slash2438072@ftp.slashetc.fr ~/webftp -p FTP_passwordThe FTP site ftp://slash2438072@ftp.slashetc.fr is mounted on folder 'webftp'. The 'download' folder content is listed. At the end, the FTP site is unmounted.
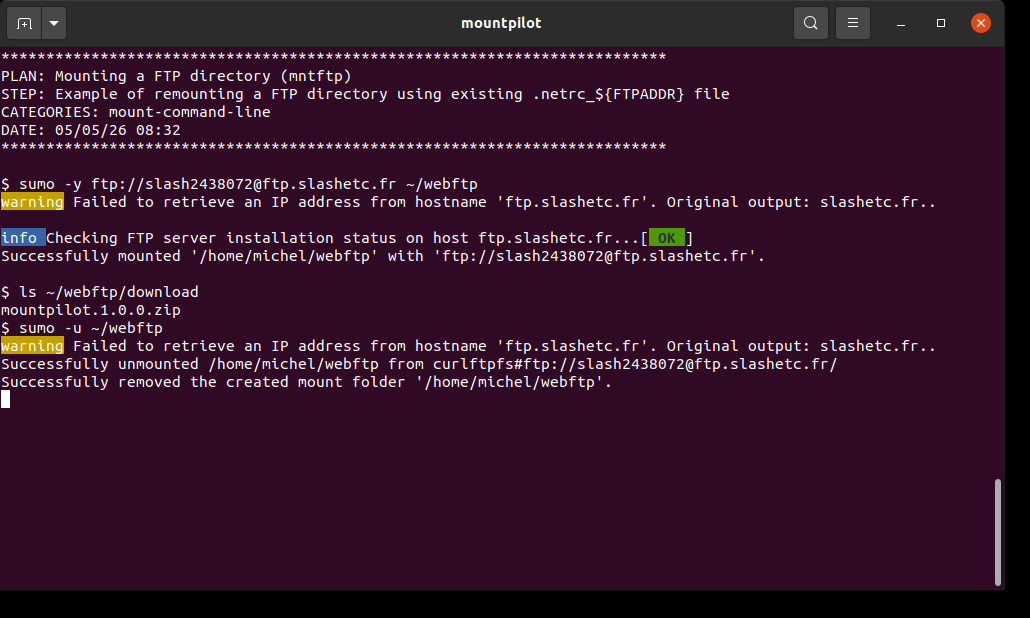
sumo -y ftp://slash2438072@ftp.slashetc.fr ~/webftpThe FTP site ftp://slash2438072@ftp.slashetc.fr is mounted on folder 'webftp' using the credentials stored in .netrc_ftp.slashetc.fr that should have been generated in previous test. The 'download' folder content is listed. At the end, the FTP site is unmounted.
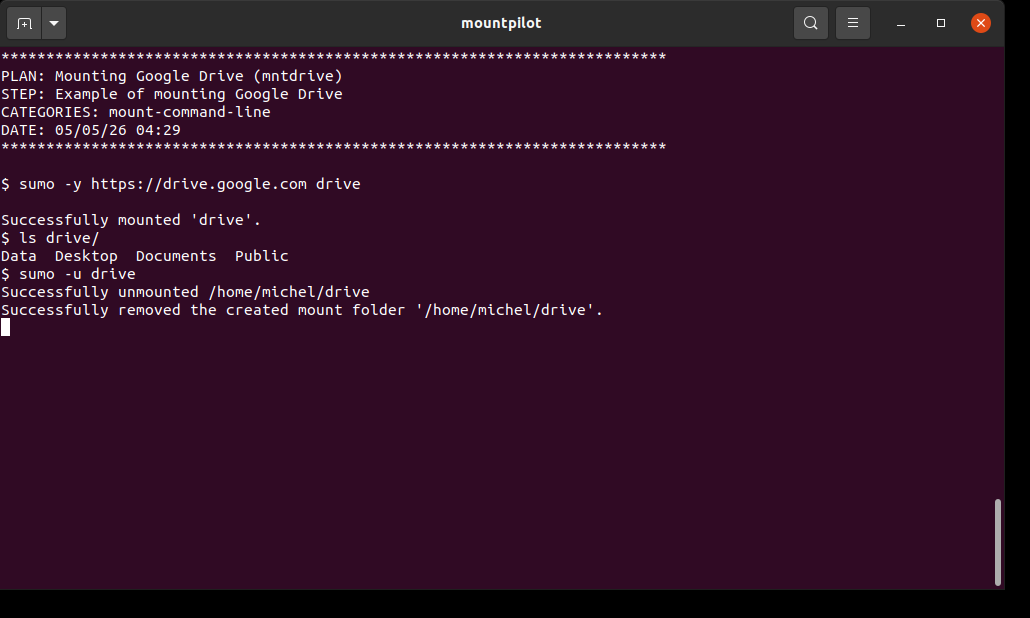
Mounting a Google Drive
| To use this feature, the [Google Drive auto-connection via OAuth IDs] must be set up beforehand. |
sumo [OPTIONS] http://drive.google.com [<mount folder>]The default mount options can be tuned by configuration. See section Google Drive setup and mount options The test
sumo -y https://drive.google.com driveThe Google Drive is mounted on folder 'drive'. The folder content is listed. At the end, the drive is unmounted. Preconditions: [1] The Google secrets have been pregenerated and put in configuration file ~/.config/Sumo/sumo.yml: … google client id: 637374942720-uct976icvfcq8emmsfrdujd35j40pd8q.apps.googleusercontent.com google secret id : [INTENTIONALLY MASKED SECRET ID] [2] The following must be executed then to verify the credentials, the user will be asked to verify twice: sumo -y https://drive.google.com drive --refresh-deps sumo -u ./drive # if successfull verification
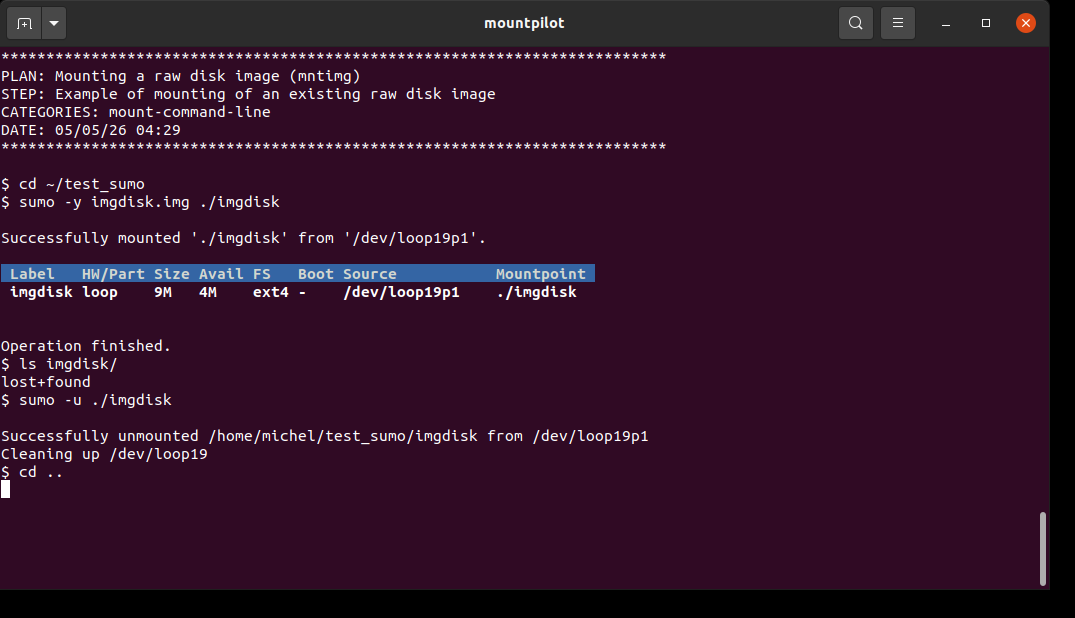
Mounting a raw disk image
sumo [OPTIONS] <disk file name>.img [target folder]sumo -y imgdisk.img ./imgdiskThe raw disk image is mounted on folder 'imgdisk'. The folder content is listed. At the end, the disk file is unmounted. precondition: ~/test_sumo/imgdisk.img exists
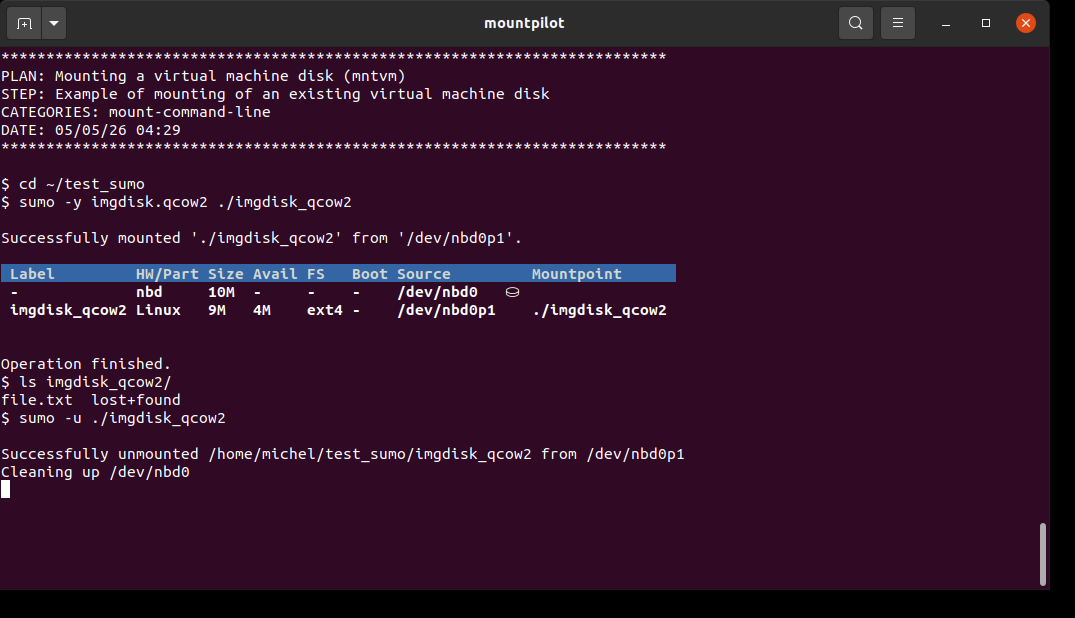
Mounting a virtual machine disk
To mount a virtual machine disk, the user has simply to pass the path to the disk file. Tested VM disk formats are qcow2 and vdi.
sumo [OPTIONS] <disk file name>.(qcow2|vdi) [target folder]sumo -y imgdisk.qcow2 ./imgdisk_qcow2The virtual disk image is mounted on folder 'imgdisk_qcow2'. The folder content is listed. At the end, the disk file is unmounted. precondition: ~/test_sumo/imgdisk.qcow2 exists
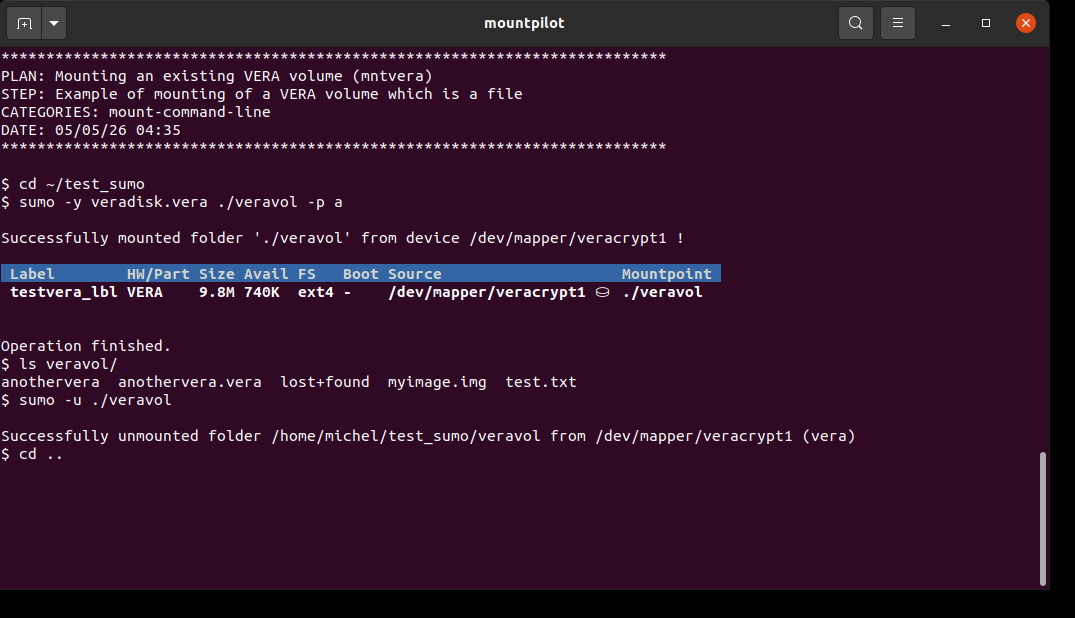
Mounting a VERA volume
VERA provides encryption for file systems in so-called VERA volumes.
A VERA volume can either be :
-
a plain file which content is locked by password. Once unlocked, the file system inside the encrypted disk file becomes readable.
-
directly hosted as a partition on a device.
To mount a VERA disk file or VERA device, the user has simply to pass the path to the disk file resp. the block device as argument.
| If not installed yet, the necessary VERA package will be automatically installed. Some configuration parameters may have to be adjusted for installation. See section VERA setup and mount options. |
sumo [OPTIONS] <disk file name>.vera [target folder]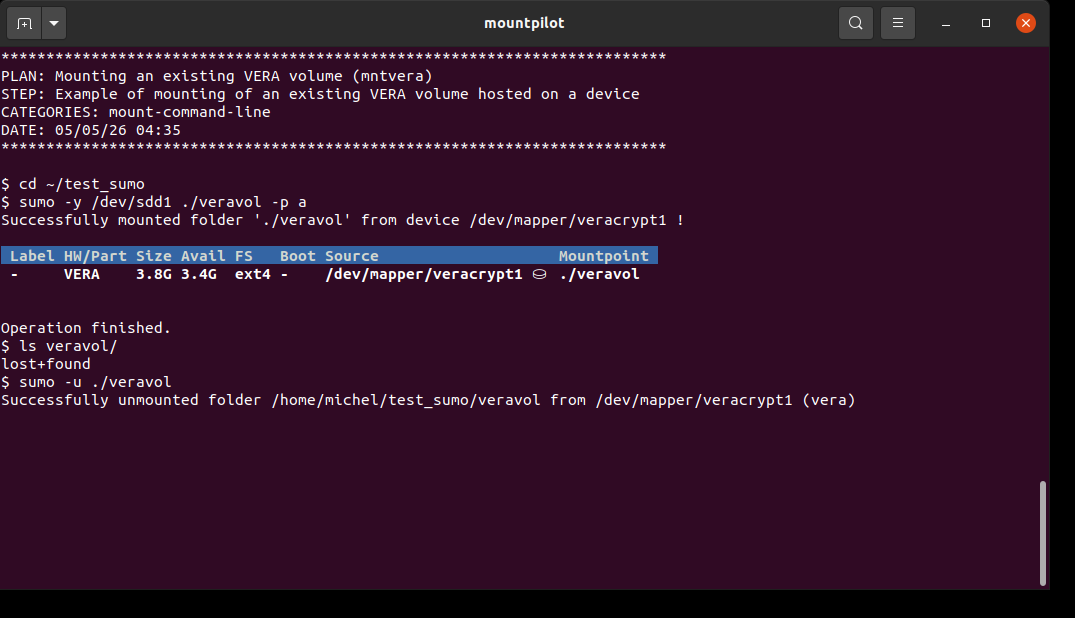
sumo [OPTIONS] <block device> [target folder]sumo -y veradisk.vera ./veravol -p aThe VERA disk file is mounted on folder 'veravol'. The folder content is listed. At the end, the disk file is unmounted. precondition: ~/test_sumo/veradisk.vera exists
sumo -y /dev/sdd1 ./veravol -p aThe VERA volume hosted on the device /dev/sdd1 (USB stick) is mounted on folder 'veravol'. The folder content is listed. At the end, the device is unmounted. precondition: the test stick can be formatted as VERA as follows: - open mountpilot console, - select stick device - type 'f', - select 'vera', <enter> - partitionless? enter 'NO' , <enter> - then select 'ext4' as file system, <enter> - enter and confirm password 'a', <enter>
Mounting a LUKS volume
LUKS is the native file system encryption of Linux.
A LUKS volume can either be :
-
a plain file which content is locked by password. Once unlocked, the file system inside the encrypted disk file becomes readable.
-
directly hosted as a partition on a device.
To mount a LUKS disk file or a LUKS device, the user has simply to pass the path to the disk file resp. the block device as argument.
| The default LUKS volume name is the basename of the specified file. |
| If not installed yet, the necessary package(s) will be automatically installed. This process is totally transparent to the user. |
sumo [OPTIONS] <disk file name>.luks [target folder]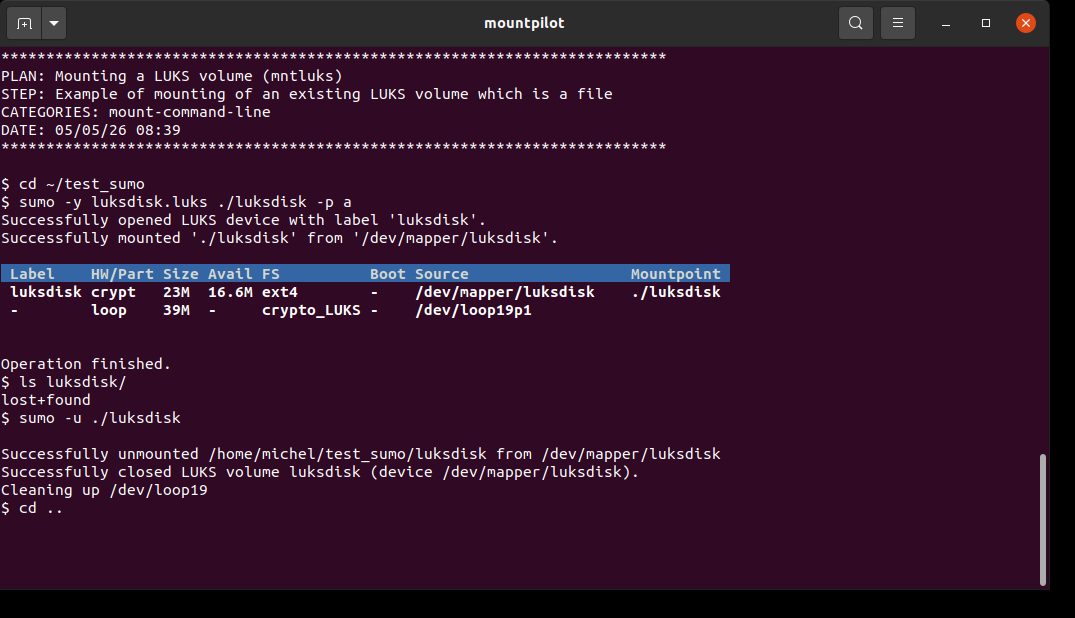
sumo [OPTIONS] <block device> [target folder]sumo -y luksdisk.luks ./luksdisk -p aThe LUKS disk file is mounted on folder 'luksdisk'. The folder content is listed. At the end, the disk file is unmounted. precondition: ~/test_sumo/luksdisk.luks exists
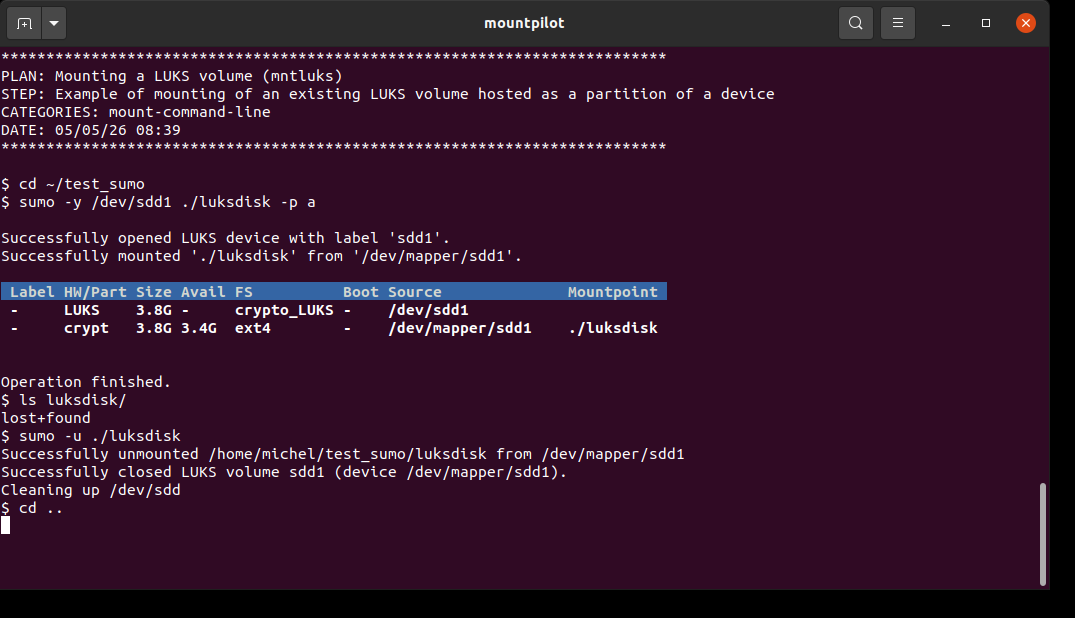
sumo -y /dev/sdd1 ./luksdisk -p aThe LUKS volume hosted on the device /dev/sdd1 (USB stick) is mounted on folder 'luksdisk' and its content is listed. At the end, the device is unmounted. precondition: the test stick can be formatted as LUKS as follows: - open mountpilot console, - select stick device - type 'f', - partitionless? enter 'NO' , <enter> - select 'LUKS', 'partitionless' , <enter> - then select 'ext4' as file system, <enter> - enter and confirm password 'a', <enter>
Mounting nested data sources
A data source may contain another data source which can in turn be mounted.
Unmounting the parent data source will request the unmouting of any contained mounted data source.
sumo [OPTIONS] <data source> [target folder]
sumo [OPTIONS] <target folder>/.../<data source2> [target folder 2]
...sumo -y -L WINDOWS11 ~/WINDOWS11
sumo -y ~/WINDOWS11/Users/miche/Documents/vault/personnel-confidentiel.vera ~/vault # /dev/sda3There’s a VERA volume file located on a Windows partition labeled 'WINDOWS11' (/dev/sda3).
First the Window partition is mounted, then the VERA volume located inside it.
At the end, the Windows partition is unmounted.
Because sumo is aware of nested mounts, it will request to confirm
the unmounting of the nested VERA volume as well.
The confirmation is entered automatically here using both the -y and -f options. Note for the sake of safety
specifying only -y is not enough in this specific case.

Mounting LVM volumes
MountPilot is capable of detecting LVM volumes inside a data source. When mounting the data source, all LVM volumes inside it will be mounted all at once.
When there ares multiple LVM volumes, there will be a mount folder for each of them, located below the parent mount folder created for the data source.
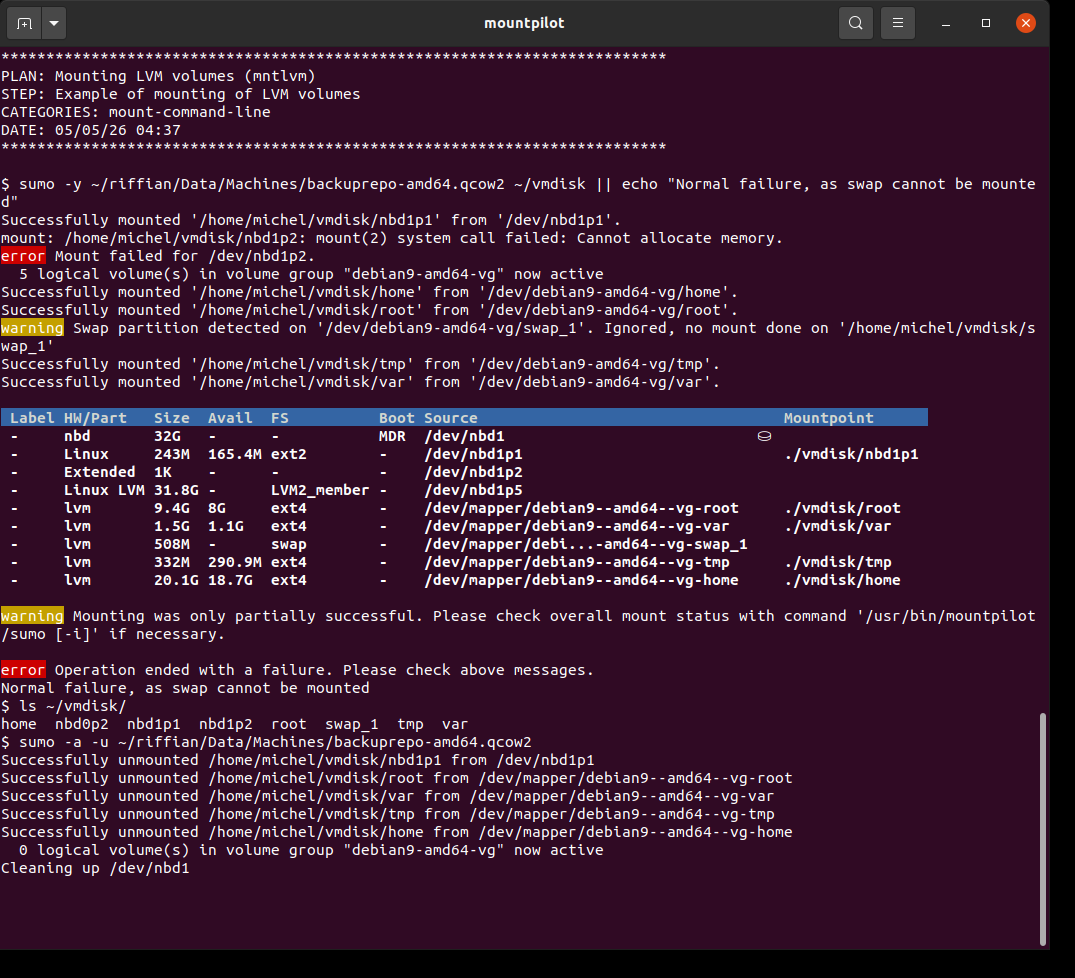
sumo [OPTIONS] <data source> [target folder]sumo -y ~/riffian/Data/Machines/backuprepo-amd64.qcow2 ~/vmdisk || echo "Normal failure, as swap cannot be mounted"The data source is here a full Debian9 VM disk that has been partitionned with LVM. The disk contains several LVM volumes which are mounted all together. Note that device nbd0p2 cannot be mounted because it is a swap partition. Once mounted, its content is listed. At the end, the whole disk and all LVM volumes are unmounted all at once. Regarding the unmount, please check also section Unmounting LVM volumes.
Passing on native tool mount options
Options for the native mount tools can be passed on command line along with the option -o.
E.g. to mount a device read-only, one can add -o ro to the sumo command.
Permanent default options can also be defined by configuration. See Configuration.
Access restrictions
| There may be access restrictions for mounted data sources. E.g. a mounted NFS folder may not have access to sub-folders which have been themselves mounted independently on the server side. Usually, the level of access permission is controlled on a server-side configuration when the native mount tool is used and a local configuration parameters when FUSE tool is used for the mounting. |
Unmounting a data source
General usage
sumo [<OPTIONS>] -u <data source>
sumo [<OPTIONS>] -u <mountpoint>
sumo [<OPTIONS>] -L <label>
A data source can be unmounted either by specifying the location string that identifies the data source (path, URL…) or by specifying the mounted folder on which the data source was mounted on.
Alternatively, the data source to unmount can be selected using the label bound with it on system level (only when the data source is a block device).
| The accepted format of the data source location is described in section Data source location. |
Unmounting using the mounted folder
Passing the mounted folder to the unmount command will unmount the exact single data source mounted on this folder.
MountPilot will identify the type of data source bound with the folder and use the appropriate tool to release the folder depending on the type of the data source.
sumo -u <mountpoint folder path>sumo -u ~/photosDir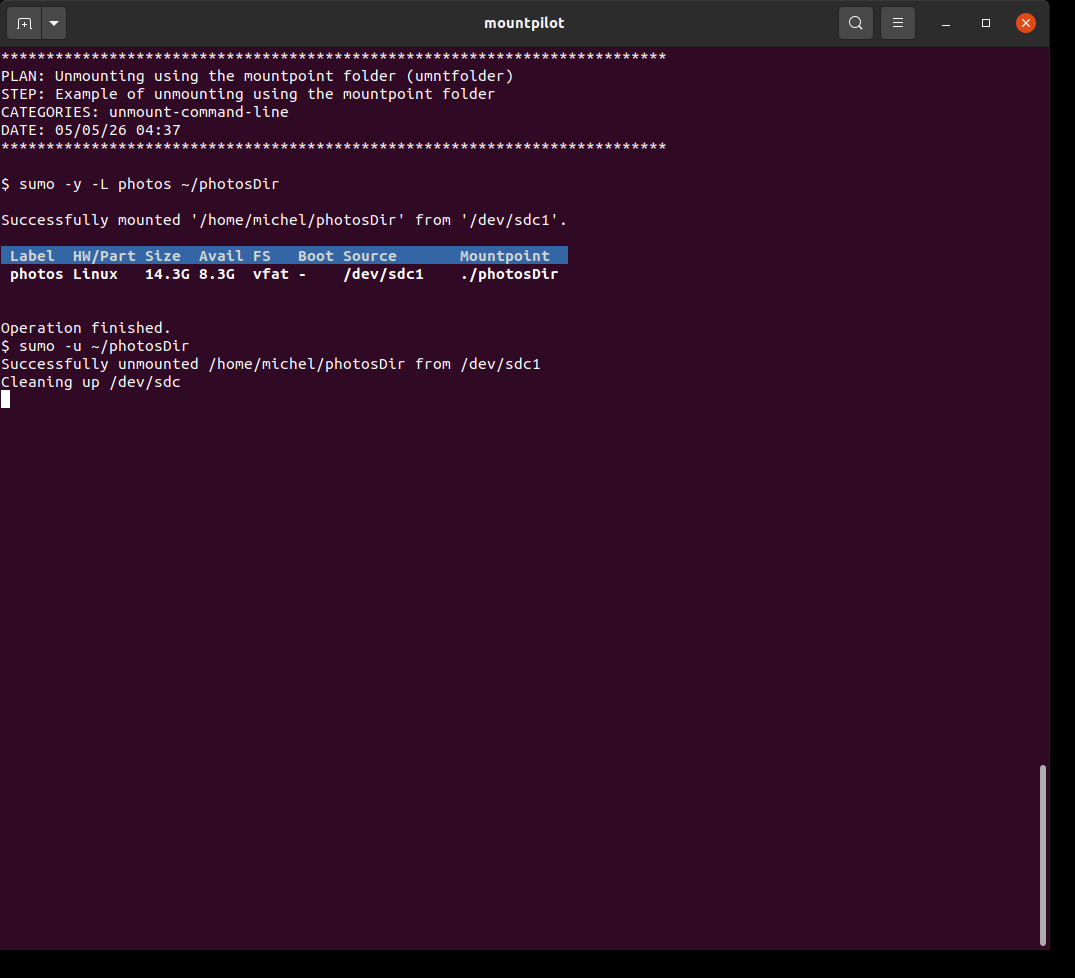
Numerous examples are also given in section Mounting a data source.
Unmounting using the device label
Passing the label of the device to the unmount command will unmount the exact single data source bound with that label on system level.
MountPilot will retrieve the device bound with that label and use the appropriate tool to release the folder depending on the type of the data source.
sumo -u -L <label>sumo -u -L photos
An example is also provided in section Label-based Mounting.
Unmounting using the data source location
In most cases, a data source may only be mounted once, but it could also have been mounted multiple times.
Passing the data source location to the unmount command enables to unmount any mountpoint attached to that data source, provided the -a is passed on along. Indeed, for security reasons, the unmounting will be denied in case of several mounts of the exact same data source exists.
With option -a, all mountpoints bound with the same data source are retrieved and unmounted with the appropriate tool.
Examples of unmounting using data source are already to be found in the following sections:
-
Mounting a block device (disk, USB key…) : unmounting of a USB key using the system device path.
-
Mounting an overlay FS : unmounting of an overlay FS using the special overlay location string.
Here below there’re additional examples for the other types of data sources:
sumo -u <block device>
sumo -u <overlay path>
sumo -u adb://usb
sumo -u [nfs://]<host>:<dirpath>
sumo -u ftp://[<login>@]<host>[:<port>]
sumo -u [ssh://]<login>@<host>:[<port>]/<path>
sumo -u <login>@<host>[:<path>]
sumo -u smb://<host>[/<login>[:password]][/<share>]]
sumo -u //<host>/<share>
sumo -u <HTTP URL>
sumo -u <disk file name>sumo -s -u riffian:/home/michel/Data/Scan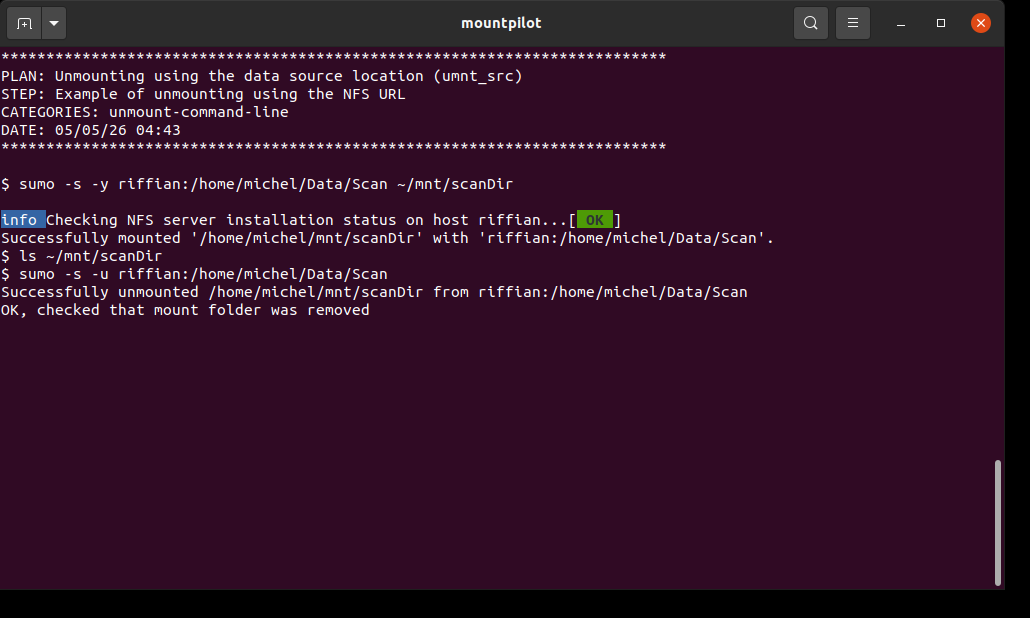
sumo -s -u michel@riffian:Data/Scan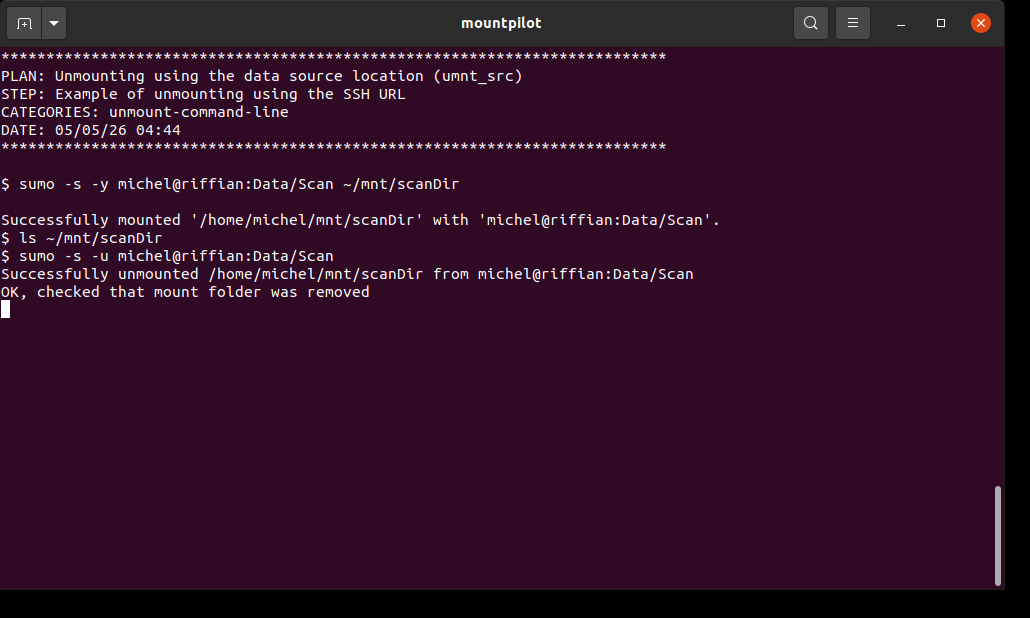
sumo -s -u //192.168.0.30/michel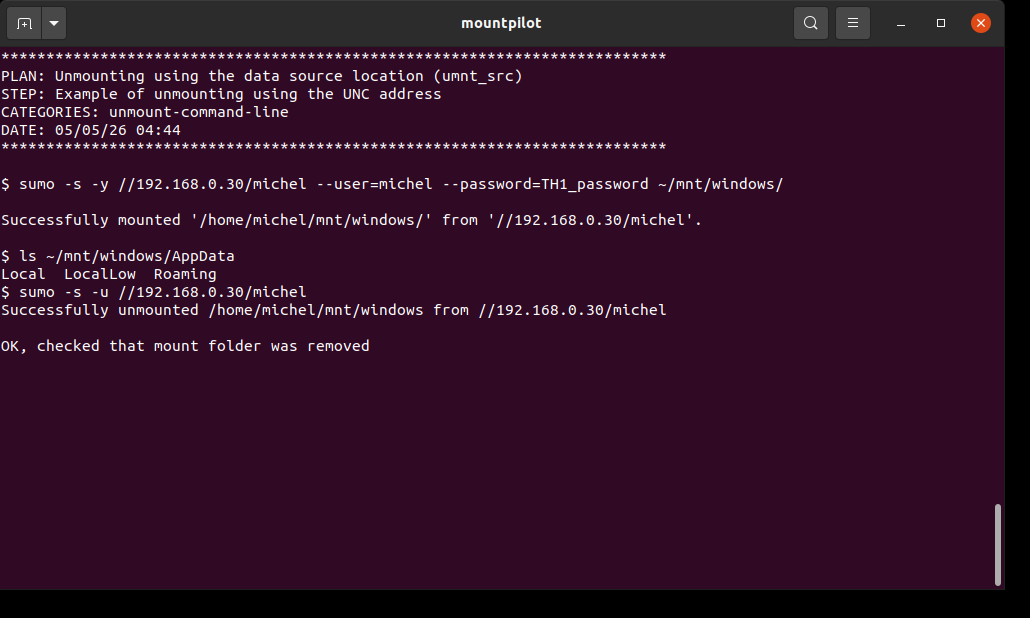
sumo -s -u ftp://slash2438072@ftp.slashetc.fr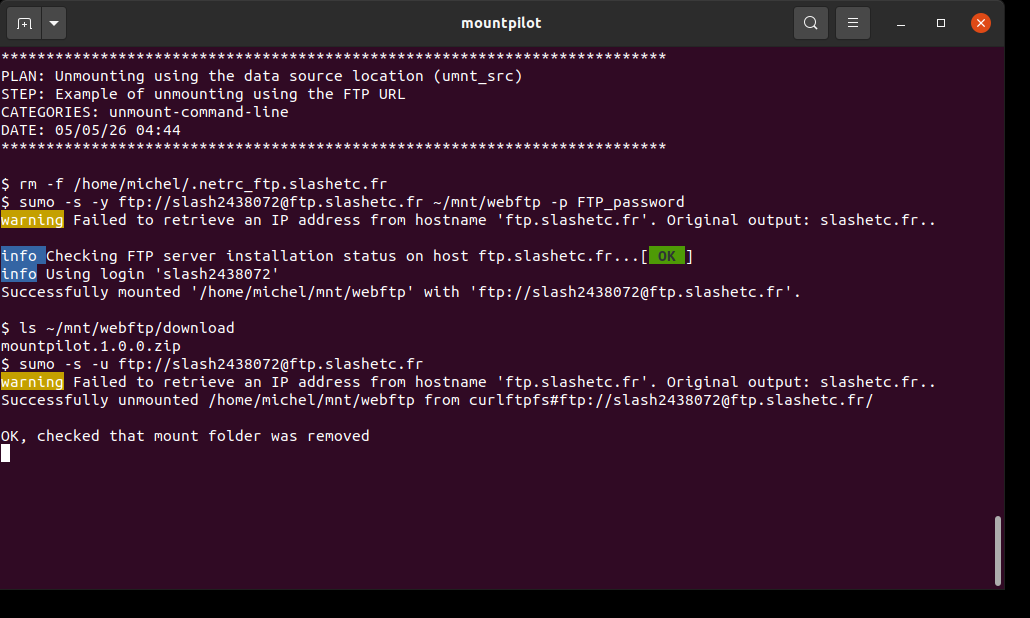
sumo -s -u https://drive.google.com
sumo -s -u veradisk.vera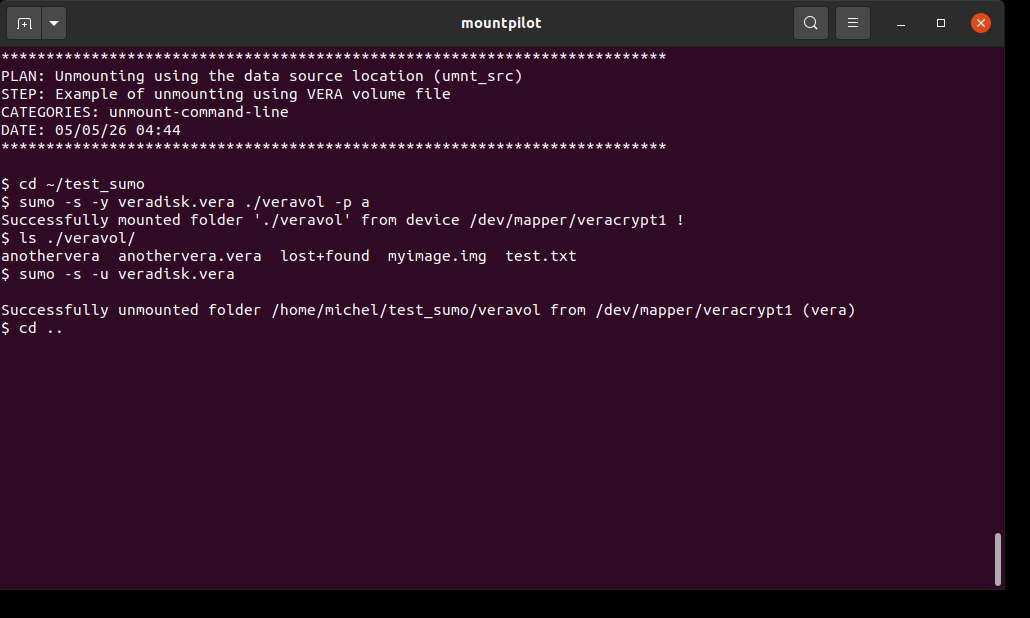
sumo -s -u luksdisk.luks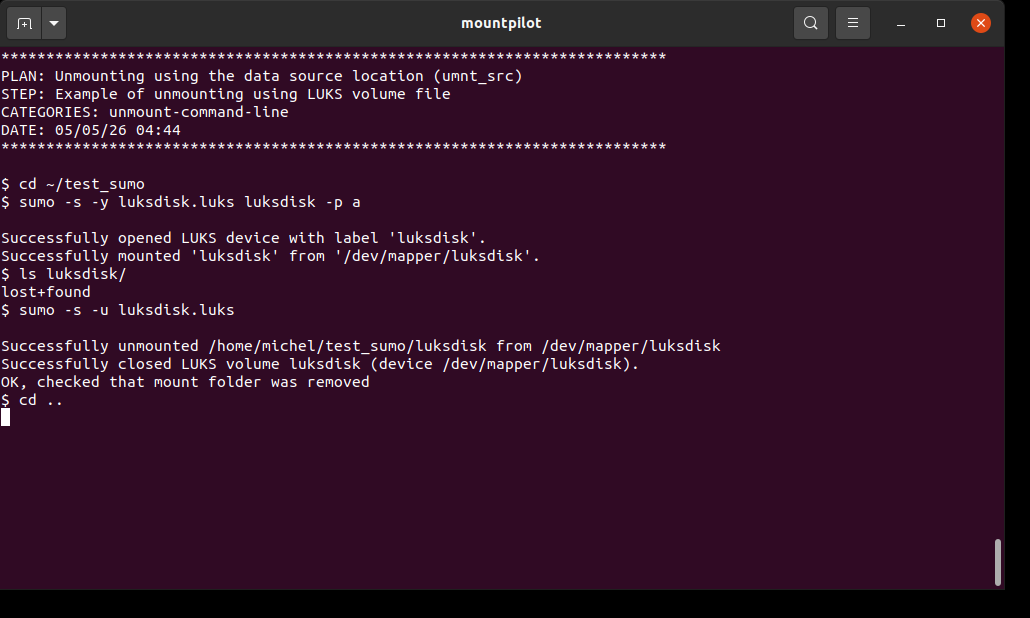
sumo -s -u imgdisk.qcow2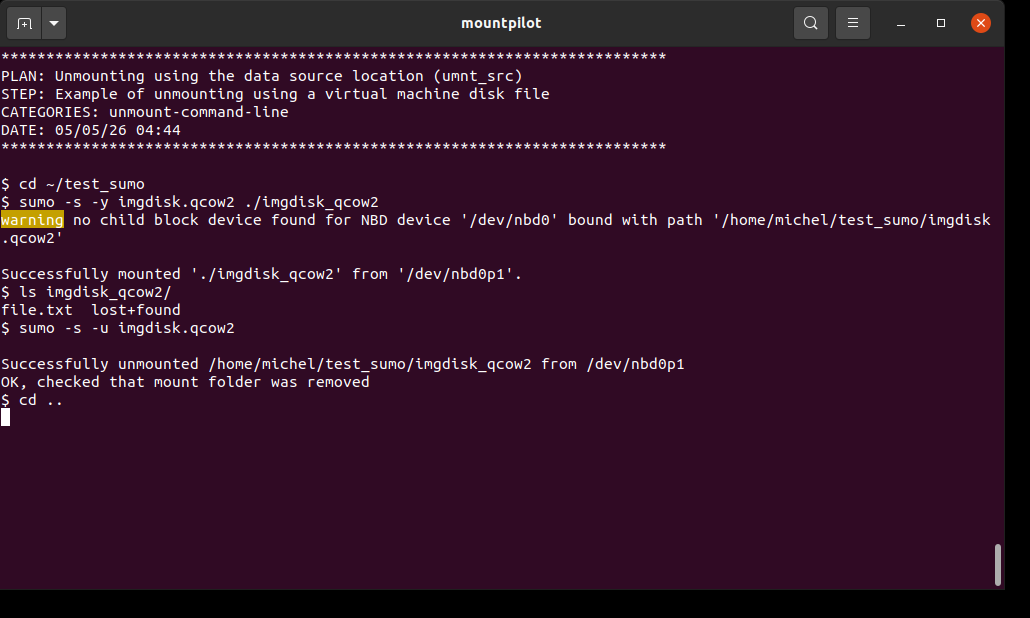
Unmounting LVM volumes
When a data source contains multiple LVM volumes, there will be a mount folder for each of them, located below the parent mount folder created for the data source.
Therefore, the disk cannot be fully unmounted just by specifying parent folder in unmount command. Either each LVM volume has to be unmounted one by one from their respective dedicated mount directory, or all LVM volumes can be unmounted all at once by specifying the data source, i.e. by adding the -a option.
| Command | Example |
|---|---|
|
An example is supplied in section Mounting LVM volumes. |
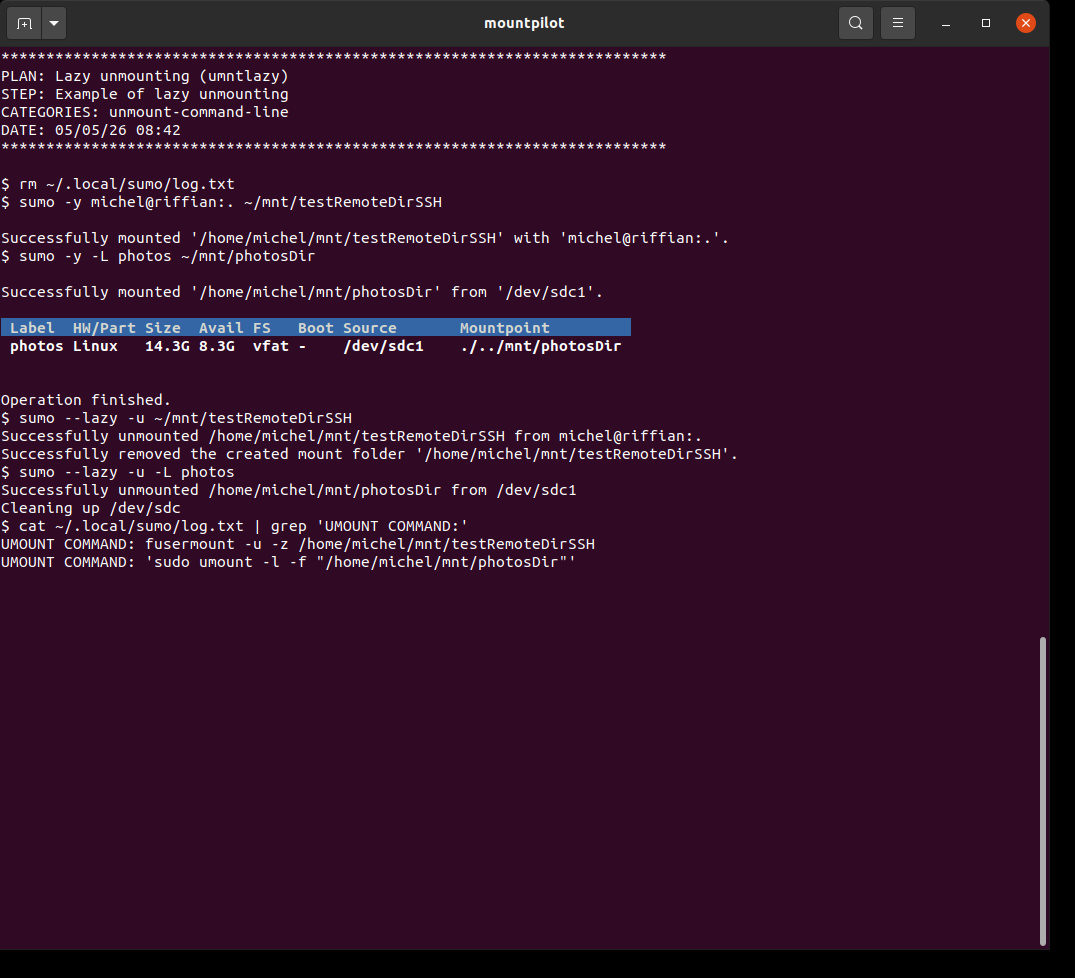
Lazy unmounting
A data source can be lazy unmounted by specifying option '--lazy'. MountPilot will pass on the matching relevant option to the underlying native tools.
| In most cases, this option does not guarantee the unmount won’t hang! |
sumo --lazy -u ~/mnt/testRemoteDirSSH
sumo --lazy -u -L photosA local USB stick and remote SSH folder are mounted. Both sources are unmounted lazy. The logs are inspected to check manually that the native lazy options have been passed on.
Auto-unmounting of nested mounts
MountPilot is aware of nested mounts.
When requesting to unmount a data source containing itself one or more mounted data sources, the user will be prompted to confirm the unmounting of all nested mounted data sources.
The confirmation can be automated using both the -y and -f options. Note for the sake of safety specifying only -y is not enough in this specific case.
An example is supplied in section Mounting nested data sources.
MountPilot dashboard
Purpose
The aim of the dashboard is to:
-
provide live supervision of active mounts and available devices, enhanced with complementary system-wide details,
-
show the hierarchical relations between the data sources
-
enable to interact with existing mounts: unmount, browse, perform disk operations
-
enable to revive past mounts from a history journal,
-
provide at a glance diagnostic infos on abnormal situations (eg. double mounts),
-
provide security functions like fail-safe mode on blocking mounts,
-
overall provide a user-friendly interface for mount and disk operations from a single keystroke,
-
logging dedicated to mount operations
Layout
Overall description
The dashboard shows a steady table of mounted and unmounted sources, which is automatically refreshed according to a configured timeout. The table also shows the hierarchical relation between data sources. The table behaves like a terminal menu on which the user can select a source and carry out an operation on it. Most operations are achieved with a single keystroke.
MountPilot shows all data sources, regardless of whether they have been mounted or unmounted using sumo or any other tool. The dashboard display is independent of the actual underlying mount and unmount methods, which can still be used. The only condition is that the data source is of one the type recognized by the tool (see diagram [Purpose and functionality]).
|
When all available information are shown, the dashboard splits into 3 parts:
-
The table of available data sources along with their mount status,
-
The mount history at the bottom of it, giving the table of past mounts, which visibility is toggleable by key 'h' .
-
At the bottommost part of the dashboard, either of the following:
-
Toggleable mount details sheet regarding the selected item, including technical data related to the physical media over which is running the mounted data flow.
-
Toggleable technical cheatsheet giving further help for the understanding of the mount details sheet. This cheatsheet is automatically hidden by a change of selection.
-
The following annotated screenshot shows this:
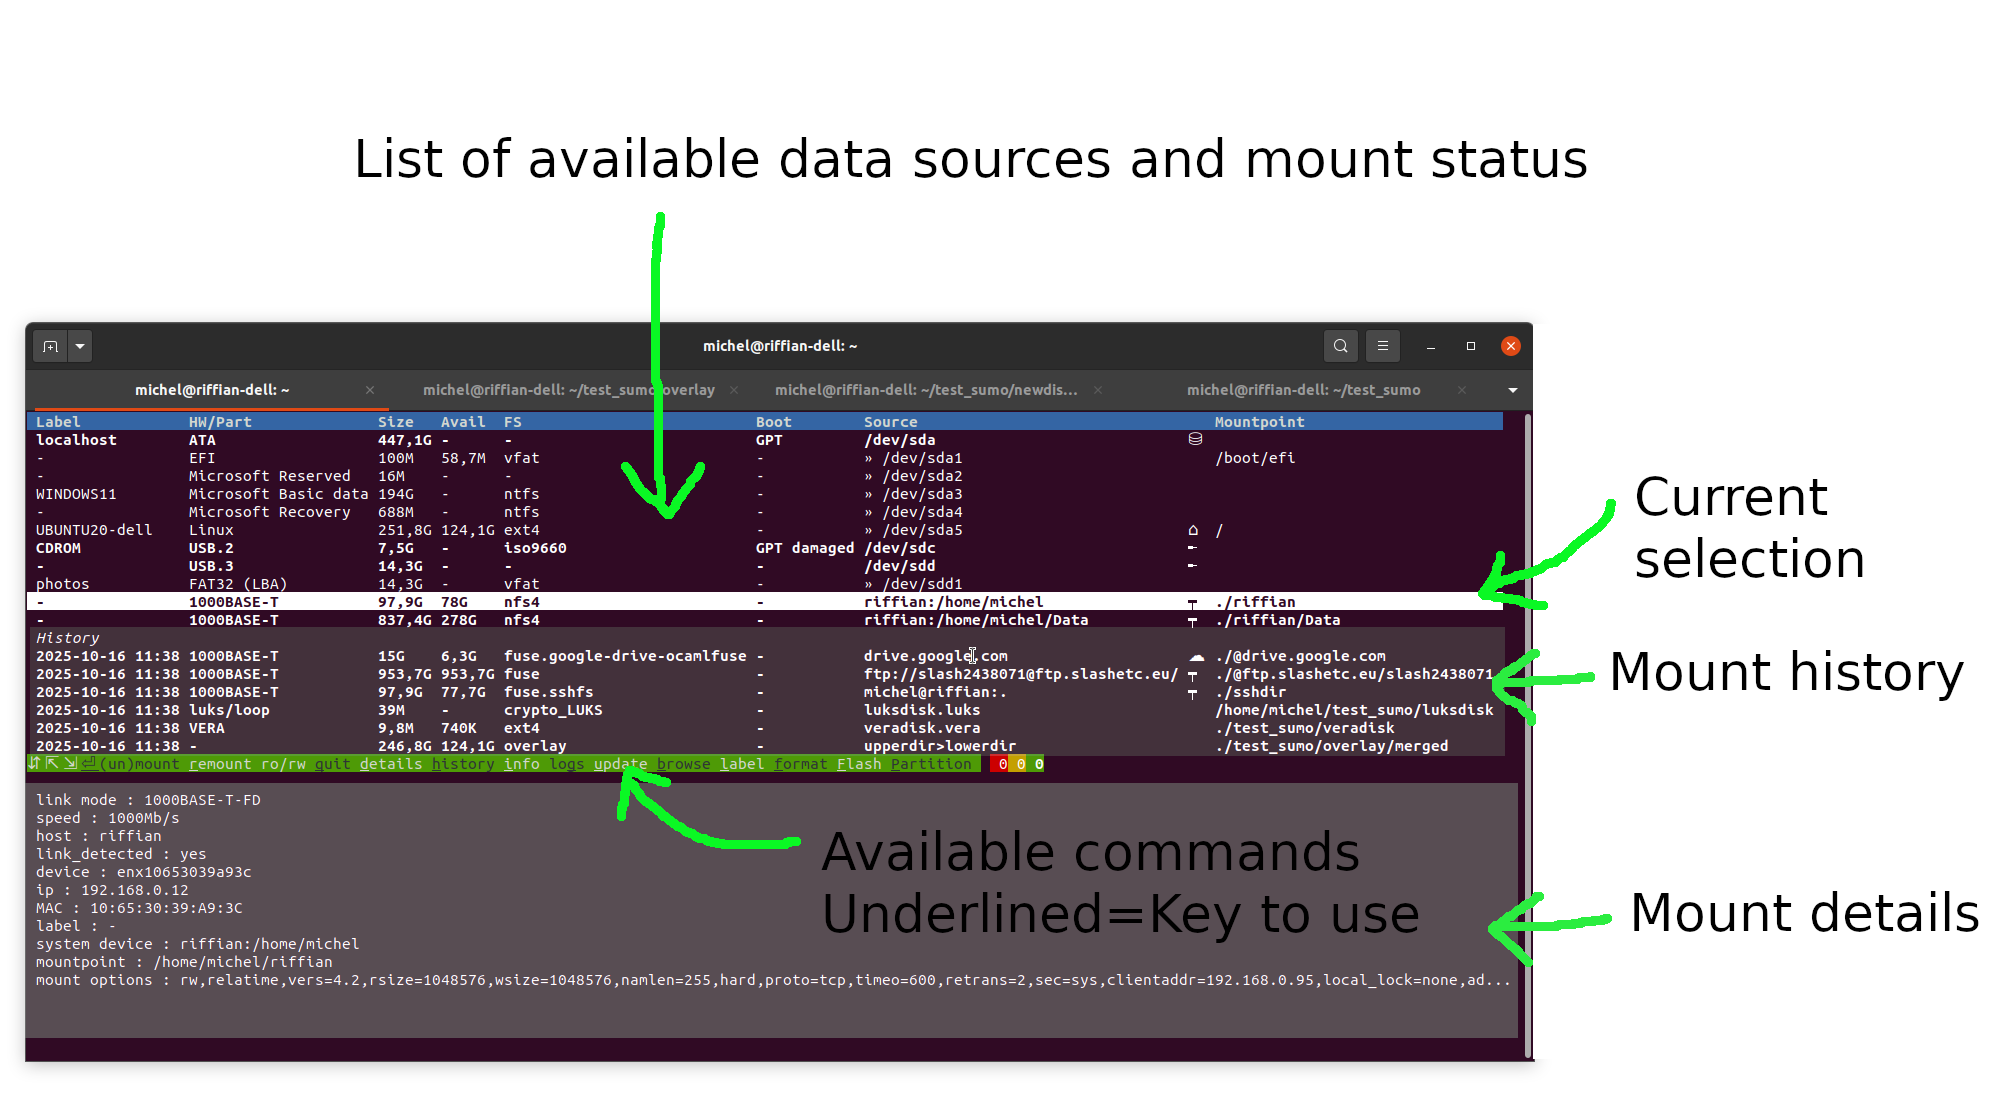
| At the very right, the column 'Mountpoint' indicates on which directory the data source is mounted. If none appears there, it means the data source is not mounted. |
| The terminal window is auto-sized to fit the required width and height |
| The user terminal context are preserved when the tool is exited. |
| Default behaviors like the color scheme can be controlled by configuration. See section General configuration. |
Toggleable display areas
Toggleable mount history
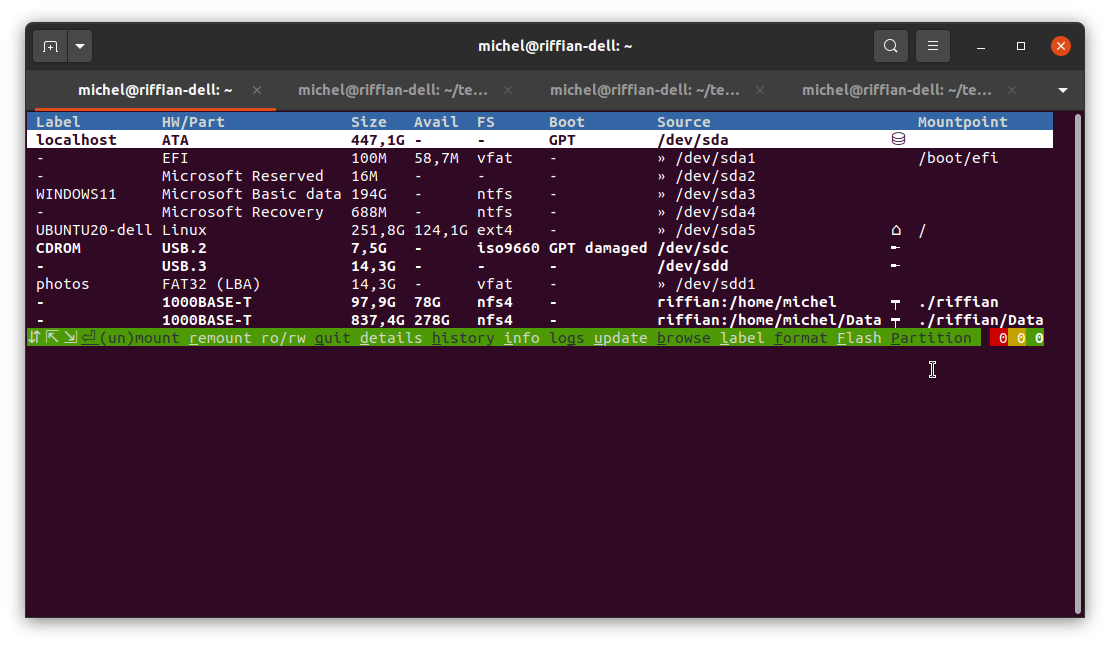
Figure 47. Dashboard showing no history
|
'h' key ⇐⇒ |
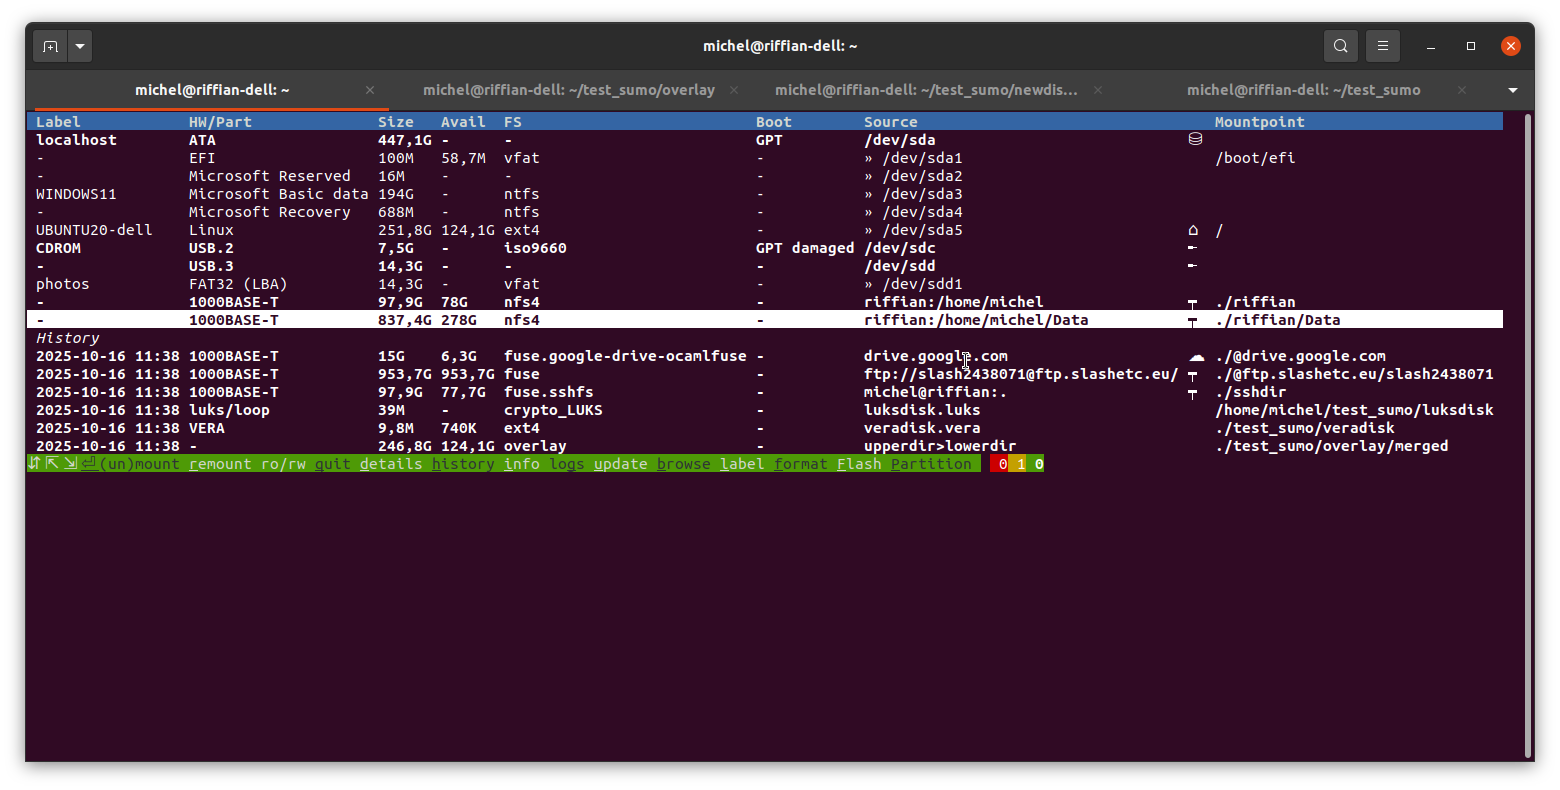
Figure 46. Dashboard showing history
|
Toggleable mount details
|
Figure 49. Dashboard showing no details
|
'd' key ⇐⇒ |
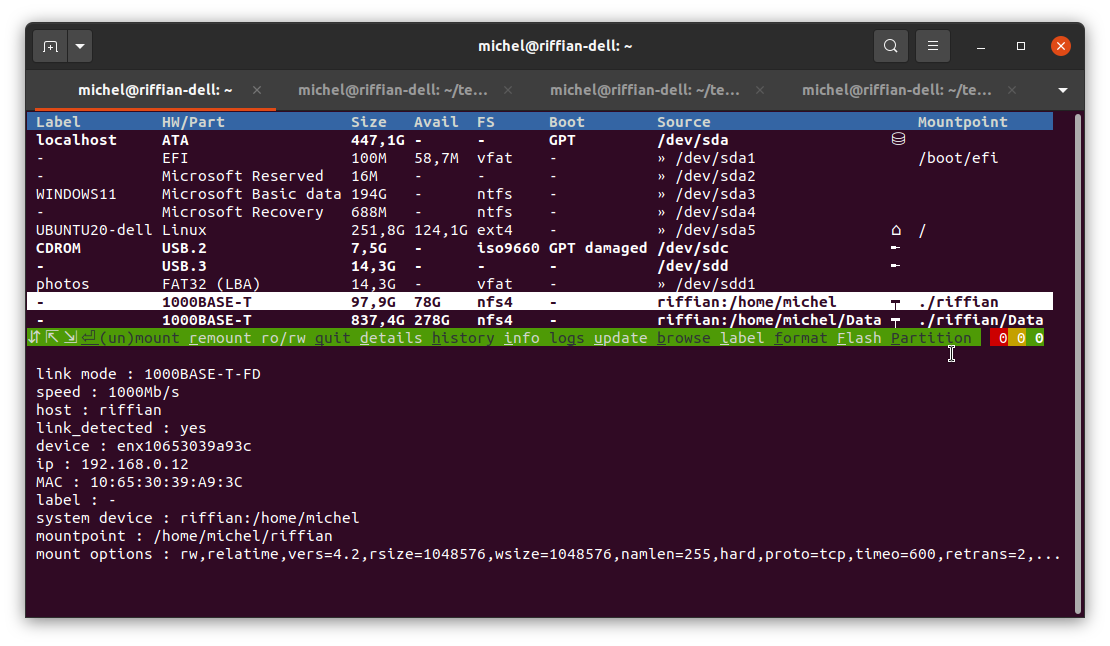
Figure 48. Dashboard showing the details
|
| Upon selection change, the mount details remain visible and are dynamically updated to reflect the details of the selected item. |
Toggleable technical cheatsheet
|
Figure 51. Dashboard not showing the cheatsheet
|
'i' key ⇐⇒ |
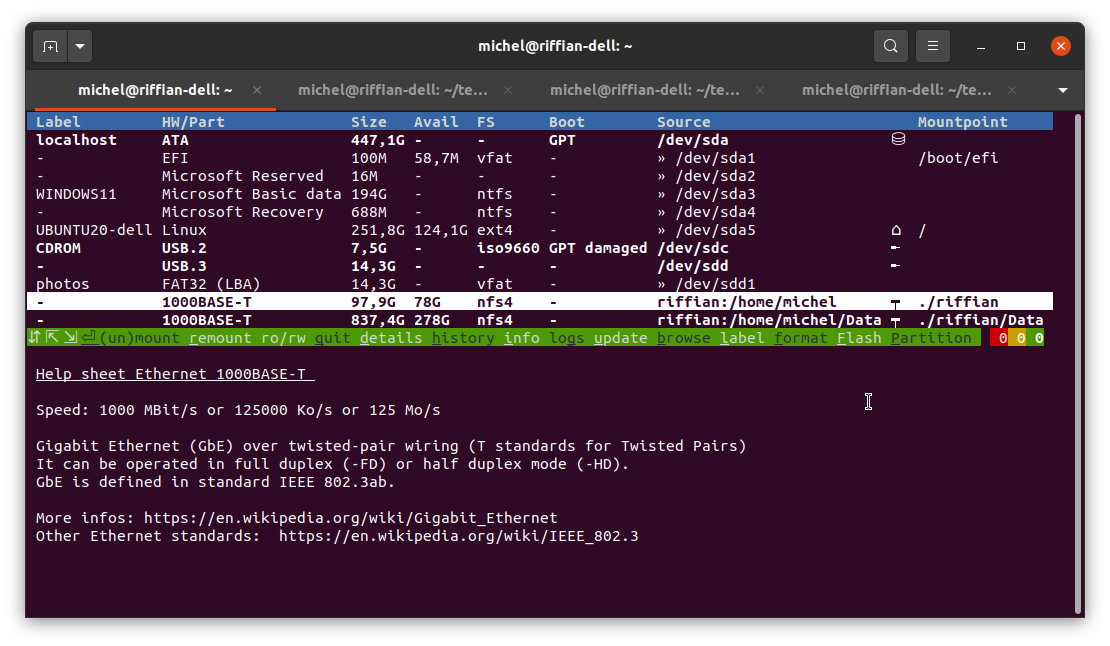
Figure 50. Dashboard showing the cheatsheet
|
| the technical cheatsheet is automatically hidden by a change of selection. Details are shown back if they were shown prior to showing the cheatcheat. |
Symbol indicators
⛁ |
Disk with multiple partitions |
⛀ |
Disk |
╾ |
USB stick |
☁ |
Cloud connection |
📶 |
Wifi connection |
┯ |
Ethernet wired connection |
⌂ |
Computer’s root mountpoint below which all other data sources are mounted. |
» |
Describes a data source descending hierarchical relationship. The data source at the right of this symbol is a child of another one, e.g. a partition of a disk. |
Commands
Control functions
The following table gives an overview of the control functions which can be activated using the keys described in section Command keys.
Mount control functions |
|
||
Disk control operations |
|
||
Display control operations |
|
Command keys
| Key | Action | ||
|---|---|---|---|
|
Quit |
||
|
Mount data source of the selected data source, if not mounted yet, or reversely unmount it if currently mounted |
||
|
Select the data source above of the current selection with the Up arrow |
||
|
Select the data source beneath the current selection with the Down arrow |
||
|
Select the first item of the table. |
||
|
Select the last item of the table. This is either an history item or a availabe data source when no history. |
||
|
|
||
|
|
||
|
Remount the selected data source in read-only if it was initially in read-write, or remount in read-write if it was initially in read-only |
||
|
Switch on/off the display of the details for the selected data source |
||
|
Switch on/off the display of the history |
||
|
Switches on/of the display of the technical cheatsheet for the underlying hardware used as medium for the data source. Typically, characteristics of different USB version, characteristics of different Ethernet links.
|
||
|
Switch on/off the display of the last logs |
||
|
Force update of the dashboard |
||
|
Launch browser on the selected file system. |
||
|
Erase the selected item from the history table
|
||
|
Assign a label to the selected file system in the table |
||
|
Format the selected partition (create a file system) |
||
|
Flash an ISO image on the selected disk |
||
|
Create a partition on the selected disk |
Security and diagnostic
Security functions
| Security function |
|---|
Time-based data sources monitoring. The table is refreshed automatically, according to a configurable timeout, upon occurrence of any of the following events:
|
No hangup in case of broken links (on startup only) |
Lazy unmount for mounts having a broken link to avoid system hang-ups. |
Visual alerts and indications
| Symbol or indication | Meaning |
|---|---|
⃠ |
Mounted read-only |
⚠✎ |
Mounted r/w, but actually not writable |
✕ [1] |
Item mounted, but with a broken link (e.g. broken SAMBA link) |
red row line |
Data source mounted multiple times |
|
The log indicators appear at the rightmost part of the command prompt:
|

Restricted list filters
|
While a filter can be supplied to the dashboard as for the command line, some restrictions apply:
|
Managing the behavior of dashboard with complex filters is a feature for which the current implementation does not provide a solution yet. In the current state:
-
it may mess up both the displayed and saved history (e.g., actual mounted items may appear in the history).
-
when mounting a disk containing a file system which is excluded, this latter may not appear in the table. The allowed actions may possibly have to be restricted as well.
| It is not possible to change the filter while the dashboard is running either. |
Mounting a data source
General usage
Overall, a data source can be mounted resp. remounted from history by selecting the matching row in the table using the keys ↑ ↓ ⇱ ⇲ ⇞ ⇟ and triggering the mount by pressing ↵.
In practice, a data source is rarely mounted the first time from the dashboard. The only data sources which may actually be mounted for the first time are block devices and file systems located inside them. Indeed, when a device is connected, it can be detected and displayed on the table. However, yet, most times these are auto-mounted by the OS in dedicated place.
For types of data source other than block devices, please refer to the section Mounting a data source of the [Command line usage] earlier in this document.
| A data source may perfectly be mounted using a native mount tool other than sumo. Once mounted, the mounted data source will popup in the dashboard. |
Label-based Mounting
The label assigned to a data source is displayed on the first column. The user has simply to identify and select the row displaying the expected label and press the enter key ↵. Section Mounting a partition hereafter provides an example where a Windows partition labelled WINDOWS11 is mounted.
Mounting read-only
A data source can be initially mounted read-only only using command line.
Already mounted data sources can be remounted read-only and vice-versa using the matching key (see Command keys).
Video |
Comments |
Example of remounting an SSH read-only
|
A SSH mount is set up, initially in read-write. The content is checked for being writeable with the browser. The SSH source is remounted read-only via the interactive console. The content is checked for being read-only with the browser. The SSH source is unmounted and mounted again from history to check that it remained read-only after remount. The SSH source is remounted from read-only back to read-write. The content is checked for being writeable with the browser. At the end, SSH connection is unmounted. |
Mounting a block device (disk, USB key…)
Video |
Comments |
Example of mounting of a block device
|
An USB stick, which contains a Debian installation ISO image is first live plugged in. The stick is then remounted by sumo command read-only on the default folder by command line. On the console, the mounted device disappears and reappears. ~/.local/sumo/log.txt is inspected, which indicates the device was actually mounted write-protected. After that the content of the stick is checked by browsing the mounted folder. At the end, the device is unmounted. |
Mounting a partition
Video |
Comments |
Example of mounting of a partition
|
A Windows data partition, which is mapped to device |
Mounting an Android device via adb
All connected Android devices will show up on the dashboard. Each device can be identified with the label which is the Android device name.
Select the device and press enter key ↵ to mount.
Mounting other types of data sources
Other data sources can be initially mounted using the command line. Please refer to the section Mounting a data source of the [Command line usage] earlier in this document.
Remounting from history
General usage and examples
Remounting a data source from hitory is straighforward: select the matching row in the table using the keys ↑ ↓ ⇱ ⇲ ⇞ ⇟ and trigger the remount by pressing ↵.
Section Mounting read-only provides a sample case where a remount is done from history.
Auto-mount of parent data source
When requesting to remount a data source which was initially contained within another data source, it will be proposed to mount the parent data source as well.
Video |
Comments |
Example of remounting from history involving a parent data source to be remounted
|
A personal vault implemented as a LUKS disk file is located on a Windows partition which is not mounted. When attempting to remount the disk file from history, it is proposed to remount automatically the Windows partition containing the disk file. At the end, the Windows partition is unmounted, which automatically triggers the unmounting of the contained disk file as well. |
Mount forwarding
Often devices like USB stick only contain a single partition. In that case, the device itself is mapped to a system device, e.g. /dev/sdc, and the partition is mapped to another one, typically /dev/sdc1 for the aforementioned example, where 1 stands for the partition rank (here the first).
Because the dashboard is aware of the hierarchical relationships between system devices, it will forward any mount request applied on a device to the contained partition.
Video |
Comments |
Example of mount forwarding with the interactive console
|
This example involves a USB stick containing a single partition and shows how the partition can be mounted and unmounted by applying the mount order to the parent system device standing for the device itself. The mount operation is repeated directly on the partition itself to show that the result is all the same. |
Unmounting a data source
General usage and examples
Unmounting a data source is straighforward: select the matching row in the table using the keys ↑ ↓ ⇱ ⇲ ⇞ ⇟ and trigger the unmount by pressing ↵.
The row can be found at a glance with any of the following displayed information: label (first column), data source location or mounted folder on the two last columns.
Upon successful unmounting of the data source, the matching row in the table will be moved to the history.
Multiple unmount examples have already been provided in the previous section Mounting a data source. The next sections will focus on specific cases only.
| A data source may perfectly be unmounted using a native mount tool other than sumo. Once unmounted, the matching row will be moved to the history. |
Lazy unmounting on broken mounts
There’s always a lazy unmount carried out for a broken or hanging mount.
Otherwise, the lazy unmount has to be initiated from the command line (see section Lazy unmounting).
Video |
Comments |
Example of lazy unmounting on broken mount
|
In the continuation of the previous test, the remote test host is mounted over NFS. The ethernet cable is unplugged. The broken link appears in red and can be released through a lazy unmount. |
Unmount forwarding
Often devices like USB stick only contain a single partition. In that case, the device itself is mapped to a system device, e.g. /dev/sdc, and the partition is mapped to another one, typically /dev/sdc1 for the aforementioned example, where 1 stands for the partition rank (here the first).
Because the dashboard is aware of the hierarchical relationships between system devices, it will forward any mount request applied on a device to the contained partition.
Earlier section [Mounting forwarding] containing a video demonstrating this.
Mount history
Introduction
MountPilot manages an history of unmounted data sources, which are re-mountable by single keystroke from the dashboard.
There can be multiple histories. An history is identified by a logical name. The content of the history is saved in a file recent.yml.<logical history name> located in ~/.config/Sumo folder. This is transparent to the user.
There can be multiples uses for managing different histories, e.g. - reconstitute specific contexts - project-related setups like for embedded systems - test bench requiring always the same set of devices to be mounted
Conditions of recording
Past mounts are recorded in the history upon either of the following conditions:
-
The dashboard must have been runnning at the time of the data source was unmounted,
-
The data source was unmounted using a
sumocommand line.
Synchronization between dashboard and commands
Unmounting a data source by commmand line updates the history which can be handled via the dashboard. The history change will be apparent either at start of the dashboard afterwards or directly live when the change occurs. This mechanism is also called history synchronization.
| History file is protected against concurrent accesses by a lock file. |
Video |
Comments |
Example of LVM disk unmounted from terminal and updated live in the history
|
The interactive is running on one terminal. A LVM system residing in a qcow2 file is mounted from another terminal. The new mounted disk appears live on the console. Then, the disk file is unmounted from the terminal. A new entry for the disk file appears live in the history of the console. |
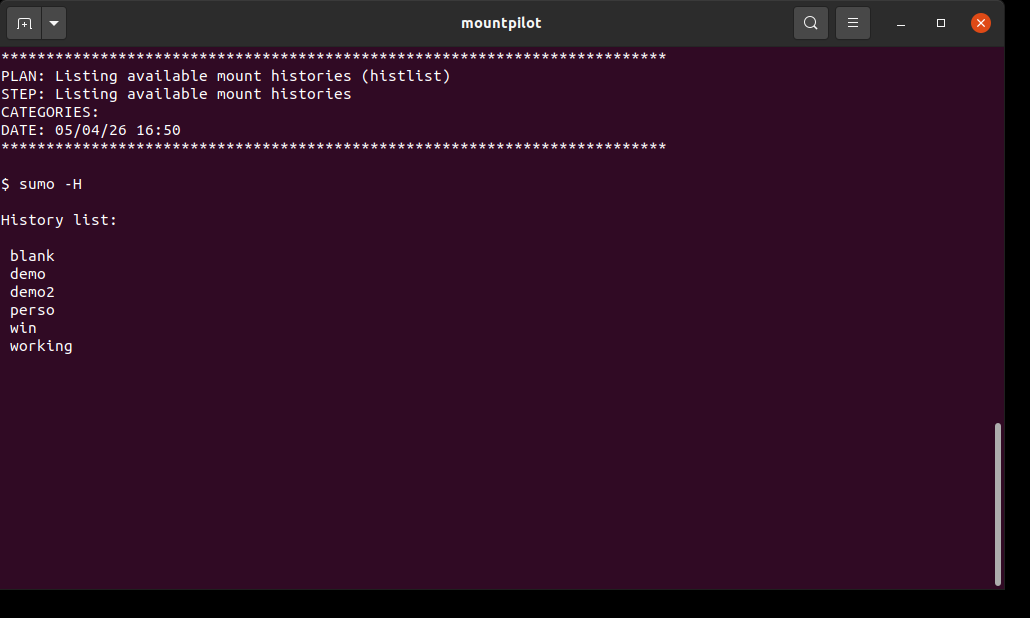
Listing available mount histories
sumo -Hsumo -HThis example shows that the available mount histories. For example, there’s the
demo one. The content of the demo history is saved in the file named
recent.yml.<history name> located in ~/.config/Sumo folder.
Switching to another mount history
sumo -H <HISTORY_NAME[:CURRENT_HISTORY_SAVE_NAME]>
mountpilot -H <HISTORY_NAME[:CURRENT_HISTORY_SAVE_NAME]>
The sumo command will exit immediately after the operation, whereas the dashboard is started immediately after the history change has been gone into effect.
|
When only HISTORY_NAME is specified, this switches to the history of name HISTORY_NAME. The current history is saved by adding the .old extension to the original matching file under .config/Sumo (see Introduction regarding naming convention). The history file is however not recoverable using the command line, only manually.
When [:CURRENT_HISTORY_SAVE_NAME] is additionally supplied, the current history is saved with the logical name CURRENT_HISTORY_SAVE_NAME. This is recoverable afterwards by using -H as described above. If CURRENT_HISTORY_SAVE_NAME history already existed, it is overwritten. Otherwise, the user is prompted for the creation of the new history.
A fresh new history can be saved by specifying twice the same history name, e.g. sumo -H <myhistory:myhistory>.
|
Video |
Comments |
Switching to another mount history
|
MountPilot is started with a previoulsy saved 'blank' history. The Windows partition is mounted and then unmounted to create a new entry in history. It is restarted with history demo2 and saving the current history to win. Remove the 3 last history items. It is restarted with history win without saving the current history. Once started, it can be observed that the previous Windows mount is indeed in the saved history. It is restarted again with the demo2 history (without saving). It can be observed that the full demo2 history is there, because this history was not saved before after erasing history items. |
Mount ghost mode
Using the --ghost option disables the saving of any change in history.
Video |
Comments |
Ghost mode
|
MountPilot is started in ghost mode with demo2 history. All items are removed. It is restarted without ghost mode. It can be checked that the previous history was untouched. Now removing again all history item. After restart, it can be checked that the history is empty, because the ghost mode was not used in the second start. |
Disk management
MountPilot provides basic disk management functions for most common uses. The most convenient way to use these functions is through the [Mountpilot dashboard]. The following sections describe how to use them directly by command line.
Label a file system
At the moment, this function is not only accessible via the dashboard by pressing the 'l' key.
Video |
Comments |
Example of labelling a filesystem with the interactive console
|
There is an USB stick present and labelled 'photos'. The label is changed to SHOTS2025 and refresh by type U. Restore the initial label |
Creation of encrypted devices
It is possible to create encrypted VERA ou LUKS volume which are directly written on the device (instead of a file).
Video |
Comments |
Example of creating a LUKS-encrypted device with the interactive console
|
This example creates a LUKS volume hosted directly by the device, with password 'luks'. The LUKS volume is created for containing a NTFS file system. The volume is mounted to check if the password works. Its root folder opened with a file explorer to check the available space. At the end, the LUKS volume is unmounted. |
Creation of disk files
General usage
MountPilot enables it to create disk files of any type at a glance on command line.
sumo [-L <label>] -o size=<size> [-t <filesystem name>] <file name>.<file extension>| The file extension determines the type of the disk image (raw, VERA, LUKS etc.) |
These disk files feature a single partition on which is installed a file system of a selectable type.
If no filesystem type is supplied, ext4 is used by default.
The size of the filesystem can be passed on command by assigning a value to the size keyword with the -o option. E.g. `-o size=1M ` orders a size of 1 megabyte.
When not specified, the user will be prompted to enter a size. The following describes the format of the size value:
| Size range | Format | Example |
|---|---|---|
KiBibyte |
K |
900K |
MiBibyte |
M |
1M |
GiBibyte |
G |
10G |
Tebibyte |
T |
4T |
Upon successful completion, it is proposed to mount the disk file (it can be aborted).
Create a raw disk image
A raw disk image file is created when attempting to mount a non-existent file having the img file extension. See also General usage.
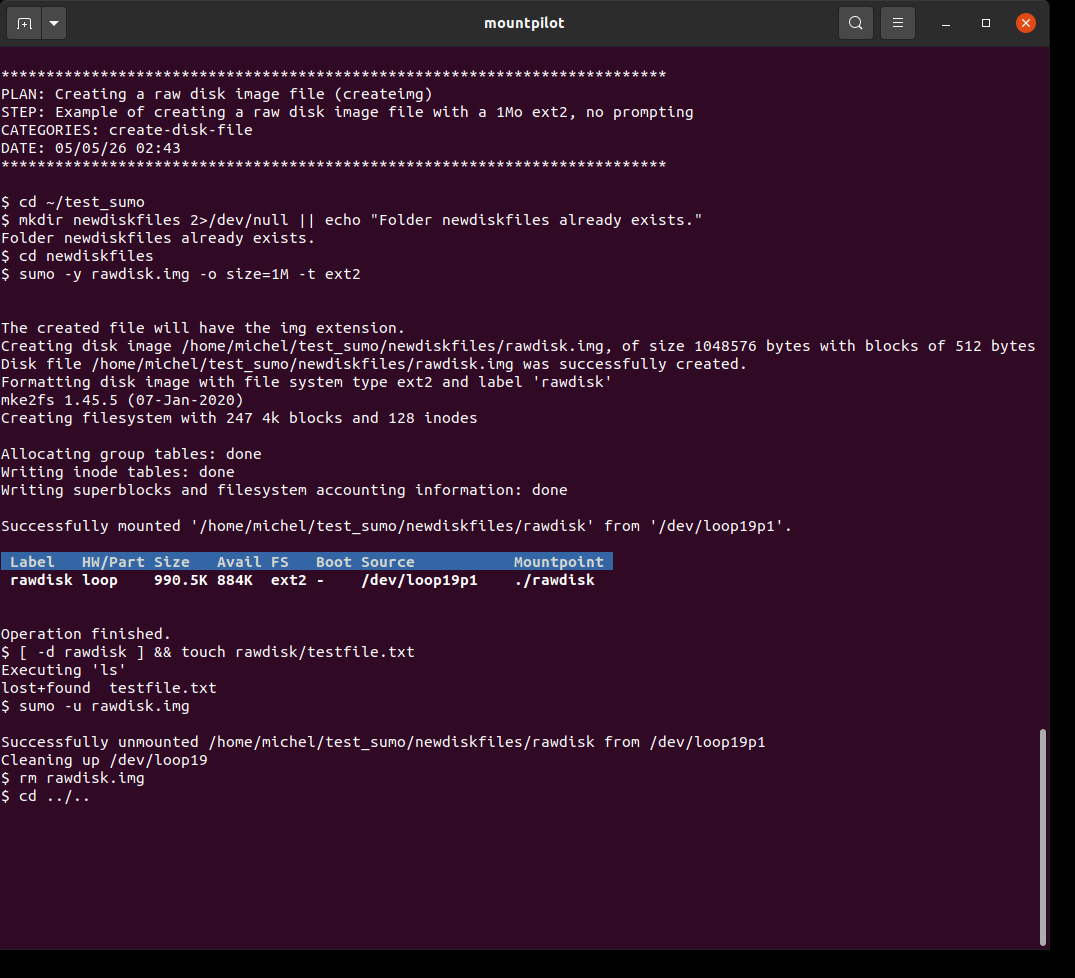
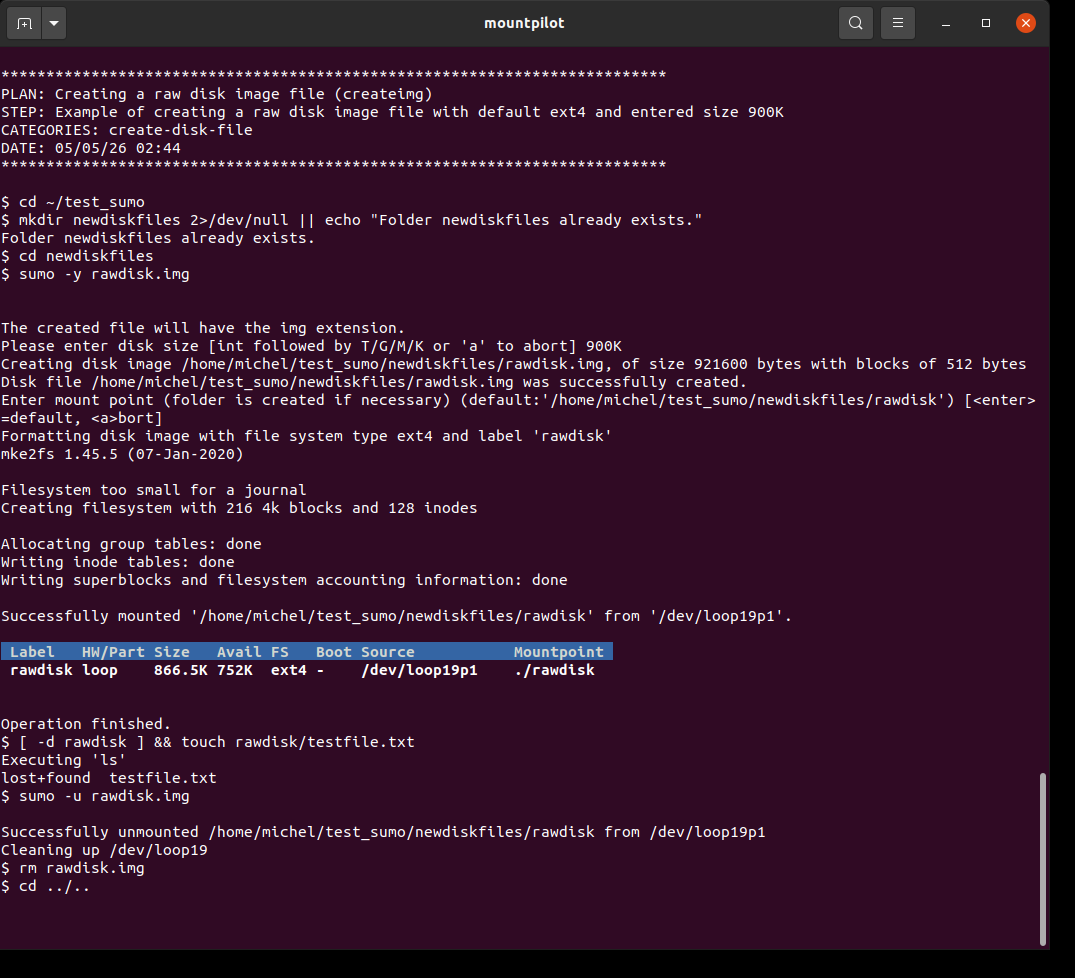
sumo [OPTIONS] <disk file name>.img [target folder]sumo -y rawdisk.img -o size=1M -t ext2A raw disk image is created hosting an 'ext2' file system. The image is mounted, a test file is written before its content inspected with 'ls', eventually unmounted.
sumo -y rawdisk.imgA raw disk image is created hosting a default 'ext4' file system. The size 900K is entered manually. The image is mounted, a test file is written before its content inspected with 'ls', eventually unmounted.
Create a VERA volume file
A VERA volume file is created when attempting to mount a non-existent file having the vera file extension. See also General usage.
The default encryption parameters are addressed in section VERA setup and mount options.
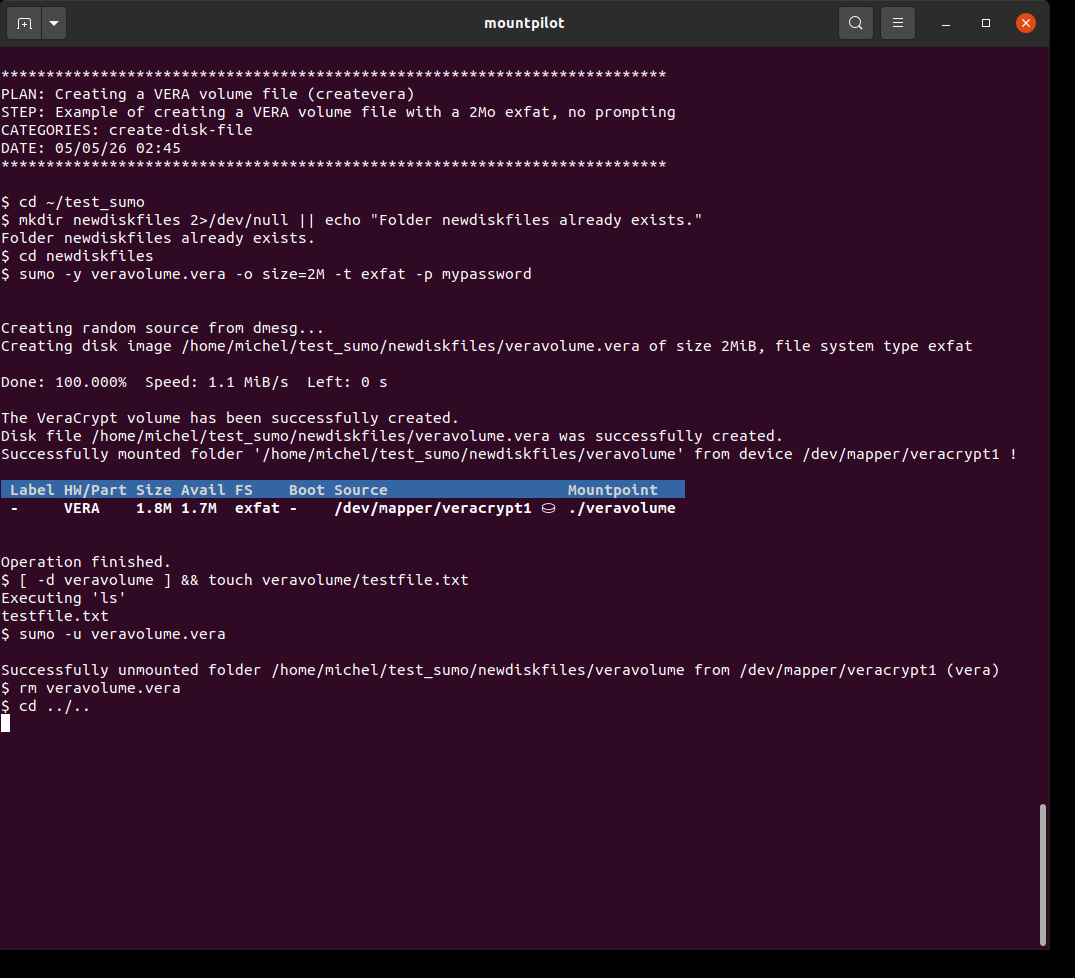
sumo [OPTIONS] <disk file name>.vera [target folder]sumo -y veravolume.vera -o size=2M -t exfat -p mypasswordA VERA volume file is created hosting an 'exfat' file system. The image is mounted, a test file is written before its content inspected with 'ls', eventually unmounted.
sumo -y veravolume.vera -t exfatA VERA volume file is created hosting an 'exfat' file system. The size (3M) and password are entered manually. The image is mounted, a test file is written before its content inspected with 'ls', eventually unmounted.

| VERA is cross-platform and is also available on Windows. |
Create a LUKS volume file
A LUKS volume file is created when attempting to mount a non-existent file having the luks file extension. See also General usage.
The LUKS volume name is the specified volume label or the basename of the specified file when no label is supplied.
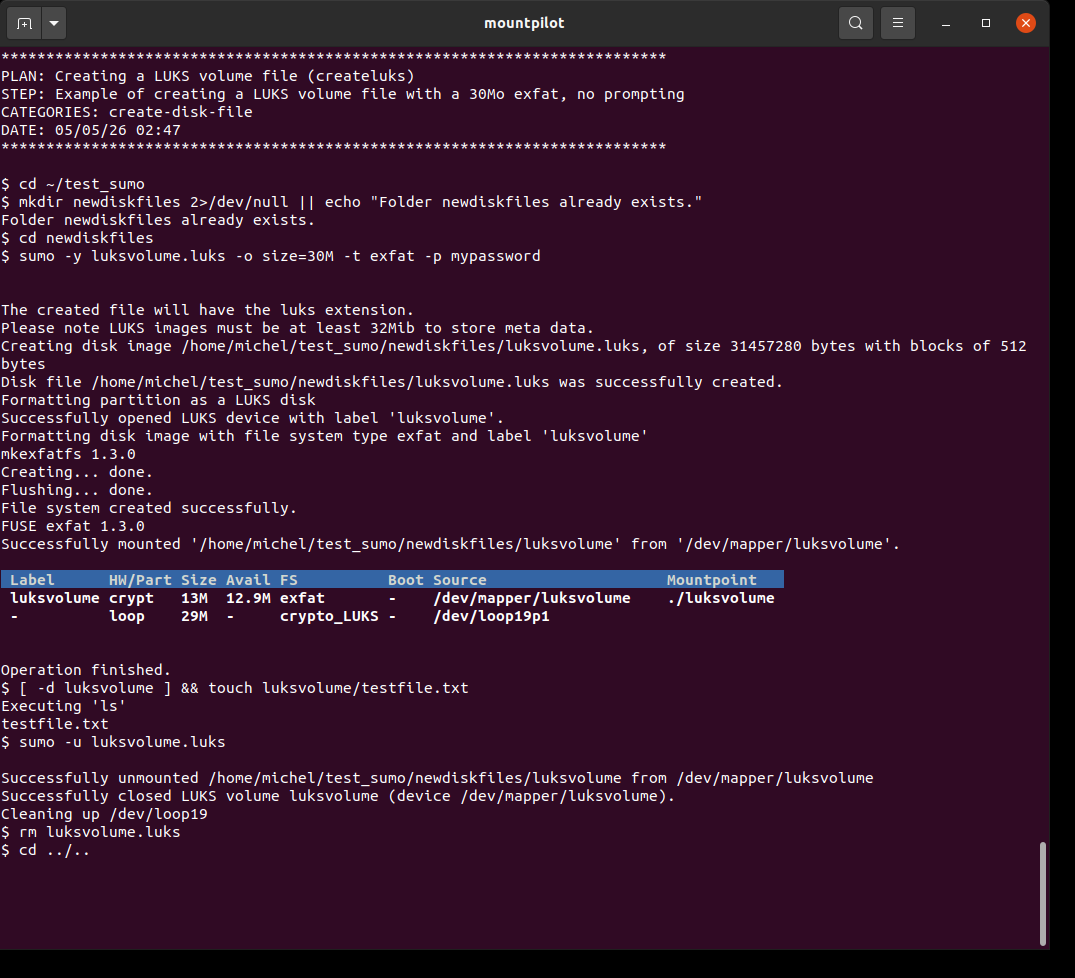
sumo [OPTIONS] <disk file name>.luks [target folder]sumo -y luksvolume.luks -o size=30M -t exfat -p mypasswordA LUKS volume file is created hosting an 'exfat' file system. The image is mounted, a test file is written before its content inspected with 'ls', eventually unmounted.
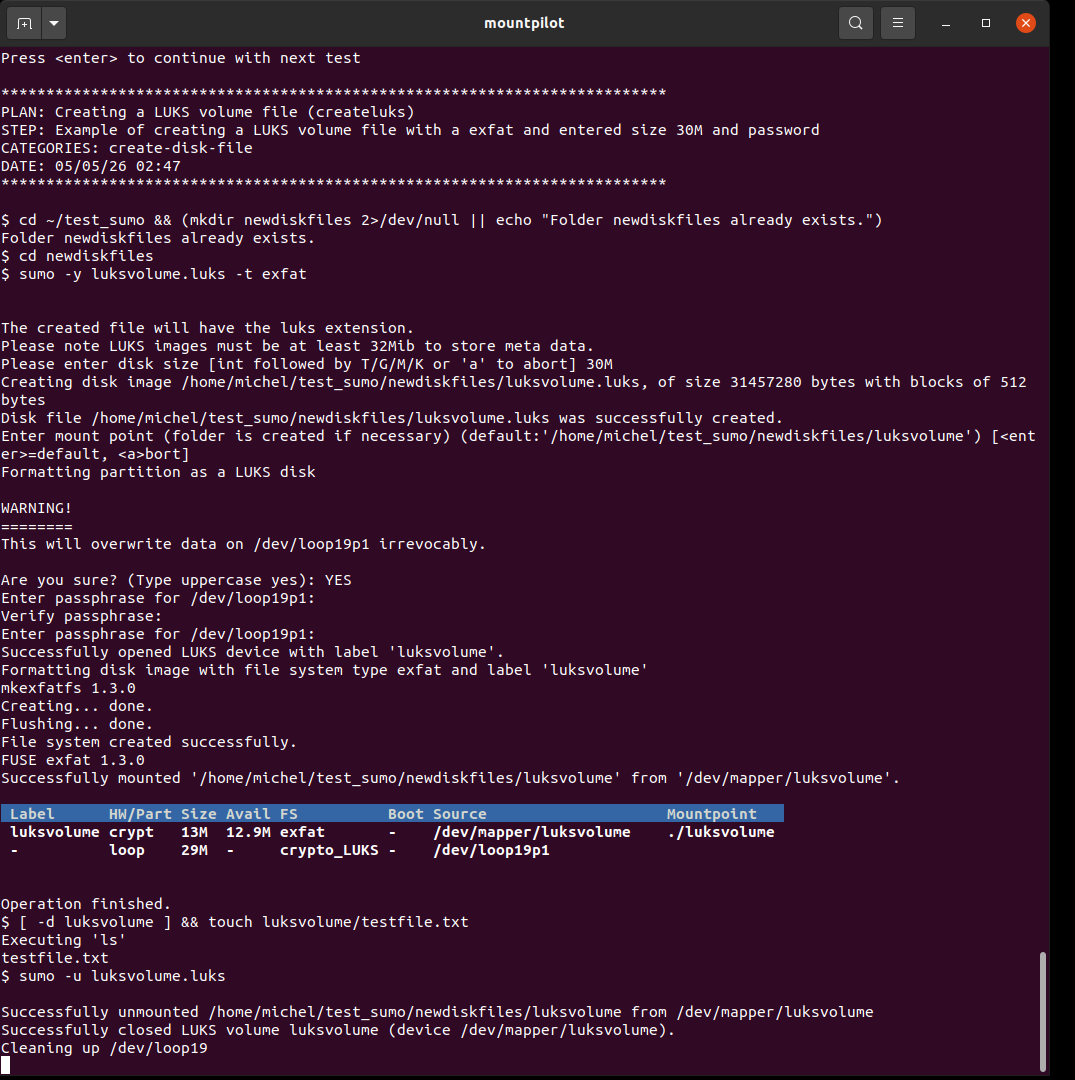
sumo -y luksvolume.luks -t exfatA LUKS volume file is created hosting an 'exfat' file system. The size greater than 30M and password are freely manually entered. The image is mounted, a test file is written before its content inspected with 'ls', eventually unmounted.
| LUKS is only supported on Linux. |
Create a QCOW2 volume file
A QCOW2 volume file is created when attempting to mount a non-existent file having the qcow2 file extension. See also General usage.
sumo [OPTIONS] <disk file name>.qcow2 [target folder]sumo qcow2disk.qcow2 -o size=3M -t exfatA QCOW2 disk file is created hosting an 'exfat' file system. The image is mounted, a test file is written before its content inspected with 'ls', eventually unmounted.
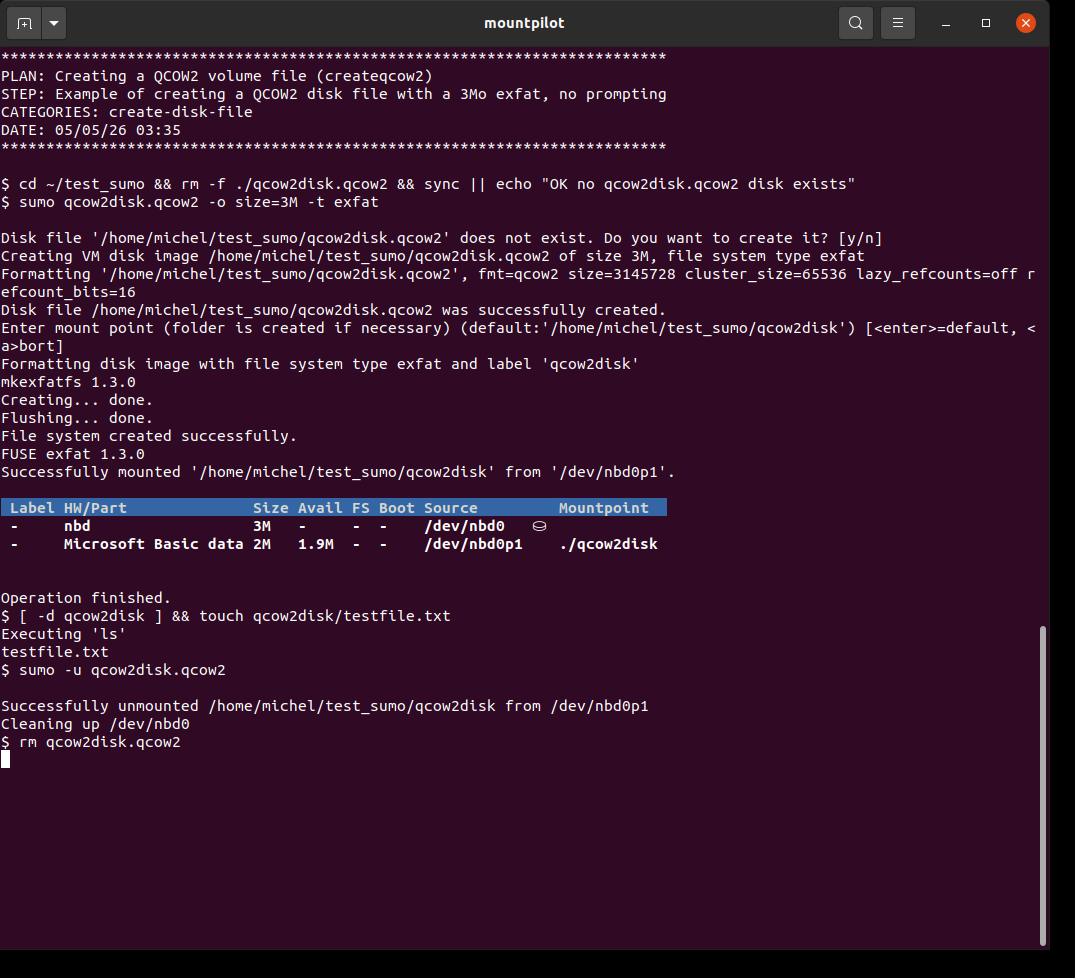
sumo -y qcow2disk.qcow2A QCOW2 volume file is created hosting an 'ext4' file system. The size is freely manually entered. The image is mounted, a test file is written before its content inspected with 'ls', eventually unmounted.
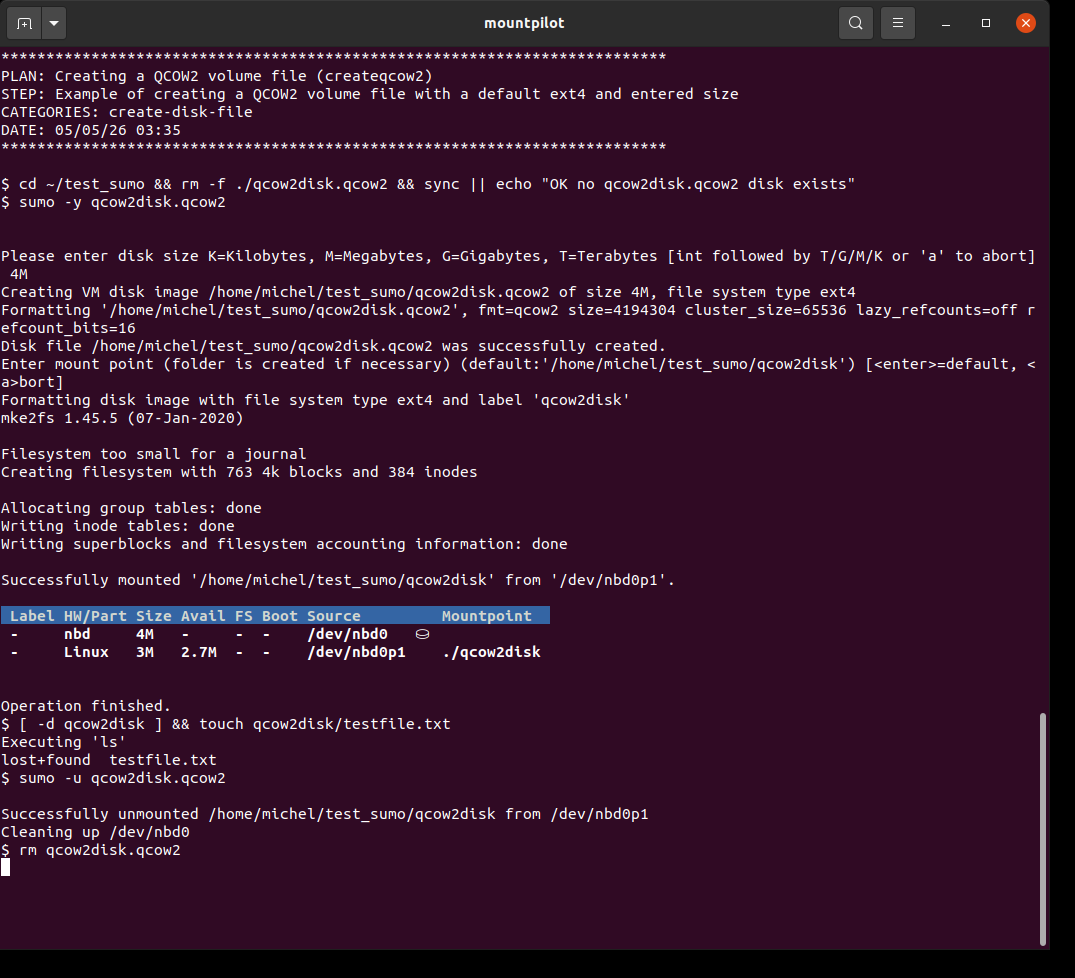
| QCOW2 is only supported on Linux. |
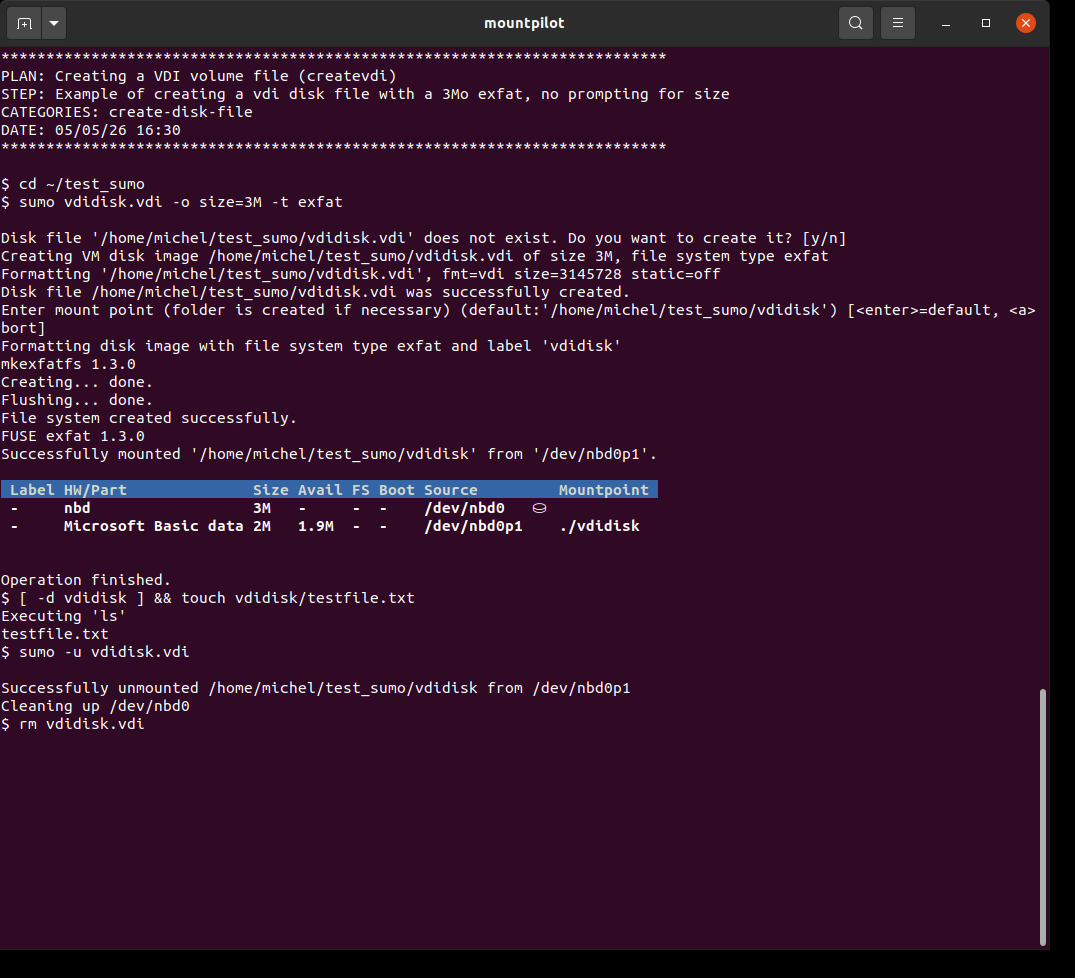
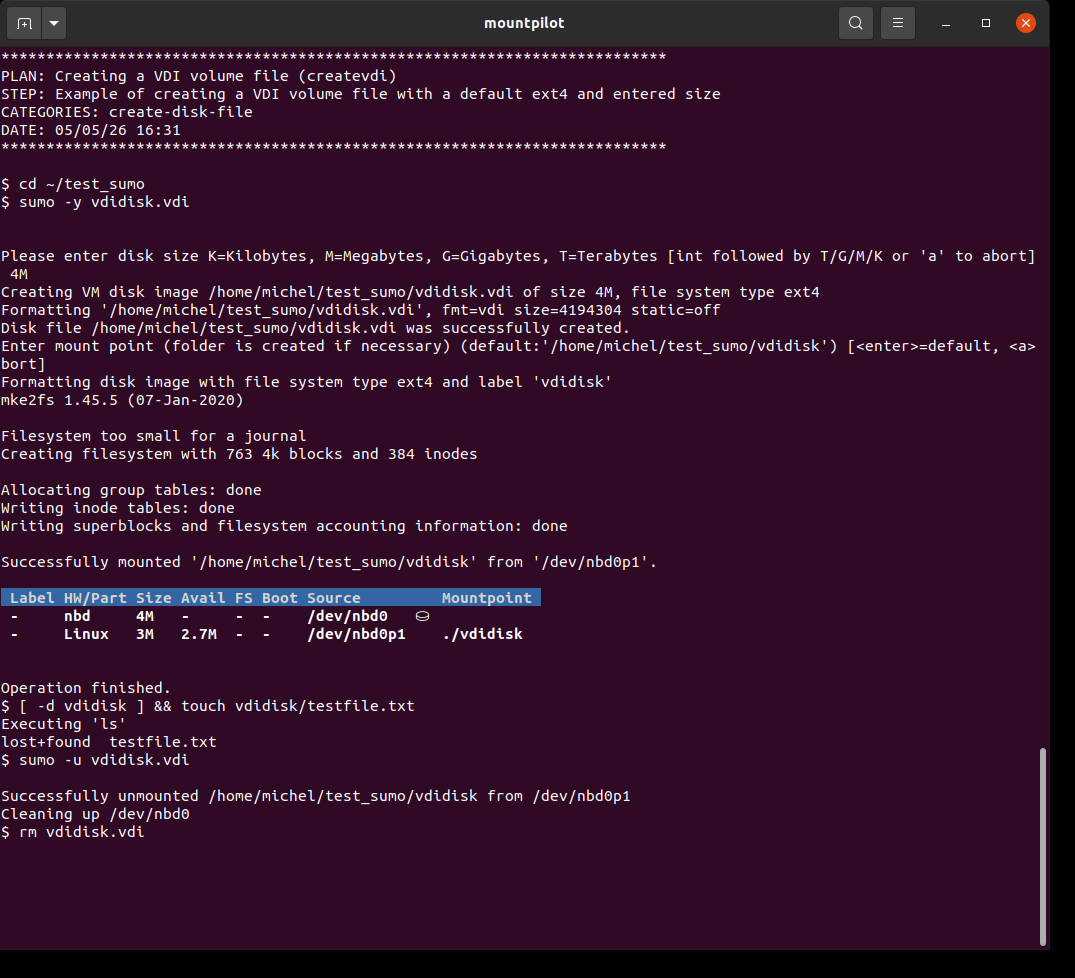
Create a VDI volume file
A VDI volume file is created when attempting to mount a non-existent file having the vdi file extension. See also General usage.
| VDI stands for VirtualBox Disk Image. VDI is cross-platform and is also available on Windows. |
sumo [OPTIONS] <disk file name>.vdi [target folder]sumo vdidisk.vdi -o size=3M -t exfatA vdi disk file is created hosting an 'exfat' file system. The image is mounted, a test file is written before its content inspected with 'ls', eventually unmounted.
sumo -y vdidisk.vdiA VDI volume file is created hosting an 'ext4' file system. The size is freely manually entered. The image is mounted, a test file is written before its content inspected with 'ls', eventually unmounted.
Flash a disk with an ISO image
Purpose
Flashing a disk consists of installing on a disk a bootable system from an ISO image.
| After this operation, all data on the disk will get lost. Use this function with care! |
Flash a disk via command line
sumo --flash-disk=<disk image> <block device path>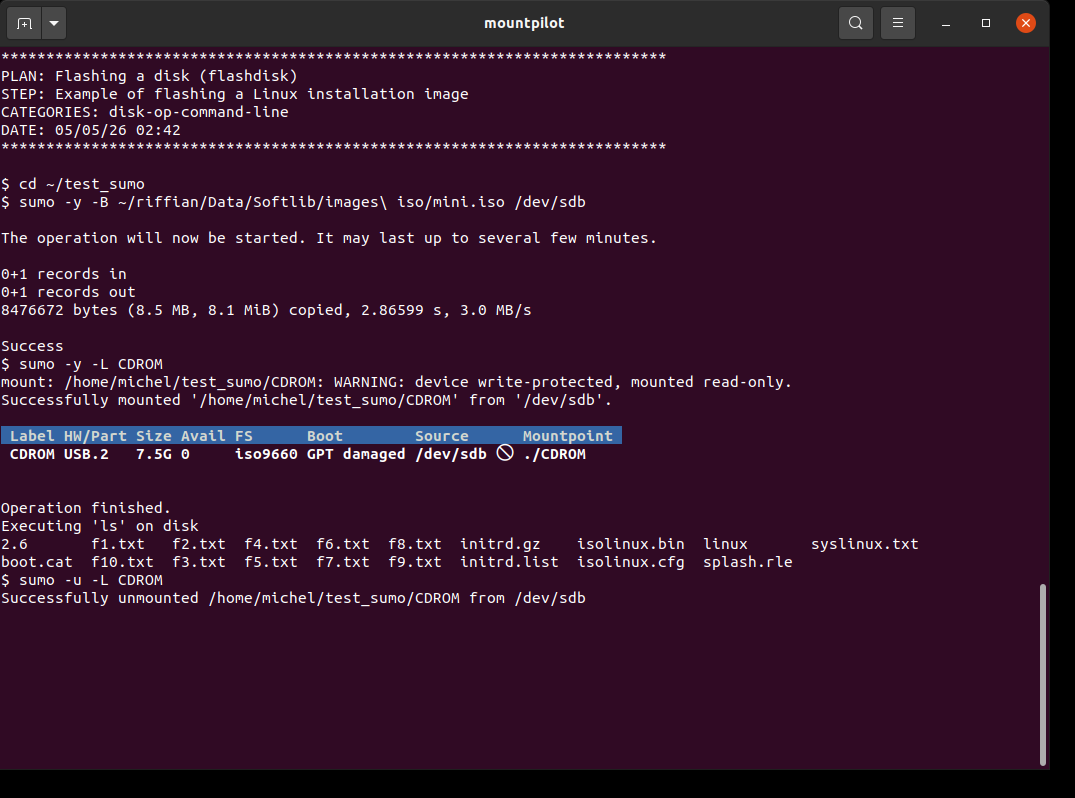
sumo -B <disk image> <block device path>sumo -y -B ~/riffian/Data/Softlib/images\ iso/mini.iso /dev/sdbThis example flashes a mini installation image of Debian labeled 'CDROM'. Flashing the image results in the creation of an ISO9660 file system which content can be mounted.
Flash a disk via dashboard
Video |
Comments |
Example of flashing a mini Debian image with the interactive console
|
The image debian_20070703T000000Z_mini.iso is flashed on stick via the console, typing 'F'. Default location folder of image is given in sumo’s local config. Once flashed, the image is mounted and browsed typing 'b'. At the end, the stick is unmounted and content wiped off. Note: This example performs the same task as the one given for the command line example, but using the console menus and functionality. precondition: plugin the big 8Go stick |
Format a disk
Purpose
This function enables to create a file system occupying the whole space of a disk. Depending on the user’s selection when prompted, the file system may be contained inside a single partition or none.
| After this operation, all data on the disk will get lost. Use this function with care! |
Filesystem without partition
When prompted the user can choose to create the file system which is not contained inside a partition, directly on the disk.
| A partitionless device misses a MDR/GPT sector and can not be partitioned later. |
| A partitionless device may not be recognized by some systems and devices. |
| It may not be allowed for some systems, like FAT family (FAT32, exfat,vfat etc.). |
| It may be recommended if anyway whole device is needed and going to be used (e.g. as backup)/. |
| You don’t have to worry about limitations of the partition format (e.g. max size of a part). |
Filesystem with partition
When prompted the user can choose to create the file system which is contained inside a partition (generally recommended).
The type of the partition will be deduced from the file system type, using an internal map giving the applicable partition GUID from the FS type.
Format a disk via command line
The file system type specified on command line is one of the values as returned by blkid --list-filesystems.
|
| The command line tool does not verify that the device was already mounted or not, but the dashboard does. |
sumo -F -t <filesystem type> <block device path>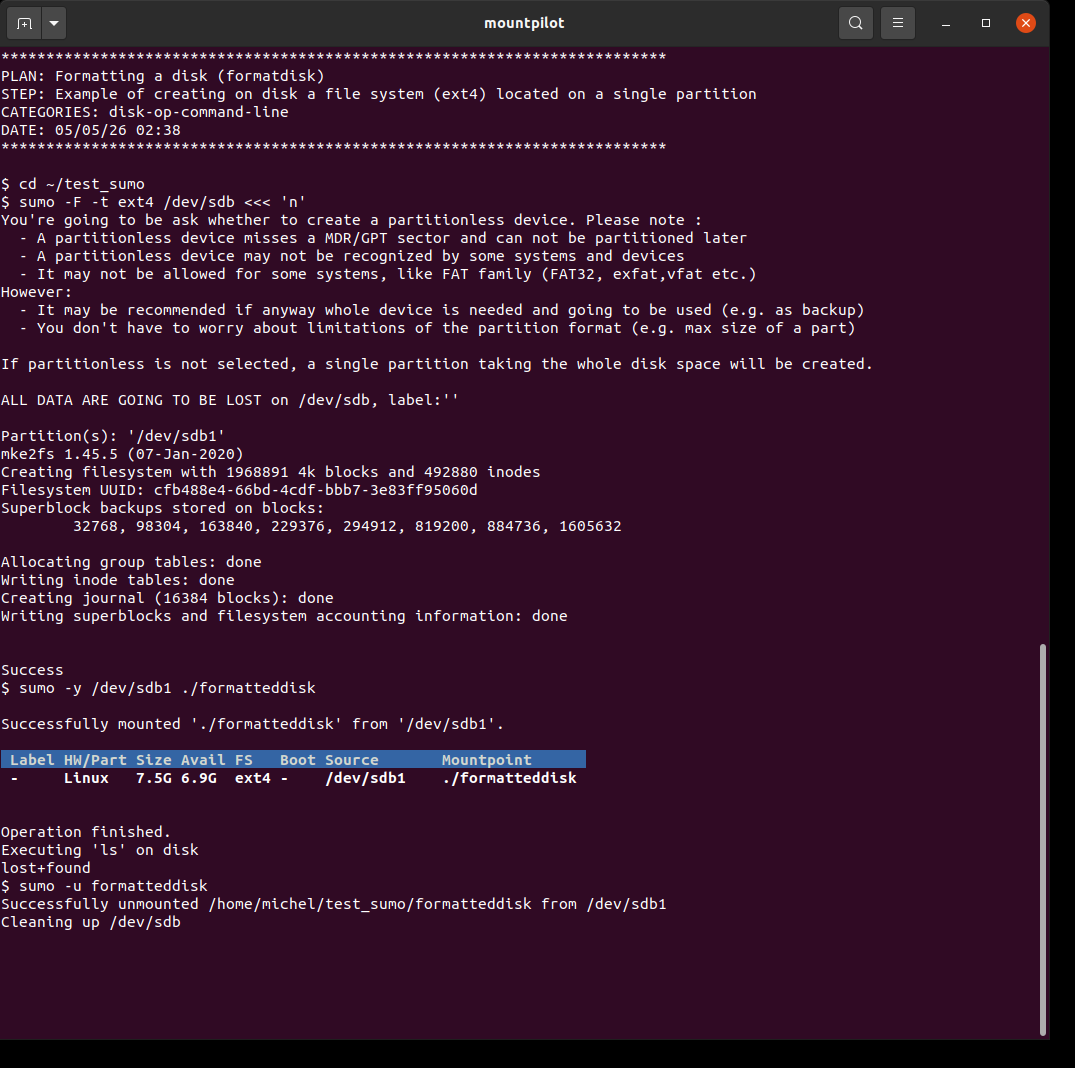
sumo --format-disk -t <filesystem type> <block device path>sumo -F -t ext4 /dev/sdb <<< 'n'When prompted, 'n' (no) is automatically entered to disable a partitionless formatting. The result is a single partition containing an ext4 file system.
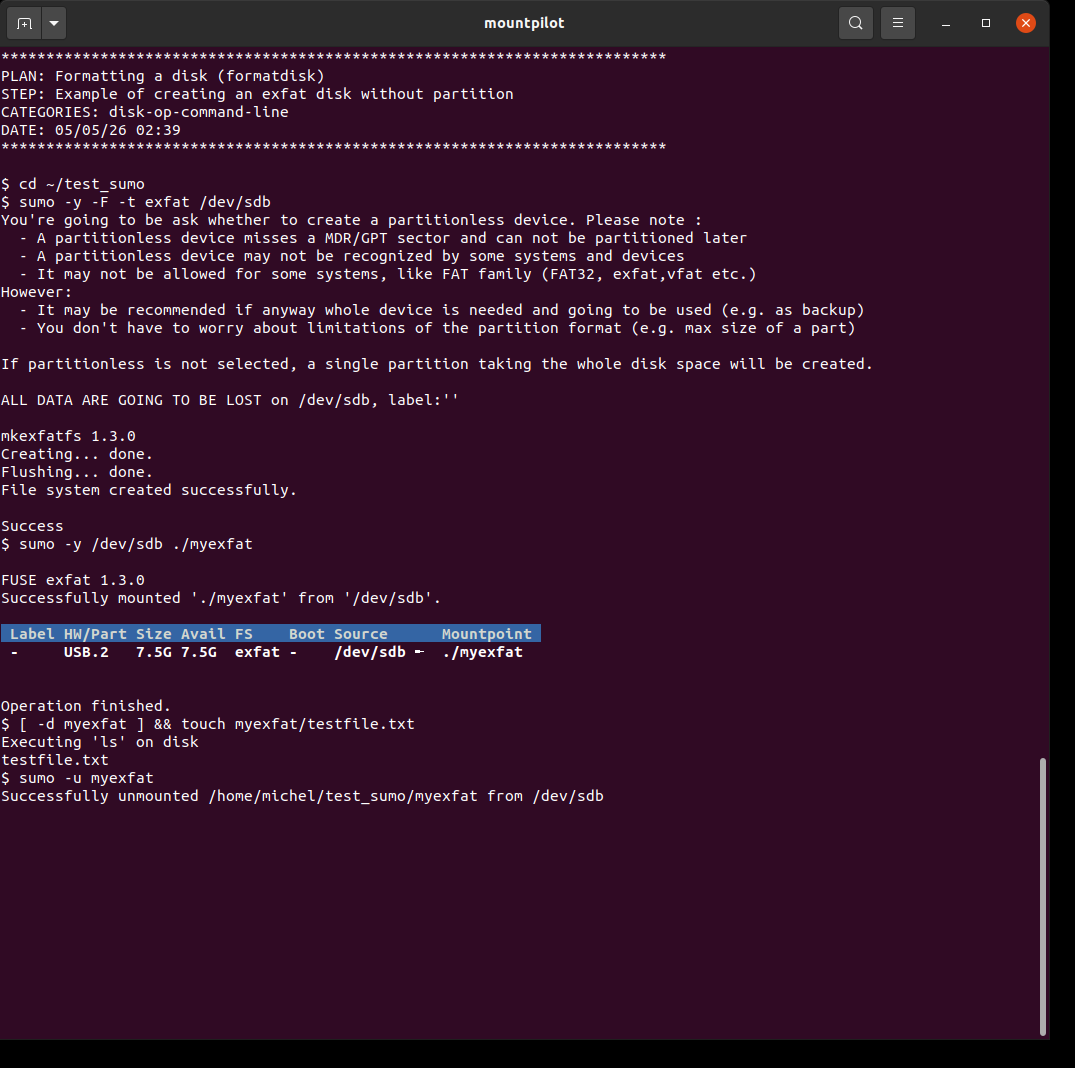
sumo -y -F -t exfat /dev/sdbWhen prompted, 'y' (yes) is entered to enable partitionless formatting. The result is an exfat disk without partition. A test file is written and its presence checked with 'ls'. Note that for mounting, the disk device path has to be used directly. precondition: plugin the big 8 Go stick
Format a disk via dashboard
Video |
Comments |
Example of formatting a exfat disk with the interactive console
|
This example formats a blank USB key with an exfat partition. The partition is mounted and browser is opened on mounted folder, which should be empty. At the end, it is unmounted. precondition: plugin the big 8Go stick |
Create a single partition disk
Purpose
This function enables to create a single partition which occupies the whole space of the selected disk.
| This doesn’t install any file system on the partition. To install a partition and file system on it, refer to the next section Format a disk. |
Create partition via command line
The type of partition to create is identified by its GUID.
The list of available partition GUIDs on the system are documented on page https://en.wikipedia.org/wiki/GUID_Partition_Table#Partition_type_GUIDs.
| After this operation, all data on the disk will get lost. Use this function with care! |
sumo --part-disk=<partition GUID> <block device path>
sumo -P <partition GUID> <block device path>sumo -y -P EBD0A0A2-B9E5-4433-87C0-68B6B72699C7 /dev/sdb
Create partition via dashboard
Video |
Comments |
Example of creating a disk partition with the interactive console
|
This example creates a Microsoft Basic data partition on a blank USB stick. Press 'P' on the disk device. Once the partition has been checked created, the stick is wiped off of any disk information to make it blank again (using key 'f’ormat). precondition: plugin the big 8Go stick |
Auto-setup assistance
Auto-login setup
SSH auto-login
Upon user’s confirmation, a SSH auto-login can be set up for avoiding having to type the password at each mount request. This process is totally transparent to the user. The user has only to enter password when asked to do so.
Video |
Comments |
Example of SSH auto-login setup carried out at first mount
|
An attempt to mount via SSH is carried out on host ${TEST_HOST_1_IP} using login michel. It is detected whether an auto-login is already out there. When not, the setup of the auto-login is followed. After the setup is done the remote folder is listed, the remote host is unmounted and remounted to check that the auto-login is in effect and no password is requested anymore. NOTE: Assign a local IP to the interface used to communicate with test host sudo ip addr add 192.168.0.31/24 dev enx000fc9119ecb On test machine, recreate user 'michel' sudo userdel -f michel sudo useradd michel -m sudo passwd michel sudo ip addr add ${TEST_HOST_1_IP}/24 dev enp0s25 # Put the correct interface name |
A new key is generated using ssh-keygen (if necessary) and copied using ssh-copy-id on the remote host. ssh-keygen and ssh-copy-id are internally called under the hood to achieve the process.
|
Automatic FTP auto-login
FTP auto-login can be achieved through the standard FTP password file .netrc located in the user’s home directory, having restricted access permission (user-only).
MountPilot makes usage of .netrc transparent to the user. It generates and manages a .netrc file each accessed FTP site, which is saved with the proper permissions in the user’s home.
Video |
Comments |
NFS exports setup on remote host
Upon user’s confirmation, it is possible to let the distant NFS export file be automatically updated for the NFS mount to succeed. The following example is the continuation of the test described in [NFS server installation].
Video |
Comments |
Example of automatic NFS exports setup upon NFS URL mounting
|
An attempt to mount a NFS share on a remote host where the exports do not allow the mounting yet The NFS export setup is agreed and the NFS mounting eventually is successful. precondition: nfs server was installed in test 'autonfsserverinstall_i'. For the sake of this test, the /etc/exports file may just have to be removed: sudo su - echo > /etc/exports exit sudo systemctl restart nfs-kernel-server |
Google Drive login via OAuth IDs
Overall process
Google Drive mounting relies on google-drive-ocamlfuse. This package will be automatically installed on first use.
For mounting Google Drive, the Google Drive account credentials must be prepared and put in the Sumo configuration file. The following diagram depicts the different steps to follow. Each of these steps is described in the sections below holding the same names:
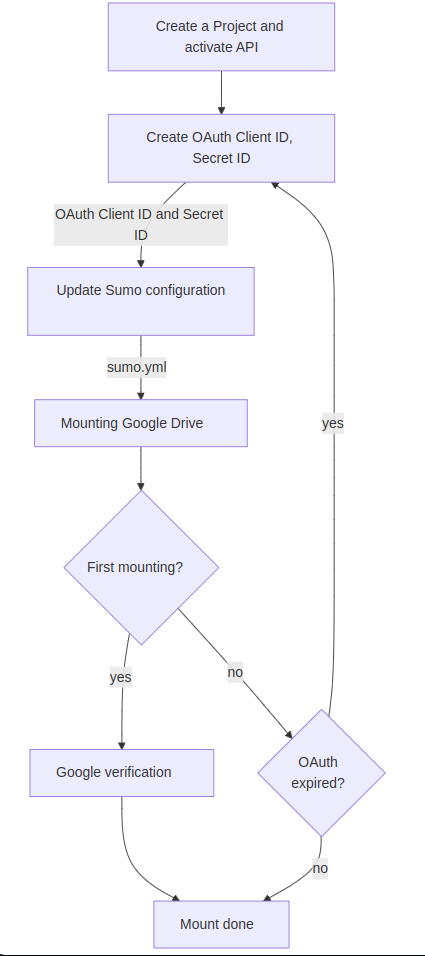
Create a Project and activate API
The Google Drive is accessed via the Google API. For the sake of using that API, a Google Project must be created beforehand the Google Drive API must activated for that project. Go to https://console.cloud.google.com/ and check the Google help if necessary.
Create OAuth Client ID, Secret ID
The access via the Google API is protected by authentication credentials which are composed of resp. the so-called OAuth Client ID and the OAuth Secret ID.
The OAuth Client ID and Secret ID must be generated for the Google Drive account from https://console.cloud.google.com/
The Google portal and procedures for generating OAuth Client ID and Secret ID have changed several times. A rule of thumb is to always check the lastest documentation from Google. The following instructions have to be seen more like hints and main milestones for achieving this task.
(1) Go to https://console.cloud.google.com/
(2) Click on Google Auth Platform”
(3) Select a project using the project picker at the top. A new project can be created from https://console.cloud.google.com/ too.
(4) Click on “Client” in the left menu
(5) Create “Client” by clicking on the button "+ Create client"
(6) Select “Desktop App” for application type
(7) Upon successful create, a window appear showing the “Client ID” and “Client Secret” Please copy/past this data on the sumo configuration file.
(8) The OAuth consent screen may have to be configured. This enables to let verified users to use the APIs
(9) Select “External”. “Internal” is only when using Google Workspace. The email addresses must be specified, app name and also the logo. Other data like domain, site etc not required.
(10) Add all scopes
(11) When invited to add users, add your gmail email address. The “add” button must be double clicked to work!
(12) A summary page is shown
Update Sumo configuration
Once the OAuth Client ID and Secret ID genrated, they must be put into the sumo configuration file sumo.yml. Here’s an example:
...
google client id: 7373740720-9113vupaeef6k84pb5o81s2im13.apps.googleusercontent.com
google secret id: POCSPX-qvduxANtT-zuAALMMyNGO9_LkL
...
Mounting Google Drive
See section Mounting a Google Drive.
when mounting after a replacement of older already existing OAuth, add the --refresh-deps option to the mount command. This option is not required for the very first time.
|
Google verification
Upon very first mount and upon regeneration of new OAuth IDs (e.g. because of expired), the user has to go through a verification process on Google.
Copy the verification code from the opened web page and paste it in the console when prompted.
OAuth expired ?
If the OAuth credentials became invalid or expired, the above process must be repeated again by regenerating new Client ID and Secret ID.
The verification shall be started anew by mounting using the --refresh-deps option:
sumo -y https://drive.google.com drive --refresh-deps
Specifying --refresh-deps will cleanup any previous cached data from the underlying fuse driver.
|
| By default, the OAuth IDs expires within a few days. Please check the Google conditions of use for setting up permanent OAuth. |
Auto-installations
Foreword
| Server-side administration and configuration is out of scope of MountPilot. This section describes one option to achieve a minimum setup. This option is not mandatory, provided a suitable server has been setup for the intended use. |
| Remote installations require a SSH access. |
adbfs auto-installation
If adbfs is neither reachable via PATH nor available in the configured adb install folder (see adbfs installation dir configuration parameter), it will be proposed to install one.
The download URL, build folder and binary installation folder are configurable. The default values can be changed as described in section ADB setup and mount options.
FTP server auto-installation
Upon user’s confirmation, it is possible to let the distant FTP server be installed when attempting to mount with a FTP URL, provided SSH access.
Video |
Comments |
Example of auto FTP server install when none is detected upon FTP mounting
|
In this example, we go through the entire FTP setup process. We attempt to mount a FTP site on a remote host where there is no FTP server. We select 'vsftpd' for installation, then we agree to proceed with FTP password setup. Finally, the mounting is done and the content of the mounted folder is listed. The folder is unmounted and remounted to check that the mounting runs smoothly with any new password entry. precondition: The SSH must have been installed via previous test 'autossh_i' ensure vsftp* packages are uninstalled sudo apt remove vsftp* |
NFS server auto-installation
Upon user’s confirmation, it is possible to let the distant NFS server be installed when attempting to mount with a NFS URL, provided SSH access.
Video |
Comments |
Example of automatic server installation when no NFS server is detected upon NFS URL mounting
|
In this example, we go through the entire NFS setup process. We attempt to mount a NFS share on a remote host where there is no NFS server. We let the installation proceed, then we agree to proceed with NFS export setup. Finally, the mounting is done and the content of the mounted folder is listed. The permission may be lacking for it, since the ID of user michel may not be the same. The folder is unmounted and remounted to check that the mounting runs smoothly with any new password entry. precondition: The test host must be connected on the same LAN, and not point-to-point anymore. The internet connection shall also be established: put "nameserver 8.8.8.8" in /etc/resolv.conf sudo ip route add default via 192.168.0.254 dev enp0s25 sudo ip addr add 192.168.0.30/24 dev enp0s25 # if done yet The SSH must have been installed via previous test 'autossh_i' ensure NFS packages are uninstalled sudo apt remove nfs-* This did not help get the permissions: remote 'michel' account must be in sudoers' group: sudo usermod michel -G sudo sudo groupadd -g 2001 G2001 |
Configuration
Overview
The YAML configuration file enables to control:
-
Default behavior of dashboard
-
Default mount options for certain data sources
-
Default parameters for the installation of packages, both for local and remote hosts
Some of the configuration can be overriden by command line.
The following sections document the configuration parameters which are relevant for each data source.
| Default values can be checked in section Default configuration file. |
Location
The configuration parameters are read from file .config/Sumo/sumo.yml in the user’s home folder.
If this file does not exist, it will be copied from the default configuration file coming along the release in the sumo’s installation directory.
If the user’s configuration file cannot be read for any reason, the default one is used.
General configuration
The following table lists the general parameters independent of any mount method.
| Option | Description | |||||||||||||||||||||||||||||||||||||||||||||
|---|---|---|---|---|---|---|---|---|---|---|---|---|---|---|---|---|---|---|---|---|---|---|---|---|---|---|---|---|---|---|---|---|---|---|---|---|---|---|---|---|---|---|---|---|---|---|
devtype |
Default filter name when listing data sources See section List filters for allowed filter names. See sample file for default value. |
|||||||||||||||||||||||||||||||||||||||||||||
monitoring time |
Timeout, expressed in seconds, for refreshing the dashboard. |
|||||||||||||||||||||||||||||||||||||||||||||
security mask |
File permission mask applied for auto-created mountpoint folders |
|||||||||||||||||||||||||||||||||||||||||||||
display format |
Possible values:
|
|||||||||||||||||||||||||||||||||||||||||||||
show details |
Boolean telling whether to show by default the details (key command 'd') at the bottom of the dashboard. Possible values: yes, no. Default is yes. |
|||||||||||||||||||||||||||||||||||||||||||||
show history |
Boolean telling whether to show by default the history (key command 'h') at the bottom of the dashboard. Possible values: yes, no. Default is yes |
|||||||||||||||||||||||||||||||||||||||||||||
browser |
The browser application to launch when browsing is triggered from the dashboard. |
|||||||||||||||||||||||||||||||||||||||||||||
iso directory |
The default directory where to find ISO images when flashing a disk. |
|||||||||||||||||||||||||||||||||||||||||||||
key shortcuts |
Provides the keymap for the command which can be executed from the dashboard. Normally, it should not be changed, and if so, it should be done with care. The available command numbers which can be mapped are the following :
|
NFS setup and mount options
| Option | Description |
|---|---|
mount options nfs |
Default native client-side mount options. See |
nfs remote server login |
The remote account to use for installing the remote NFS server and modifying the NFS exports on the server |
nfs exports options |
The server-side mount options to be put in the NFS export file on the server side. |
SSH setup and mount options
| Option | Description |
|---|---|
mount options ssh |
Default sshfs mount options. Type |
FTP setup and mount options
| Option | Description |
|---|---|
mount options ftp |
Default curlftpfs mount options. Type |
ftp server packages |
The system packages for installing the remote FTP server |
ADB setup and mount options
| Option | Description |
|---|---|
mount options adb |
Default FUSE mount options for adb. See |
adbfs build dir |
The directory inside which the adbfs-rootless git repo is cloned and binary is built. |
adbfs install dir |
Target installation of adbfs binary. |
adbfs git repo |
HTTP address from which adbfs-rootless is cloned. |
VERA setup and mount options
| Option | Description |
|---|---|
vera creation options |
Default options used when creating new VERA volume. Type `veracrypt -h ` for possible values. |
vera version |
Gives the version of the VERA package to download when it needs to be installed. |
vera download url debian |
URL to use for downloading the installation package via wget. |
The default creation options set by configuration are the following:
-
volume type is "normal",
-
encryption algorithm is "Serpent-AES",
-
hash used is SHA-512,
-
PIM is O,
-
quick is set on,
-
No key files used,
-
no hidden volume.
The content of command 'dmesg' is used as random source for encryption. This can not be changed by configuration at the moment.
Google Drive setup and mount options
| Option | Description |
|---|---|
mount options google-drive-ocamlfuse |
Default FUSE mount options for google-drive-ocamlfuse. For advanced specific options, see https://github.com/astrada/google-drive-ocamlfuse. |
google client id |
OAuth client ID as generated from https://console.cloud.google.com/ |
google secret id |
OAuth secret ID as generated from https://console.cloud.google.com/ |
ppa google-drive-ocamlfuse |
PPA repository where to download installation package |
apt google-drive-ocamlfuse |
APT package name of google-drive-ocamlfuse |
Default configuration file
display format: bolddisk
vera creation options : --protect-hidden=no --volume-type="normal" --encryption="Serpent-AES" --hash="SHA-512" -k "" --pim=0 --quick
vera version: 1.26.24 1.26.14
vera download url debian: https://launchpad.net/veracrypt/trunk/%%version%%/+download/%%name%%-%%version%%-%%distroname%%-%%distrovermajor%%-%%arch%%.deb
#vera download url debian: https://launchpad.net/veracrypt/trunk/%%version%%/+download/%%name%%-%%version%%-%%distroname%%-11-%%arch%%.deb
vera download url ubuntu: https://launchpad.net/veracrypt/trunk/%%version%%/+download/%%name%%-%%version%%-%%distroname%%-%%distrovermajor%%.04-%%arch%%.deb
#vera download url ubuntu: https://launchpad.net/veracrypt/trunk/%%version%%/+download/%%name%%-%%version%%-%%distroname%%-%%distrover%%-%%arch%%.deb
devtype: noloop,nodocker
browser: nautilus
key shortcuts: d:255,r:64+?,u:253,i:252,b:251,e:250,h:249,l:248,f:247,F:246,P:245,g:244
show details: yes
show history: yes
monitoring time: 1
security mask: 0077
mount options google-drive-ocamlfuse: -o allow_other -o auto_unmount
mount options ssh: -o allow_other,reconnect,ConnectTimeout=15,ServerAliveInterval=30,ServerAliveCountMax=4000
#mount options ssh: -o allow_root
mount options ftp: -o allow_other
#mount options ftp: no_verify_hostname,ssl
ftp server packages: vsftpd pureftp
mount options nfs: -o soft,timeo=10,retrans=3
nfs remote server login: $USER
# no_root_squash means a root can mount a distant folder as root as well, otherwise it is mounted as 'nobody'
# root squashing is safer in public/corporate networks
nfs exports options: rw,sync,no_subtree_check,no_root_squash,crossmnt
mount options adb: -o allow_root,uid=$(id -u),gid=$(id -g)
# The directory inside which the adbfs-rootless git repo is cloned.
# Once clone, $HOME/adbfs-rootless/adbfs-rootless is expected to be there
adbfs build dir: $HOME/mountpilot-deps
adbfs install dir: /usr/local/bin
adbfs git repo: https://github.com/spion/adbfs-rootless
ppa google-drive-ocamlfuse: ppa:alessandro-strada/ppa
apt google-drive-ocamlfuse: google-drive-ocamlfuse
google client id: todo
google secret id: todo
Logging
Overview
The tool generates logs in a plain text file regarding the most important executed system-level commands and further details in case of warning and errors.
At the moment, it will be endless growing and survive over successive runs.
Log file location
.local/sumo/log.txt in the user’s home directory.
Logging level
There are 4 types of messages which are highlighted with different colors when also displayed on the terminal:
| Message type | Usual output in the console | color |
|---|---|---|
Informational messages |
standard output (stdout) |
none |
Important Informational messages |
standard output (stdout) |
blue |
Warning messages |
standard error output (stderr) |
yellow |
Error messages |
standard error output (stderr) |
red |
Debug messages |
standard error output (stderr) |
green |
The debug messages can be activated with the --debug-mode option. This should be reserved for development and debugging purposes.
|
Viewing the logs
The following table shows the different alternatives for viewing the log content:
Execute |
Type key 'g' from dashboard. The logs are shown on the bottom parts |
Edit file |
Lifecycle
Configuration management
The configuration management of the original software is managed on a non-disclosed server.
The clean release packages and the release source code files are available on GitHub at https://github.com/michelm33/mountpilot
Testing
The software is tested based on the plan file shotplan.yml part of the release.
shotplan.yml contains the test plans for mountpilot/sumo which can be used in any of the following ways depending on the option passed to the plan processor shotplan.sh:
-
without any option among those described below: For generating document parts for the online documentation and generating test reports. An individual plan or a set of plans of a given category or 'all' can be selected.
-
with option '-T|no-report': For running tests only, part of them being automatic and other manual. An individual plan or a set of plans of a given category or 'all' can be selected.
-
with option '-M|--manpage' : For generating the example lines for the manpage
-
with option '--cat' : List available categories
| This plan file is executed using an in-house made tool which may become publicly available at a later date. |
Bug tracking
Reported bugs are tracked via the GitHub page https://github.com/michelm33/mountpilot.
Roadmap
Priorities will be adjusted according to inquiries.
| Short description | Details | Current priority (LOWEST, MEDIUM, HIGHEST) | Workload (LOW, MEDIUM, HIGH) |
|---|---|---|---|
Mount function |
|
HIGH in average |
MEDIUM individually, HIGH in all |
List function |
|
|
LOW |
Inter-operability |
Propose alternate output for the list of mounts: e.g. JSON, YAML, XML. This could be useful when output is used as input by other tools. |
LOW |
LOW individually, MEDIUM in all |
Benchmarking function |
|
HIGH |
HIGH |
Log function |
|
LOW |
LOW |
Dashboard |
New features:
Improvs:
|
|
|
Command line |
Changing directory to the mountpoint of a labelled device : e.g. sumo --cd BACKUP_ALL |
LOW |
LOW |
Security function |
|
MEDIUM |
HIGH |
Diagnostic function |
|
HIGH |
HIGH |
Platforms |
|
|
|
Extended and New functionalities (high workload) |
|
|
|
Internal Architecture |
Improvs:
|
LOW |
MEDIUM |
Swiss-knife extension |
Define an architecture for pluggable extensions, whereby new functionality can be added while keeping base functions untouched. For example, a vault can be easily implemented as extension based on VERA volume. |
LOW |
MEDIUM |
Packaging & updating |
Basically, there would be a file for each one, mappping the original package names with the target ones and the relevant packaging tool. The file selection would base on the output of a tool or a mix of different tools like lsb_release, uname etc. |
LOW |
LOW |
Test |
|
MEDIUM |
LOW |
External platforms
Donating and gifts
How you can support this work and how to claim your gifts is reported on the dedicated Donate & Gifts online page.
Thanks
-
The stack overflow community which is a precious source of support and information that may save your day sometimes!
-
help2man an utility to generate man pages
-
svgrepo.com for the great graphical artefacts
-
The Linux community of course
-
'OBS' free video recording tool
-
'OpenShot' video editor tool
-
'handbrake' video conversion tool
-
'meld' tool
Probably this list may be completed over time, sorry if I missed anyone!
Appendix
The technical manual provides the user with technical insights and support about tools under the hood, as well as specific setup and advanced procedures. Thereby, it serves as basis for the maintenance of MountPilot.
System tools and packages
The table hereafter lists, for each supported type of mountable data source, the underlying system tools which are used and the related package dependencies.
| Data source | Mounting method | Low-level tool,service | Packages | Further information |
|---|---|---|---|---|
Block device (mass storage device), overlayFS |
Native linux mounting |
mount, dmsetup, findmnt, lsblk, udevadm, sgdisk, gdisk, partprobe, parted, sfdisk, df, losetup, mkfs, wipefs, dd, lsusb (USB only) |
dmsetup |
See manpages |
LVM volumes |
Native linux utils |
mount, pvs, lvs, vgchange, dmsetup |
lvm2, dmsetup |
See manpages |
Any network-based mounting |
Native linux utils |
ethtool, ip addr/route, nslookup, host, iwconfig, nmcli |
ethtool, bind9-dnsutils, bind9-host, wireless-tools, network-manager |
See manpages |
Computer reachable over NFS |
Native linux mounting |
mount.nfs |
nfs-common, putty-tools, nfs-kernel-server (server-side) |
See Ubuntu page Network File System (NFS) |
Windows computer reachable via SAMBA |
Native linux mounting |
mount.cifs |
smbclient, cifs-utils |
See manpages for mount.cifs. SAMBA (formerly CIFS) enables to mount a folder of a remote Windows computer over the network via SAMBA protocol. |
Computer reachable over SSH |
FUSE mounting |
sshfs |
openssh-client, sshfs |
SSHFS enables to mount a folder of a remote computer over the network via SSH protocol. See Secure shell file system on Wikipedia |
Computer reachable over FTP |
FUSE mounting |
CurlFtpFs |
curlftpfs |
CurlFtpFs enables to mount a folder of a remote computer over the network via FTP protocol. See CurlFtpFs Manpages. See also FTPFS on Wikipedia for more general hints. |
Android reachable via adb |
FUSE mounting |
adbfs-rootless |
(git) |
adbfs-rootless enables to connect to an Android device via the adb protocol |
Google Drive Cloud |
Mounting of a Google Drive Account |
google-drive-ocamlfuse |
google-drive-ocamlfuse |
|
Disk file |
Mounting of raw disk file |
losetup,partprobe,sfdisk,pvs,lvs |
See manpages |
|
VERA Disk file |
Mounting of VERA encrypted disk file |
veracrypt |
veracrypt-console |
|
LUKS Disk file |
Mounting of LUKS encrypted disk file |
cryptsetup |
cryptsetup-bin |
|
Virtual Machine Disk file |
Mounting of QCOW2 and VDI disk files |
qemu-ndb |
qemu-utils |
sudo with no password
Running sudo requires entry of password every 15min by default. To avoid having to type the password all the time for the dedicated account, follow this procedure and replace mountpilot with your own account if different.
-
Execute
sudo visudo -
Insert the following line at the end of the file :
mountpilot ALL=(ALL) NOPASSWD: ALL -
CTRL-Oto write, thenCTRL-Xto exit
sudo with increased reentry timeout
Running sudo requires entry of password every 15min by default. To avoid having to type the password all the time, an alternative to setting up sudo with no password, is to increase the re-entry timeout.
-
Execute
sudo visudo -
Add parameter
timestamp_timeout(minutes) to the defaults line as follows (here e.g. for 24h):Defaults env_reset,timestamp_timeout=1440
-
CTRL-Oto write, thenCTRL-Xto exit
User account with sudo priviledges
The _sumo_create_user.sh script is for convenience for setting up an account to be used for MountPilot. At first, it asks for the account login. If it does not exist yet, it will create it.
chmod +x _sumo_create_user # Make script executable
sudo _sumo_create_user.sh
When using an existing account, the sudo priviledges can also be set up by running: (sudo dpkg -l sudo &>/dev/null || sudo apt install sudo) && sudo usermod -a -G sudo <your_login>. where <your_login> has to be replaced with the chosen account name. This installs sudo if not yet installed and add the user to the sudo group.
|
FAQ
Android device is not detected
Sometimes it may be tricky to make the adb/USB link work. Here’s some hints.
Perform some checks:
-
USB cable is connected
-
'User developper options' are activated on the Android device Note: this achieved by tapping 7 times on 'build number' inside 'Settings/About' Note: 'User developper options' are accessed via 'Settings/System' afterwards
-
'USB debugging' mode is activated inside 'User developper options'
-
USB preferences are either set to 'PTP' or 'No data transfer' (Settings/Connected devices/USB).
-
Connection to the device was accepted when asked so on the device.
Follow these instructions if it is still now working:
-
(try first without Plug in/off the cable)
-
Deactivate 'USB debugging',
-
Revoke USB auth,
-
Activate 'USB debugging' again,
-
Unmount any auto-mount done by the system
-
accept authorization when asked so.
-
Ensure 'PTP' or 'No data transfer' transfer is selected when asked so on the device.
-
Sometimes you might have to try the above twice.
Sometimes, it may take up to 1 or 2 minutes for the first operation to complete. It is often worth to wait a little bit instead of breaking the connection and reach an unstable or stuck system state.
If it still fails despite that all, then either the device is too old to be compatible with the installed adbfs package, or the adbfs package needs to be upgraded. Check the following:
Permission denied (fuse)
For fuse-based mounting, if a 'permission denied' arises, it may be fixed by using either allow_other mount options. This can either be passed on via command line with the -o option or be set as default through configuration (see Configuration).
If allow_other is necessary on client side, it may be necessary to adapt the /etc/fuse.conf configuration on the server side as well, by defining (or uncommenting) the line:
user_allow_other