In a nutshell
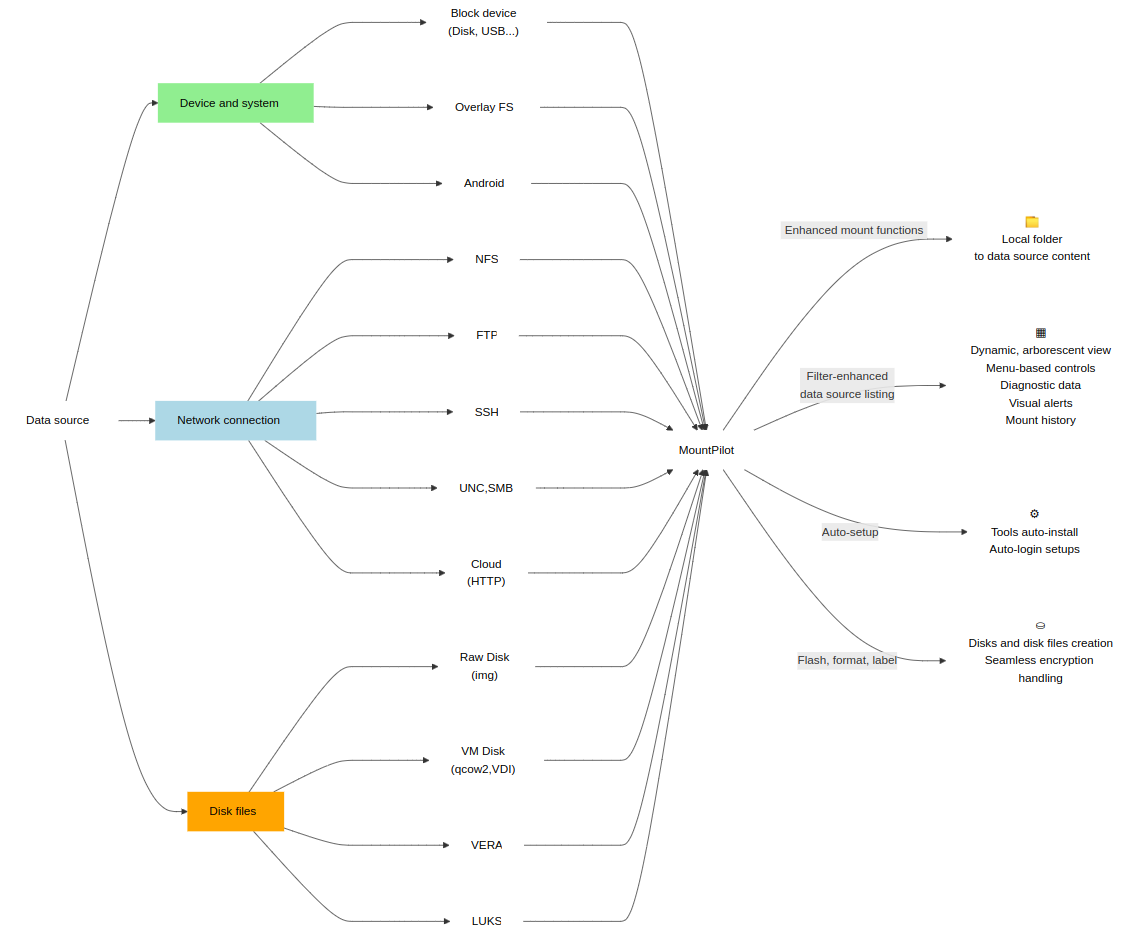
MountPilot integrates into one tool the multitude of mount methods which exist for different types of data source media like disks and network, enhanced with diagnostic, monitoring, auto-setup, auto-install capabilities. It can be used either via command line or as interactive dashboard. Based on the specified source address, it will install and run the suitable system tools. The dashboard also serves as advanced monitoring tool and mount history manager.
| See Mounting and its benefits for more background infos on mount mechanism. |
In its simplest form, a sumo command line typically looks as follows (see manpages for details):
sumo [<OPTIONS>] <data source> [<mountpoint>]There are multiple command examples supplied in section Sample mount commands.
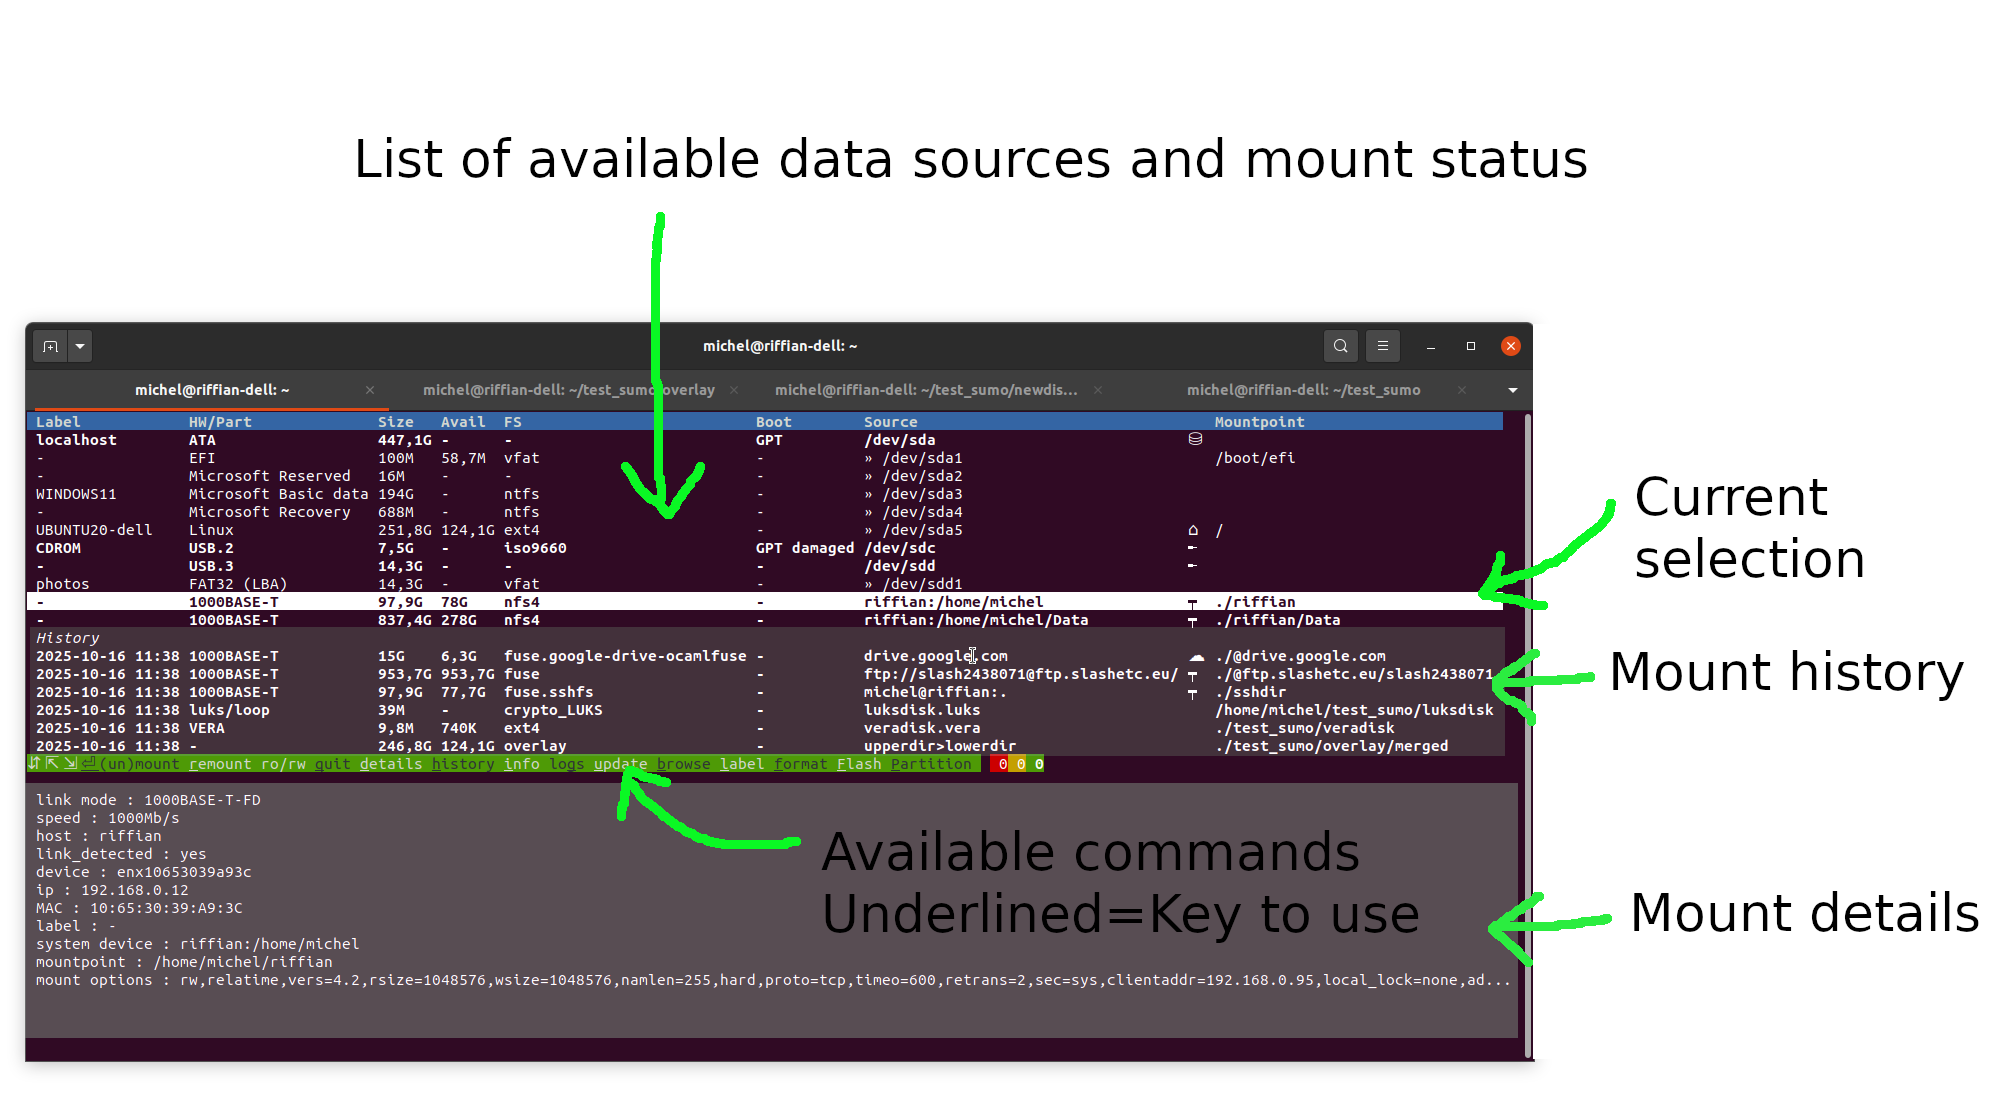
With the mountpilot dashboard, you’re just a keystroke away from most common mounting and disk operations. The dashboard shows a dynamic table of mounted and unmounted sources, as well as an history of past mount. The table can be controlled like a terminal menu on which the user can select a source and carry out an operation on it.
It can be launched as follows:
mountpilotor simply with the following shortcut:
mpThe following annotated screenshot explaines the dashboard layout:
Installation and platforms
The MountPilot’s core exclusively relies on standard system tools and is written 100% in BASH. It is therefore deemed to offer a great level of compatibility and durability, even though the tool has been primarily used and tested on Debian-based distributions till now (Debian, Ubuntu).
The tool is released as both as a Debian package (.pkg) and ZIP package. See Download page for further information.
GitHub
The clean release packages and the release source code files are available on GitHub at https://github.com/michelm33/mountpilot
Demo video
The following video is supplied as sample demo. The dashboard is run on one terminal and from another one a LVM system residing in a qcow2 file is mounted using a sumo command. The new mounted disk appears live on the dashboard. From there, a file browser is launched to check the content of the mounted disk. Then, the disk file is unmounted from the terminal.
Once unmounted, a new entry for the disk file appears live in the history of the dashboard. From here on, the video shows that the LVM disk can be remounted from the history by pressing enter key ↵. The LVM is unmounted again, this time directly via the dashboard, by pressing enter key ↵ on the root entry corresponding to the qcow2 file. Note that individual partitions can also be mounted and unmounted from there.
Sample sumo commands
Sample list commands
# Default List (everything but loop devices)
$ sumo -l
# List all except loop devices (default behavior)
$ sumo -l noloop
# List only real disks
$ sumo -l disk
# List only NTFS partitions
$ sumo -l ntfs
# List by searching the string 'adb'.
$ sumo -l adb
# List all available data sources incl. loop
$ sumo -l all
# Default list using the 'bgcolor' display format
$ sumo -l --display-format=bgcolor
# Default list using the 'color' display format
$ sumo -l --display-format=color
Sample mount commands
Mounting using a system label
# An USB stick labeled 'photos' is mounted on the folder 'photosDir' and its content listed.
$ sumo -y -L photos ./photosDir
Mounting a data source read-only
# A USB stick labeled 'photos' is mounted read-only on the folder 'photosDir'.
$ sumo -o ro -y -L photos ./photosDir
Mounting a block device
# An USB key contains a flashed image of a Debian installation image.
$ sumo -y /dev/sdb ./DebianInstall
Mounting a partition
# An USB key which partition is mapped to device `/dev/sdc1` is mounted on the folder 'photosDir'.
$ sumo -y /dev/sdc1 ./photosDir
Mounting an overlay file system
# An overlay FS is created where 'demoUpperDir' is the overlaying upper dir and 'demoLowerDir' the overlaid lower dir.
$ sumo -y 'demoUpperDir>demoLowerDir' overlayDir
Mounting an Android device via adb
# An Android tablet is mounted on folder '~/test_sumo/adb'.
$ sumo -y adb://usb  ~/test_sumo/adb
Mounting a NFS shared directory
# The remote home of another host is mounted on folder 'testNFSDir'.
$ sumo -y 192.168.0.12:/home/michel testNFSDir
Mounting a remote directory via SSH
# The remote home of another host is mounted on folder 'testRemoteDirSSH'.
$ sumo -y michel@riffian:. testRemoteDirSSH
Mounting a Windows share
# The home of the remote Windows host 192.168.0.30 is mounted on folder 'windows'.
$ sumo -y //192.168.0.30/michel --user=michel --password=secret_password_ ~/windows/
Mounting a FTP directory
# The FTP site ftp.slashetc.eu is mounted on folder 'webftp'.
$ sumo -y ftp://slash2438071@ftp.slashetc.eu ~/webftp -p mypassword
Mounting Google Drive
# The Google Drive is mounted on folder 'drive'.
$ sumo -y https://drive.google.com drive
Mounting a raw disk image
# The raw disk image is mounted on folder 'imgdisk'.
$ sumo -y imgdisk.img ./imgdisk
Mounting a virtual machine disk
# The virtual disk image is mounted on folder 'imgdisk_qcow2'.
$ sumo -y imgdisk.qcow2 ./imgdisk_qcow2
Mounting a VERA volume
# Example of mounting of a VERA volume which is a file.
# The VERA disk file is mounted on folder 'veravol'.
$ sumo -y veradisk.vera ./veravol -p a
# Example of mounting of a VERA volume hosted on a device. The VERA volume hosted on the device /dev/${VERA_DEVICE} (USB stick) is  mounted  on  folder
'veravol'.
$ sumo -y /dev/${VERA_DEVICE} ./veravol -p a
Mounting a LUKS volume
# Example of mounting of a LUKS volume which is a file
# The LUKS disk file is mounted on folder 'luksdisk'.
$ sumo -y luksdisk.luks ./luksdisk -p a
#  Example  of  mounting  of  a LUKS volume hosted as a partition of a device
# The LUKS volume hosted on the device /dev/${LUKS_DEVICE}  (USB stick) is
mounted
$ sumo -y /dev/${LUKS_DEVICE} ./luksdisk -p a
Mounting a nested data source
# There's a VERA volume file located on a Windows partition labeled 'WINDOWS1' (/dev/sda3).
$ sumo -y -L WINDOWS11 ~/WINDOWS11
$ sumo -y WINDOWS11/Users/miche/Documents/vault/personnel-confidentiel.vera ~/vault # /dev/sda3
Mounting LVM volumes
# The data source is here a full Debian9 VM disk that has been partitionned with LVM.
$ sumo -y ~/riffian/Data/Machines/backuprepo-amd64.qcow2 ~/vmdisk # Note swap won't/cannot be mounted
Sample unmount commands
Unmounting using the mountpoint folder
$ sumo -u ~/photosDir
Unmounting using the device label
$ sumo -u -L photos
Unmounting using the data source location
# Example of unmounting using the NFS URL
$ sumo -s -u riffian:/home/michel/Data/Scan
# Example of unmounting using the SSH URL
$ sumo -s -u michel@riffian:Data/Scan
# Example of unmounting using the UNC address
$ sumo -s -u //192.168.0.30/michel
# Example of unmounting using the FTP URL
$ sumo -s -u ftp://slash2438071@ftp.slashetc.eu
# Example of unmounting using the Google Drive URL
$ sumo -s -u https://drive.google.com
# Example of unmounting using VERA volume file
$ sumo -s -u veradisk.vera
# Example of unmounting using LUKS volume file
$ sumo -s -u luksdisk.luks
# Example of unmounting using a virtual machine disk file
$ sumo -s -u imgdisk.qcow2
Lazy unmounting
# A local USB stick and remote SSH folder are mounted.
$ sumo --lazy -u ~/mnt/testRemoteDirSSH
$ sumo --lazy -u -L photos
Sample mount history listing
Listing available mount histories
$ sumo -H
Sample disk commands
Formatting a disk
# Example of creating on disk a file system (ext4) located on a single partition
# When prompted, 'n' (no) is automatically entered to disable a  parti‐
tionless formatting.
$ sumo -F -t ext4 /dev/sdb <<< 'n'
# Example of creating an exfat disk without partition # When prompted, 'y' (yes) is entered to enable partitionless formatting.
$ sumo -y -F -t exfat /dev/sdb
Creating a disk partition
# Example of creating a single partition of type Microsoft Basic data partition
$ sumo -y -P EBD0A0A2-B9E5-4433-87C0-68B6B72699C7 /dev/sdb
Flashing a disk
# Example of flashing a Linux installation image
# This example flashes a mini installation image of Debian labeled 'CDROM'.
$ sumo -y -B ~/riffian/Data/Softlib/images\ iso/mini.iso /dev/sdb
Creating a raw disk image file
# Example of creating a raw disk image file with a 1Mo ext2 file system without any prompting
$ sumo -y rawdisk.img -o size=1M -t ext2
# Example of creating a raw disk image file with default file system (ext4) and manually entered size 900K
$ sumo -y rawdisk.img
Creating a VERA volume file
# Example of creating a VERA volume file with a 2Mo exfat file system without any prompting
$ sumo -y veravolume.vera -o size=2M -t exfat -p mypassword
# Example of creating a VERA volume file with a exfat file system, manually entered size 3M and password
$ sumo -y veravolume.vera -t exfat
Creating a LUKS volume file
# Example of creating a LUKS volume file with a 30Mo exfat file system without any prompting
$ sumo -y luksvolume.luks -o size=30M -t exfat -p mypassword
# Example of creating a LUKS volume file with a exfat file system, manually entered size 30M and password
$ sumo -y luksvolume.luks -t exfat
Creating a QCOW2 volume file
# Example of creating a QCOW2 disk file with a 3Mo exfat file system without any prompting
$ sumo -y qcow2disk.qcow2 -o size=3M -t exfat
# Example of creating a QCOW2 volume file with a default file system (ext4), manually entered size
$ sumo -y qcow2disk.qcow2
Creating a VDI volume file
# Example of creating a vdi disk file with a 3Mo exfat file system without any prompting
$ sumo -y vdidisk.vdi -o size=3M -t exfat
# Example of creating a VDI volume file with a default file system (ext4), manually entered size
$ sumo -y vdidisk.vdi
Mounting and its benefits
'Mounting' is a mechanism by which data stored on a device or the network are made accessible via a local directory.  The most straightfoward case is an USB stick. When plugged in, the stick is even usually automatically mounted by the system.
The USB stick is called a data source. But in a world of connectivity and possibilities, a data source can also be something fully different, e.g. a remote folder shared over the network or an encrypted file containing a disk image. Thereby, that data also needs to be accessed in a specific way, via suitable protocols and tools.
To be able to mount a data source is not mandatory to access it, yet it comes with a great advantage since it virtually enables to access any type of data source in the simplest possible way for anyone, thereby relieving one of the burden and complexity of the underlying technologies.
That’s why most often there exists also suitable tools and methods to mount each data source. Yet, knowing, mastering and dealing with them is all but straightforward.
The purpose of MountPilot is to go a step further:
-
to control and manage all mounts the same way via a unified user interface
-
to integrate into one tool the numerous various mount methods that exist for heterogeneous data sources
-
to provide a live interface for monitoring and interacting with active or past mounts